This document contains information about the SCSISelect Configuration Utility.
The SCSISelect configuration utility allows you to change SCSI controller settings without opening the computer or changing jumpers.
The following table lists the settings you can change with the SCSISelect utility and the default value for each setting. Some settings apply globally to the SCSI controller and all SCSI devices on the bus; other settings apply individually to each device on the bus.
 | Note: The Silicon Graphics 330 Visual Workstation is equipped with a dual SCSI channel controller that enhances your system's performance and flexibility |
Table 5-1. Default Settings for SCSI Controller and All Devices
Global Settings for SCSI Controller and All Devices | Default Value |
|---|---|
Host Adapter SCSI ID | 7 |
SCSI Parity Checking | Enabled |
Host Adapter SCSI Termination | Automatic |
Boot Channel/ Boot SCSI I/O | A/0 (zero) |
Host Adapter BIOS | Enabled |
Support Removable Disks Under BIOS as Fixed Disks | Boot only |
Extended BIOS Translation for DOS Drives > 1 Gbyte | Enabled |
Display <Ctrl-A> Message During BIOS Initialization | Enabled |
BIOS Support for Bootable CD-ROM | Enabled |
BIOS Support for Int13 Extensions | Enabled |
Individual Settings for Each SCSI Device | Default Value |
Initiate Wide Negotiation | Yes |
Maximum Sync Transfer Rate | 80 MBytes/sec. |
Enable Disconnection | Yes |
Send Start Unit Command | Yes |
Use the SCSISelect utility if you need to:
Change any of the default values listed in the settings table
Check and/or change SCSI device settings that may conflict with those of other devices (e.g., SCSI ID)
Perform low-level formatting on new SCSI disk devices
When the SCSISelect utility detects the AHA-3950U2B SCSI controller in your computer, it displays the Options menu shown below.
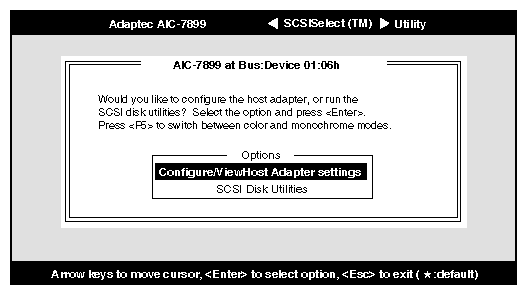
Use the ↑ and ↓ keys and the Enter key to make selections in the SCSISelect utility. Press Esc at any time to return to the previous menu.
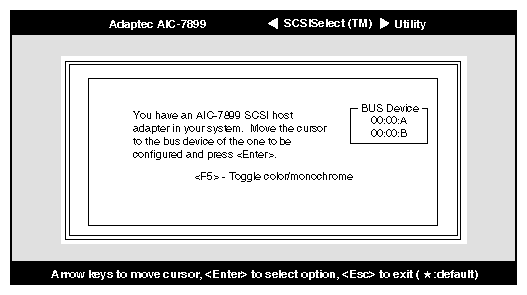
| Note: You can press F5 to toggle the display between color and monochrome modes. (This feature may not work on all monitors.) |
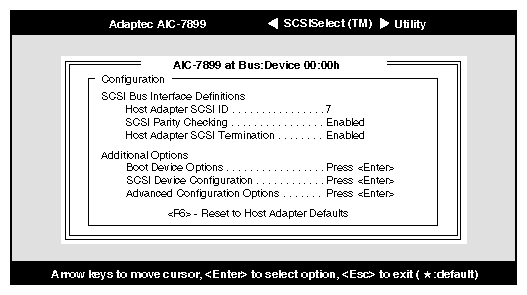
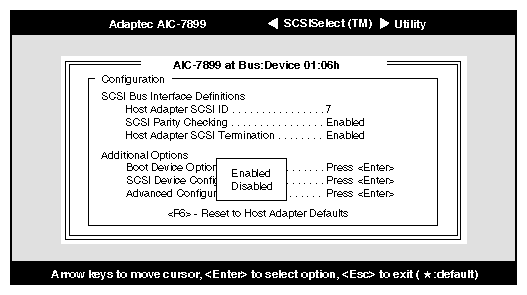
The Configure/View Host Adapter Settings menu lists three settings under SCSI Bus Interface Definitions and three additional options, as shown below:
Host Adapter SCSI ID: changes the host controller SCSI ID from its default value
of 7SCSI Parity Checking: enables or disables host controller SCSI parity checking
Host Adapter SCSI Termination: configures host controller SCSI termination
Advanced users can access Boot Device Options, SCSI Device Configuration, and Advanced Configuration Options through the following menu:
Use the cursor (↑ \ξαφ ) to move to your selection. Press Enter to display a pop-up menu of choices or to make selections. Press Esc at any time to return to the previous menu.
| Note: Press F6 to reset all settings to the SCSI controller defaults. SCSI controller default settings are marked with an asterisk (*) throughout the selection submenus. |
This option allows you to change the host controller SCSI ID. The figure below shows the available IDs for use with the AHA-3950U2B. The default setting is SCSI ID 7. (We recommend that you not change this setting.) Some operating system software will not run unless the SCSI controller ID is set at ID 7.

Each SCSI device on the SCSI bus, including the SCSI controller, must be set to a unique SCSI ID. The SCSI ID serves two purposes: it uniquely identifies each SCSI device on the bus, and it determines the device's priority on the bus during the Arbitration phase. The Arbitration phase determines which device controls the bus when two or more devices request use of it.
Use the cursor (↑ \ξαφ ) and Enter keys to select the SCSI ID, if you need to change it. Press Esc at any time to return to the previous menu.
Select this option to enable or disable SCSI Parity Checking on the SCSI controller. The figure below displays your choices. The default setting is Enabled.
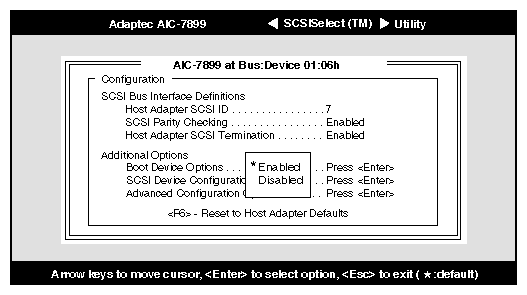
The SCSI controller always checks parity when reading from the SCSI bus to verify the correct transmission of data from your SCSI devices. You should disable SCSI Parity Checking if any attached SCSI devices do not support SCSI parity. (Most currently available SCSI devices do support SCSI parity.)
Use the cursor (↑ \ξαφ ) and Enter keys to make selections. Press Esc at any time to return to the previous menu.
This option allows you to configure host controller SCSI termination. The following figure shows the choices available if you have an AHA-3950U2B.
Use the cursor (↑ \ξαφ ) and Enter keys to make your selection.
This option shows the target ID of the device you are booting from. The default setting is 0 (zero). We recommend that you not change this setting. Some operating systems will not run unless the boot device is set at zero.
The figure below shows the Boot Device Options screen.

This option allows you to configure certain parameters of each SCSI device on the SCSI bus. A screen similar to the figure below appears. The screen shows a column of information for each SCSI ID, even if some SCSI IDs are not assigned to a device. To configure a specific SCSI device, you need to know which SCSI ID it uses. See SCSI Disk Utilities later in this section to learn how to determine which SCSI ID is used by which device.
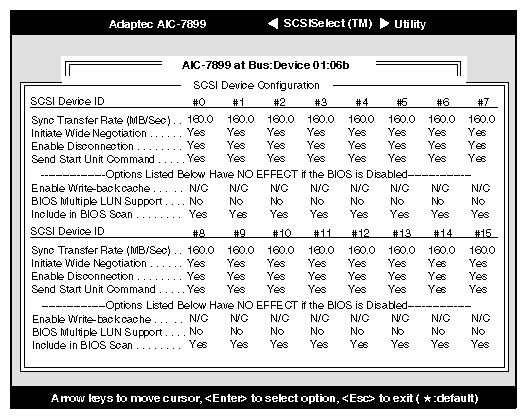
Use the cursor keys (↑ \ξαφ ) to move between options. Press Enter to display a pop- up menu with a selection of values. Use the cursor keys (↑ \ξαφ ) to select a value, and press Enter to make your selection.
This option determines whether the SCSI controller initiates synchronous negotiation with the SCSI device.
When set to yes, the SCSI controller initiates synchronous negotiation with the SCSI device. When set to no, the SCSI controller does not initiate synchronous negotiation. The SCSI controller, however, always responds to synchronous negotiation if the SCSI device initiates it. The default setting is yes.
Data is transferred in asynchronous mode if neither the SCSI controller nor the SCSI peripheral negotiates for synchronous data transfers.
| Note: Some older SCSI-1 devices do not support synchronous negotiation. This may cause your computer to operate erratically or hang if Initiate Sync Negotiation is enabled. Set Initiate Sync Negotiation to no for these devices. |
This option determines the maximum synchronous data transfer rate that the SCSI controller can support. The SCSI controller supports rates up to the maximum of 80.0 MBytes/sec. The default value is 80.0.
In most cases, you can use the maximum value of 80.0. If the SCSI controller is set not to negotiate for synchronous data transfer (i.e., Initiate Sync Negotiation is set to no), then the value selected here is the maximum rate that the SCSI controller accepts from the device during negotiation. (This is standard SCSI protocol.)
| Note: Some older SCSI-1 devices do not support Fast SCSI data transfer rates. This may cause your computer to operate erratically or hang if the transfer rate is set too high. Set Initiate Sync Negotiation to no for these devices. |
This option determines whether the SCSI controller allows a SCSI device to disconnect from the SCSI bus (sometimes called Disconnect/Reconnect). Disconnect/Reconnect allows the SCSI controller to perform other operations on the SCSI bus while the SCSI device is temporarily disconnected.
When set to yes, the SCSI device may disconnect from the SCSI bus. The SCSI device, however, may choose not to disconnect, even if permitted by the SCSI controller (this can usually be configured on the SCSI device). When set to no, the SCSI device is not allowed to disconnect from the SCSI bus. The default setting is yes.
You should leave Enable Disconnection set to yes if two or more SCSI devices are connected to the SCSI controller. This optimizes SCSI bus performance. If only one SCSI device is connected to the SCSI controller, set Enable Disconnection to no to achieve slightly better performance.
This option, which is supported by some SCSI devices, determines whether the Start Unit Command (SCSI command 1B) is sent to the SCSI device (most devices do not require this). Enabling this option reduces the load on your computer's power supply by allowing the SCSI controller to power-up SCSI devices one-at-a- time when you boot your computer. Otherwise, the devices all power-up at the same time. Most devices require you to set a jumper before they can respond to this command.
When set to yes, the Start Unit Command is sent to the SCSI device during bootup. When set to no, each SCSI device powers-up in its normal fashion. The default setting is no.
| Note: The Send Start Unit Command setting is valid only if the host adapter BIOS is enabled. |
If this option is enabled for more than one SCSI device, the Start Unit Command is sent first to the device with the lowest SCSI ID. When this device responds to the SCSI controller, the Start Unit Command is sent to the next highest SCSI ID with a setting of yes. The process continues until all supported devices respond to the SCSI controller.
| Note: If many drives are set to yes for Send Start Unit Command, the boot time varies depending on how long it takes each drive to spin up. |
When you select Advanced Configuration Options, a screen similar to the figure below appears. Do not change these options unless absolutely necessary.
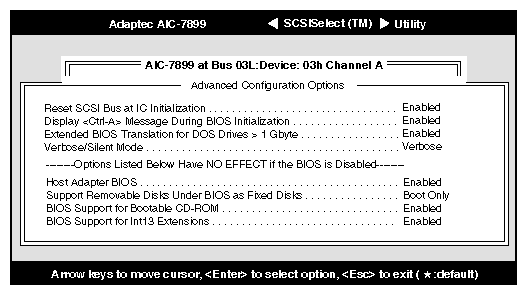
Use the cursor keys (↑ \ξαφ ) to move between options. Press Enter to display a pop- up menu with a selection of options. Use the cursor keys (↑ \ξαφ ) to select an option, and press Enter to make your selection.
This option enables or disables the SCSI controller BIOS. Default is Enabled.
The SCSI controller BIOS must be enabled if you want the computer to boot from a SCSI hard disk drive connected to the SCSI controller. Several SCSISelect options cannot be used unless the SCSI controller BIOS is enabled.
This option allows you to control which removable-media drives are supported by the SCSI controller BIOS. It is only valid if the SCSI controller BIOS is enabled. The default setting is Boot Only. The following choices are available:
Boot Only – Only the removable-media drive designated as the boot device are treated as a hard disk drive.
All Disks – All removable-media drives supported by the BIOS are treated as hard disk drives.
Disabled – No removable-media drives are treated as hard disk drives. In this situation, software drivers are needed because the drives are not controlled by the BIOS.

Caution: Support for removable-media drives means only that the SCSI controller BIOS allows you to use a removable-media drive as if it were a hard disk drive; it does not mean you can remove the disk media during operation. If a removable-media SCSI device is controlled by the SCSI controller BIOS, do not remove the media while the drive is powered-on or you may lose data! If you want to be able to remove media while the power is on, install the removable-media device driver and set this option to Disabled.
This option allows you to enable or disable extended translation for SCSI hard disks with a capacity greater than 1 GByte. It is only valid if the SCSI controller BIOS is enabled. The default setting is Enabled. Do not change this setting from the default.
If this option is enabled, the following translation schemes are used:
SCSI hard disks < 1 GByte use a translation scheme of 64 heads, 32 sectors per track
SCSI hard disks > 1 GByte use a translation scheme of 255 heads, 63 sectors per track
This option allows entering the SCSI Select utility during BIOS initialization. The default setting is Enabled.
When this option is enabled, a bootable CD-ROM device may be used to directly load an operating system. The default setting is Enabled.
When you select SCSI Disk Utilities from the Options menu the SCSISelect utility scans the SCSI bus and lists all SCSI devices installed on the SCSI bus. You will see a screen similar to the figure below. You can easily determine from this screen which SCSI ID is assigned to each device on the SCSI bus.

When you highlight a disk device by moving to it with the cursor keys and press Enter, a small menu window appears. You then select Format Disk or Verify Media from this menu.
Use the cursor keys (↑ \ξαφ ) to move between options. Press Enter to display a pop- up menu with a selection of values. Use the cursor keys (↑ \ξαφ ) to select a value, and press Enter to make your selection.
| Note: Use SCSI Disk Utilities to check the hard disk drive firmware version. Select SCSI Disk Utilities from the Configure/View Host Adapter Settings screen. Use the arrow keys to highlight a disk device, then press Enter to display the firmware version. |
The Format Disk utility performs a low-level format on disk devices.
Most SCSI disk devices are preformatted and do not need to be formatted again. The Adaptec Format Disk utility is compatible with the vast majority of SCSI disk drives. Run it on hard disk drives or removable-media drives that were previously used with a non-Adaptec SCSI controller.
| Note: A low-level format destroys all data on the drive. Be sure to back up your data before performing this operation. You cannot abort a low-level format once it is started. |