| Caution: CXFS is a complex product. To ensure that it is installed and configured in an optimal manner, you must purchase initial setup services from SGI. This chapter is not intended to be used directly by the customer, but is provided for reference. |
The software you install on an IRIX system determines whether it will be a CXFS administration node (containing the complete set of CXFS cluster services and the cluster database) or a CXFS client-only node. Nodes that you intend to run as metadata servers must be installed as CXFS administration nodes; all other nodes should be client-only nodes.
This chapter covers the following steps:
After completing these steps, see Chapter 3, “Initial Configuration of the Cluster”. For details about specific configuration tasks, see Chapter 4, “Reference to GUI Tasks for CXFS”, and Chapter 5, “Reference to cmgr Tasks for CXFS”. For information about installing CXFS and Trusted IRIX, see Chapter 8, “Trusted IRIX and CXFS”. For information about upgrades, see “Rolling Upgrades”.
You should read through this entire book, especially Chapter 10, “Troubleshooting”, before attempting to install and configure a CXFS cluster. If you are using coexecution with IRIS FailSafe, see the IRIS FailSafe Version 2 Administrator's Guide. If you are using a multiOS cluster, see the CXFS MultiOS for CXFS Client-Only Nodes: Installation and Configuration Guide.
Any node that may be a CXFS metadata server must be installed as a CXFS administration node. All other nodes should be client-only nodes.
Installing the CXFS base CD for a CXFS administration node requires approximately 30.3 MB of space.
To install the required IRIX software for a CXFS administration node, do the following:
On each CXFS administration node in the pool, upgrade to IRIX 6.5.20f according to the IRIX 6.5 Installation Instructions.
To verify that a given node has been upgraded, use the following command to display the currently installed system:
# uname -aR
(For sites with a serial port server) On each CXFS administration node, install the version of the serial port server driver that is appropriate to the operating system. Use the CD that accompanies the serial port server. Reboot the system after installation.
For more information, see the documentation provided with the serial port server.
On each CXFS administration node in the pool, do the following:
Install the CXFS license key. When you order a product that requires a license key, the key will be sent to you automatically through e-mail by the order desk along with instructions for installing it. If you do not have this information, contact SGI or your local support provider.
If the license is properly installed, you will see the following output from the cxfslicense command after the CXFS software installation is complete:
# /usr/cluster/bin/cxfslicense -d
CXFS license granted.
If you do not have the CXFS license properly installed, you will see the following error on the console when trying to run CXFS:
Cluster services:CXFS not properly licensed for this host.  Run
        '/usr/cluster/bin/cxfslicense -d'
for detailed failure information.  After fixing the
license, please run '/etc/init.d/cluster restart'.
An error such as the following example will appear in the SYSLOG file:
Mar  4 12:58:05 6X:typhoon-q32 crsd[533]: <<CI> N crs 0> Crsd restarted.
Mar  4 12:58:05 6X:typhoon-q32 clconfd[537]: <<CI> N clconf 0>
Mar  4 12:58:05 5B:typhoon-q32 CLCONFD failed the CXFS license check.Use the
Mar  4 12:58:05 5B:typhoon-q32    '/usr/cluster/bin/cxfslicense -d'
Mar  4 12:58:05 5B:typhoon-q32 command to diagnose the license problem.
If you increase the number of CPUs in your system, you may need a new license. Partitioned Origin 3000 and Onyx 3000 systems upgrading to IRIX 6.5.15f or later will require replacement licenses. Prior to IRIX 6.5.15f, these partitioned systems used the same lmhostID to license all the partitions in the system. For more information, see the 6.5.15 Start Here/Welcome and the following web page: http://www.sgi.com/support/licensing/partitionlic.html.
For more information about installing software licenses, see the IRIX 6.5 Installation Instructions booklet.
Insert CD-ROM #2 into the CD drive.
Instruct inst to read the already inserted CD-ROM as follows:
Inst> from /CDROM/dist
When you see the following message, press the Enter key to read the CD-ROM:
Install software from : [/CDROM/dist]
Install the CXFS software:
Inst> keep *
Inst> install eoe.sw.xvm
The following subsystem will be installed:
eoe.sw.xvm
Insert CD-ROM #4 into the CD drive.
Instruct inst to read the already inserted CD-ROM as follows:
Inst> from /CDROM/dist
When you see the following message, press the Enter key to read the CD-ROM:
Install software from : [/CDROM/dist]
Install the CXFS software:
Inst> keep *
Inst> install cluster_admin
Inst> install cluster_control
Inst> install cluster_services
Inst> install cxfs
Inst> install eoe.books.xvm
Inst> install sysadm_base
Inst> install sysadm_cxfs
Inst> install sysadm_cluster
Inst> install sysadm_xvm
Inst> go

Note: An IRIX node must either be a CXFS administration node (for which you install cluster_admin) or a client-only node (for which you install cxfs_client). You cannot install both cluster_admin and cxfs_client on the same node. The following subsystems will be installed:
   cluster_admin.man.man
   cluster_admin.sw.base
   cluster_control.man.man
   cluster_control.sw.base
   cluster_control.sw.cli
   cluster_services.man.man
   cluster_services.sw.base
   cluster_services.sw.cli
   cxfs.books.CXFS_AG
   cxfs.sw.cxfs
   cxfs.sw.xvm_cell
   eoe.books.xvm
   sysadm_base.man.priv
   sysadm_base.man.relnotes
   sysadm_base.man.server
   sysadm_base.sw.client
   sysadm_base.sw.dso
   sysadm_base.sw.priv
   sysadm_base.sw.server
   sysadm_cxfs.man.pages
   sysadm_cxfs.man.relnotes
   sysadm_cxfs.sw.client
   sysadm_cxfs.sw.desktop
   sysadm_cxfs.sw.server
   sysadm_cxfs.sw.web
   sysadm_cluster.man.relnotes
   sysadm_cluster.sw.client
   sysadm_cluster.sw.server
   sysadm_xvm.man.pages
   sysadm_xvm.man.relnotes
   sysadm_xvm.sw.client
   sysadm_xvm.sw.desktop
   sysadm_xvm.sw.server
   sysadm_xvm.sw.web
When sysadm_base is installed, tcpmux service is added to the /etc/inetd.conf file.
If you want to use a web-based version of the GUI, the following subsystems must be installed on the CXFS administration nodes that you will connect to (by means of a Java-enabled web browser running on any platform) for performing administrative operations:
  sysadm_base.sw.client
  sysadm_cxfs.sw.client
  sysadm_cxfs.sw.web
  sysadm_xvm.sw.client
These subsystems are part of the default software that was installed in step 3e.
If you want to use a web-based version of the GUI, you must also have one of the following installed:
sgi_apache.sw.server
nss_enterprise.sw.server (from the Netscape CD-ROM)
If one of these subsystems is not already installed, you must load the appropriate CD-ROM and install the subsystem.
If you want to run the GUI client from an IRIX desktop (which can be a node in the cluster or outside of the cluster), install the following subsystems:
Inst> keep *
Inst> install java2_eoe.sw
Inst> install java2_eoe.sw32
Inst> install sysadm_base.man
Inst> install sysadm_base.sw.client
Inst> install sysadm_cluster.sw.client
Inst> install sysadm_cxfs.man
Inst> install sysadm_cxfs.sw.client
Inst> install sysadm_cxfs.sw.desktop
Inst> install sysadm_xvm.sw.client
Inst> install sysadm_xvm.sw.desktop
Inst> go

Caution: The GUI only operates with Java2 v1.4.1 Execution Environment (Sun JRE v1.4.1). This is the version of Java that is provided with the IRIX 6.5.x release.
The SGI website also contains Java1. However, you cannot use this version of Java with the GUI. Using a Java version other than 1.4.1 will cause the GUI to fail.If the workstation is an IRIX machine that launches the GUI client from a web browser that supports Java, install the java_plugin subsystem from the IRIX 6.5.x CD. This is the Runtime Plug-in for IRIX, Java Edition 1.4.1, which supports JRE 1.4.1. (However, launching the GUI from a web browser is not the recommended method on IRIX. Running the GUI client from an IRIX desktop, as in step 5 above, is preferred.)
After installing the Java plug-in, you must close all browser windows and restart the browser.
If you want to use Performance Co-Pilot (PCP) to run XVM statistics, install the default pcp_eoe subsystems and also select pcp_eoe.sw.xvm. This installs the PCP PMDA (the agent to export XVM statistics) as an exit operation (exitop).
Exit from inst:
Inst> quit
The process may take a few minutes to complete.
After you have installed the software and quit the inst interface, you are prompted to reboot the system to apply the changes. However, you will reboot in the step documented by “Reboot the System”.
| Note: For information about installing software for a node running an operating system other than IRIX, see the CXFS MultiOS for CXFS Client-Only Nodes: Installation and Configuration Guide. |
To install the required IRIX software, do the following:
On each IRIX client-only node in the pool, upgrade to IRIX 6.5.20f according to the IRIX 6.5 Installation Instructions.
To verify that a given node has been upgraded, use the following command to display the currently installed system:
# uname -aR
(For sites with a serial port server) On each node, install the version of the serial port server driver that is appropriate to the operating system. Use the CD that accompanies the serial port server. Reboot the system after installation.
For more information, see the documentation provided with the serial port server.
On each IRIX client-only node in the pool, do the following:
Install the CXFS license key. When you order a product that requires a license key, the key will be sent to you automatically through e-mail by the order desk along with instructions for installing it. If you do not have this information, contact SGI or your local support provider.
If the license is properly installed, you will see the following output from the cxfslicense command:
# /usr/cluster/bin/cxfslicense -d
CXFS license granted.
If you do not have the CXFS license properly installed, you will see the following error on the console when trying to run CXFS:
Cluster services:CXFS not properly licensed for this host.  Run
        '/usr/cluster/bin/cxfslicense -d'
for detailed failure information.  After fixing the
license, please run '/etc/init.d/cluster restart'.
If you increase the number of CPUs in your system, you may need a new license. Partitioned Origin 3000 and Onyx 3000 systems upgrading to IRIX 6.5.15f or later will require replacement licenses. Prior to IRIX 6.5.15f, these partitioned systems used the same lmhostID to license all the partitions in the system. For more information, see the 6.5.15 Start Here/Welcome and the following web page: http://www.sgi.com/support/licensing/partitionlic.html.
For more information about installing software licenses, see the IRIX 6.5 Installation Instructions booklet.
Insert CD-ROM #2 into the CD drive.
Instruct inst to read the already inserted CD-ROM as follows:
Inst> from /CDROM/dist
Caution: Do not install to an alternate root using the inst -r option. Some of the exit operations (exitops) do not use pathnames relative to the alternate root, which can result in problems on both the main and alternate root filesystem if you use the -r option. For more information, see the inst(1M) man page.
When you see the following message, press the Enter key to read the CD-ROM:
Install software from : [/CDROM/dist]
Install the CXFS software:
Inst> install eoe.sw.xvm
The following subsystem will be installed:
eoe.sw.xvm
Insert CD-ROM #4 into the CD drive.
Instruct inst to read the already inserted CD-ROM as follows:
Inst> from /CDROM/dist
Caution: Do not install to an alternate root using the inst -r option. Some of the exit operations (exitops) do not use pathnames relative to the alternate root, which can result in problems on both the main and alternate root filesystem if you use the -r option. For more information, see the inst(1M) man page.
When you see the following message, press the Enter key to read the CD-ROM:
Install software from : [/CDROM/dist]
Install the CXFS software:
Inst> keep *
Inst> install cxfs
Inst> install cxfs_client
Inst> install eoe.books.xvm
Inst> go
Note: An IRIX node must either be a CXFS administration node (for which you install cluster_admin) or a client-only node (for which you install cxfs_client). You cannot install both cluster_admin and cxfs_client on the same node. The following subsystems will be installed:
   cxfs.books.CXFS_AG
   cxfs_client.man.man
   cxfs_client.sw.base
   cxfs.sw.cxfs
   cxfs.sw.xvm_cell
   eoe.books.xvm
If you want to use Performance Co-Pilot (PCP) to run XVM statistics, install the default pcp_eoe subsystems and also select pcp_eoe.sw.xvm. This installs the PCP PMDA (the agent to export XVM statistics) as an exit operation (exitop).
Exit from inst:
Inst> quit
The process may take a few minutes to complete.
After you have installed the software and quit the inst interface, you are prompted to reboot the system to apply the changes. However, you will reboot in the step documented by “Reboot the System”.
When you install the CXFS software, there are some system file considerations you must take into account. The network configuration is critical. Each node in the cluster must be able to communicate with every other node in the cluster by both logical name and IP address without going through any other network routing; proper name resolution is key. SGI recommends static routing.
This section describes the required and optional changes you must make on IRIX nodes; for information about changes required for nodes running other operating systems, see the CXFS MultiOS for CXFS Client-Only Nodes: Installation and Configuration Guide.
This section discusses files that are common to all nodes in a cluster.
| Caution: It is critical that you understand these rules before attempting to configure a CXFS cluster. |
The following hostname resolution rules and recommendations apply to all cluster nodes:
Hostnames cannot begin with an underscore (_) or include any whitespace characters.
The value of the /etc/sys_id file must match the node's primary hostname in the /etc/hosts file (that is, the first field after the node's IP address in /etc/hosts). This field can be either the hostname or the fully qualified domain name.
You must use the name in /etc/sys_id at the following times:
In the Server field in the GUI login window when logging in to the CXFS GUI for the first time
In the Hostname field when defining the first node in the pool
The /etc/hosts file has the following format, where primary_hostname can be the simple hostname or the fully qualified domain name:
IP_address primary_hostname aliases
Only the primary network is used by CXFS for heartbeat/control. You should only use a second network if you are also running FailSafe in a coexecution cluster.
For example, suppose your /etc/hosts contains the following:
# The public interface:
128.2.3.4  color-green.sgi.com color-green green

# The private interface:
192.0.1.1  color-green-private.sgi.com  color-green-private green-private
The /etc/sys_id file could contain either the hostname color-green or the fully qualified domain name color-green.sgi.com. It cannot contain the alias green.
In this case, you would enter the hostname color-green or the fully qualified domain name color-green.sgi.com for the Server field in the login screen and for the Hostname field in the Define a new node window.
Note: Using the value of /etc/sys_id is only necessary when logging in to the first node during initial configuration; aliases such as green may be used for subsequent nodes. If you use the nsd(1M) name service daemon, you must configure your system so that local files are accessed before either the network information service (NIS) or the domain name service (DNS). That is, the hosts line in /etc/nsswitch.conf must list files first. For example:
hosts: files nis dns
(The order of nis and dns is not significant to CXFS; files must be first.)
The /etc/config/netif.options file must have one of the interfaces be equal to the value of /etc/sys_id ($HOSTNAME).
For more information about the Unified Name Service (UNS) and the name service daemon, see the nsd(1M) man page.
If you change the /etc/nsswitch.conf or /etc/hosts files, you must restart nsd by using the nsadmin restart command, which also flushes its cache.
The reason you must restart nsd(1M) after making a change to these files is that the nsd name service daemon actually takes the contents of /etc/hosts and places the contents in its memory cache in a format that is faster to search. Thus, you must restart nsd in order to see that change and place the new /etc/hosts information into RAM cache. If /etc/nsswitch.conf is changed, nsd must re-read this file so that it knows what type of files (for example, hosts or passwd) to manage, what services it should call to get information, and in what order those services should be called.
The IP addresses on a running node in the cluster and the IP address of the first node in the cluster cannot be changed while cluster services are active.
You should be consistent when using fully qualified domain names in the /etc/hosts file. If you use fully qualified domain names in /etc/sys_id on a particular node, then all of the nodes in the cluster should use the fully qualified name of that node when defining the IP/hostname information for that node in their /etc/hosts file.
The decision to use fully qualified domain names is usually a matter of how the clients (such as NFS) are going to resolve names for their client server programs, how their default resolution is done, and so on.
If you change hostname resolution settings in the /etc/nsswitch.conf file after you have defined the first node (which creates the cluster database), you must recreate the database. See “Recreating the Cluster Database” in Chapter 10.
When using coexecution with IRIS FailSafe, never add an /etc/hosts entry that associates the value of /etc/sys_id with an IP address alias. You must use the primary address.
If you want to use the connectivity diagnostics provided with CXFS, ensure that the /.rhosts file on each IRIX node allows all the nodes in the cluster to have access to each other in order to run remote commands such as rsh(1). The connectivity tests execute a ping(1) command from the local node to all nodes and from all nodes to the local node. To execute ping on a remote node, CXFS uses rsh(1) (user root). For example, suppose you have a cluster with three nodes: cxfs0 , cxfs1, and cxfs2. The /.rhosts file on each IRIX node will be as follows (prompt denotes node name):
cxfs0# cat /.rhosts cxfs1 root cxfs1-priv root cxfs2 root cxfs2-priv root cxfs1# cat /.rhosts cxfs0 root cxfs0-priv root cxfs2 root cxfs2-priv root cxfs2# cat /.rhosts cxfs0 root cxfs0-priv root cxfs1 root cxfs1-priv root |
This section discusses system files on administration nodes.
Edit the /etc/services file on each CXFS administration node so that it contains entries for sgi-cad and sgi-crsd before you install the cluster_admin product on each CXFS administration node in the pool. The port numbers assigned for these processes must be the same in all nodes in the pool.
| Note: You will see an inst message that says sgi-cmsd and sgi-gcd must be added to /etc/services. This is true only for coexecution with FailSafe, or when running only FailSafe; if you are running just CXFS, you do not need sgi-cmsd. Cluster services for CXFS do not require sgi-cmsd. |
The following shows an example of /etc/services entries for sgi-cad and sgi-crsd:
sgi-crsd 7500/udp # Cluster reset services daemon sgi-cad 9000/tcp # Cluster Admin daemon |
The /etc/config/cad.options file on each CXFS administration node contains the list of parameters that the cluster administration daemon reads when the cad process is started. cad provides cluster information.
The following options can be set in the cad.options file:
| --append_log | Append cad logging information to the cad log file instead of overwriting it. | |
| --log_file filename | cad log filename. Alternately, this can be specified as -lf filename. | |
| -vvvv | Verbosity level. The number of v characters indicates the level of logging. Setting -v logs the fewest messages; setting -vvvv logs the highest number of messages. |
The default file has the following options:
-lf /var/cluster/ha/log/cad_log --append_log |
The following example shows an /etc/config/cad.options file that uses a medium-level of verbosity:
-vv -lf /var/cluster/ha/log/cad_nodename --append_log |
The default log file is /var/cluster/ha/log/cad_log. Error and warning messages are appended to the log file if log file is already present.
The contents of the /etc/config/cad.options file cannot be modified using the cmgr(1M) command or the GUI.
If you make a change to the cad.options file at any time other than initial configuration, you must restart the cad processes in order for these changes to take effect. You can do this by rebooting the nodes or by entering the following command:
# /etc/init.d/cluster restart |
If you execute this command on a running cluster, it will remain up and running. However, the GUI will lose connection with the cad(1M) daemon; the GUI will prompt you to reconnect.
For information about licensing, see “Install IRIX Software on a CXFS Administration Node”, and “Install IRIX Software on a Client-Only Node”.
The /etc/config/fs2d.options file on each CXFS administration node contains the list of parameters that the fs2d daemon reads when the process is started. The fs2d daemon manages the distribution of the cluster database (CDB) across the CXFS administration nodes in the pool.
Table 2-1 shows the options can that can be set in the fs2d.options file.
Table 2-1. fs2d.options File Options
Option | Description |
|---|---|
-logevents event name | Log selected events. The following event names may be used: all, internal, args, attach, chandle, node, tree, lock, datacon, trap, notify, access, storage. The default is all. |
-logdest log destination | Set log destination. The following log destinations may be used: all, stdout, stderr, syslog, logfile. If multiple destinations are specified, the log messages are written to all of them. If logfile is specified, it has no effect unless the -logfile option is also specified. The default is logfile. |
-logfile filename | Set log filename. The default is /var/cluster/ha/log/fs2d_log. |
-logfilemax maximum size | Set log file maximum size (in bytes). If the file exceeds the maximum size, any preexisting filename.old will be deleted, the current file will be renamed to filename.old, and a new file will be created. A single message will not be split across files. If -logfile is set, the default is 10000000. |
-loglevel loglevel | Set log level. The following log levels may be used: always, critical, error, warning, info, moreinfo, freq, morefreq, trace, busy. The default is info. |
-trace trace_class | Trace selected events. The following trace classes may be used: all, rpcs, updates, transactions, monitor. If you specify this option, you must also specify -tracefile and/or -tracelog. No tracing is done, even if it is requested for one or more classes of events, unless either or both of -tracefile or -tracelog is specified. The default is transactions. |
-tracefile filename | Set trace filename. There is no default. |
-tracefilemax maximum_size | Set trace file maximum size (in bytes). If the file exceeds the maximum size, any preexisting filename.old will be deleted, the current file will be renamed to filename.old, and a new file will be created. |
-[no]tracelog | [Do not] trace to log destination. When this option is set, tracing messages are directed to the log destination or destinations. If there is also a trace file, the tracing messages are written there as well. The default is -tracelog. |
-[no]parent_timer | [Do not] exit when the parent exits. The default is -noparent_timer. |
-[no]daemonize | [Do not] run as a daemon. The default is -daemonize. |
-l | Do not run as a daemon. |
-h | Print usage message. |
-o help | Print usage message. |
If you use the default values for these options, the system will be configured so that all log messages of level info or less, and all trace messages for transaction events, are sent to the /var/cluster/ha/log/fs2d_log file. When the file size reaches 10 MB, this file will be moved to its namesake with the .old extension and logging will roll over to a new file of the same name. A single message will not be split across files.
If you make a change to the fs2d.options file at any time other than the initial configuration time, you must restart the fs2d processes in order for those changes to take effect. You can do this by rebooting the CXFS administration nodes or by entering the following command:
# /etc/init.d/cluster restart |
If you execute this command on a running cluster, it should remain up and running. However, the GUI will lose connection with the cad(1M) daemon; the GUI will prompt you to reconnect.
The following example shows an /etc/config/fs2d.options file that directs logging and tracing information as follows:
All log events are sent to /var/adm/SYSLOG.
Tracing information for RPCs, updates, and transactions are sent to /var/cluster/ha/log/fs2d_ops1.
When the size this file exceeds 100,000,000 bytes, this file is renamed to /var/cluster/ha/log/fs2d_ops1.old and a new file /var/cluster/ha/log/fs2d_ops1 is created. A single message is not split across files.
(Line breaks added for readability.)
-logevents all -loglevel trace -logdest syslog -trace rpcs -trace updates -trace transactions -tracefile /var/cluster/ha/log/fs2d_ops1 -tracefilemax 100000000 |
The following example shows an /etc/config/fs2d.options file that directs all log and trace messages into one file, /var/cluster/ha/log/fs2d_chaos6, for which a maximum size of 100,000,000 bytes is specified. -tracelog directs the tracing to the log file.
(Line breaks added for readability.)
-logevents all -loglevel trace -trace rpcs -trace updates -trace transactions -tracelog -logfile /var/cluster/ha/log/fs2d_chaos6 -logfilemax 100000000 -logdest logfile. |
This section discusses the cxfs_client.options file for IRIX client-only nodes. For client-only nodes running other operating systems, see the CXFS MultiOS for CXFS Client-Only Nodes: Installation and Configuration Guide.
You can modify the CXFS client service by placing options in the /etc/config/cxfs_client.options file. The available options are documented in the cxfs_client(1M) man page.
| Caution: Some of the options are intended to be used internally by SGI only for testing purposes and do not represent supported configurations. Consult your SGI service representative before making any changes. |
The first line in the cxfs_client.options file must contain the options you want cxfs_client to process; you cannot include a comment as the first line.
To see if cxfs_client is using the options in cxfs_client.options, enter the following:
# ps -ef | grep cxfs |
If you want nodes to restart automatically when they are reset or when the node is powered on, you must set the boot parameter AutoLoad variable on each IRIX node to yes as follows:
# nvram AutoLoad yes |
This setting is recommended, but is not required for CXFS.
You can check the setting of this variable with the following command:
# nvram AutoLoad |
When configuring your network, remember the following:
You must be able to communicate between every node in the cluster directly using IP address and logical name, without routing.
Dedicate a private network to be your heartbeat and control network. No other load is supported on this network.
The heartbeat and control network must be connected to all nodes, and all nodes must be configured to use the same subnet for that network.
To configure network interfaces, do the following:
Ensure that name services are available. Using local name resolution is required. Even if you are using DNS or NIS, you must add every IP address and hostname for the nodes to /etc/hosts on IRIX nodes and as defined in the CXFS MultiOS for CXFS Client-Only Nodes: Installation and Configuration Guide. For example:
190.0.2.1 server1-company.com server1
190.0.2.3 stocks
190.0.3.1 priv-server1
190.0.2.2 server2-company.com server2
190.0.2.4 bonds
190.0.3.2 priv-server2
You should then add all of these IP addresses to /etc/hosts on the other nodes in the cluster.
For more information, see the hosts(4), named(1M), dns(7P), and nis(7P) man pages; IRIX Admin: Networking and Mail; and NIS Administrator's Guide.
Note: Exclusive use of NIS or DNS for IP address lookup for the nodes will reduce availability in situations where the NIS or DNS service becomes unreliable. See “Hostname Resolution: /etc/sys_id, /etc/hosts, /etc/nsswitch.conf”.
On one node, add that node's interfaces and their IP addresses to the /etc/config/netif.options file.
if1name=ec0
if1addr=$HOSTNAME
$HOSTNAME is an alias for an IP address that appears in /etc/hosts. See “Hostname Resolution: /etc/sys_id, /etc/hosts, /etc/nsswitch.conf”.
If there are additional interfaces, their interface names and IP addresses appear on lines like the following:
if2name=
if2addr=
In the example, the control network name and IP address are as follows:
if3name=ec3
if3addr=priv-$HOSTNAME
The control network IP address in this example, priv-$HOSTNAME, is an alias for an IP address that appears in /etc/hosts.
If there are more than eight interfaces on the node, change the value of if_num to the number of interfaces. For fewer than eight interfaces, the line is as follows:
if_num=8
Repeat steps 1 through 3 for the other nodes.
Edit the /etc/config/routed.options file on each IRIX node so that the routes are not advertised over the control network. See the routed(1M) man page for a list of options.
For example:
-q -h -Prdisc_interval=45
The options do the following:
Configure an e-mail alias on each CXFS administration node that sends e-mail notifications of cluster transitions to a user outside the CXFS cluster and to a user on the other nodes in the cluster. For example, suppose there are two nodes called cxfs1 and cxfs2. On cxfs1, add the following line to the /etc/aliases file:
cxfs_admin:operations@console.xyz.com,admin_user@cxfs2.xyz.com
On cxfs2, add the following line to the /usr/lib/aliases file:
cxfs_admin:operations@console.xyz.com,admin_user@cxfs1.xyz.com
The alias you choose (cxfs_admin in this case) is the value you will use for the mail destination address when you configure your system. In this example, operations is the user outside the cluster and admin_user is a user on CXFS administration node.
If FDDI is being used, finish configuring and verifying the new FDDI station, as explained in the FDDIXPress release notes and the FDDIXPress Administration Guide.
If one CXFS administration node is configured to reset another CXFS administration node , you must turn off the getty process for the tty ports to which the serial hardware reset serial cables are connected. You must do this on the IRIX node performing the reset (not the node receiving the reset). To do this, perform the following steps on each CXFS administration node; if you have a cluster with nodes running other operating systems, see the CXFS MultiOS for CXFS Client-Only Nodes: Installation and Configuration Guide.
Determine which port is used for the serial hardware reset line.
Find the line for the port by looking at the comments on the right for the port number from step 1.
Change the third field of this line to off. For example:
t2:23:off:/sbin/getty -N ttyd2 co_9600 # port 2Save the file.
Enter the following commands to make the change take effect:
# killall getty
# init q
Note: If you configure a cluster with the reset daemon running on an IRISconsole system, do not configure the reset port into the IRISconsole; it may conflict with the reset daemon that the CXFS system is running. (CXFS does not support the Silicon Graphics O2 workstation as a CXFS node and therefore it cannot be a CXFS serial hardware reset server.)
Execute the following command on each IRIX node to reboot it:
# reboot |
The shutdown process then runs autoconfig(1M) to generate the kernel with your changes.
See the CXFS MultiOS for CXFS Client-Only Nodes: Installation and Configuration Guide for additional information.
This section discusses the following:
For each private network on each IRIX node in the pool, enter the following, where nodeIPaddress is the IP address of the node:
# /usr/etc/ping -c 3 nodeIPaddress |
Typical ping(1) output should appear, such as the following:
PING IPaddress (190.x.x.x: 56 data bytes 64 bytes from 190.x.x.x: icmp_seq=0 tt1=254 time=3 ms 64 bytes from 190.x.x.x: icmp_seq=1 tt1=254 time=2 ms 64 bytes from 190.x.x.x: icmp_seq=2 tt1=254 time=2 ms |
If ping fails, follow these steps:
Verify that the network interface was configured up by using ifconfig. For example:
# /usr/etc/ifconfig ec3
ec3: flags=c63<UP,BROADCAST,NOTRAILERS,RUNNING,FILTMULTI,MULTICAST>
inet 190.x.x.x netmask 0xffffff00 broadcast 190.x.x.x
The UP in the first line of output indicates that the interface was configured up.
Verify that the cables are correctly seated.
Repeat this procedure on each IRIX node.
To test the serial hardware reset connections, do the following:
Ensure that the IRIX nodes and the serial port multiplexer are powered on.
Start the cmgr(1M) command on one of the CXFS administration nodes in the pool:
# cmgr
Stop CXFS services on the entire cluster:
stop cx_services for cluster clustername
cmgr> stop cx_services for cluster cxfs6-8
Wait until the node has successfully transitioned to inactive state and the CXFS processes have exited. This process can take a few minutes.
Test the serial connections by entering one of the following:
To test the whole cluster, enter the following:
test serial in cluster clustername
cmgr> test serial in cluster cxfs6-8
Status: Testing serial lines ...
Status: Checking serial lines using crsd (cluster reset services) from node cxfs8
Success: Serial ping command OK.

Status: Checking serial lines using crsd (cluster reset services) from node cxfs6
Success: Serial ping command OK.

Status: Checking serial lines using crsd (cluster reset services) from node cxfs7
Success: Serial ping command OK.

Notice: overall exit status:success, tests failed:0, total tests executed:1
To test an individual node, enter the following:
test serial in cluster clustername node machinename
For example:
cmgr> test serial in cluster cxfs6-8 node cxfs7
Status: Testing serial lines ...
Status: Checking serial lines using crsd (cluster reset services) from node cxfs6
Success: Serial ping command OK.

Notice: overall exit status:success, tests failed:0, total tests executed:1
To test an individual node using just a ping, enter the following:
admin ping node nodename
For example:
cmgr> admin ping node cxfs7

ping operation successful
If a command fails, make sure all the cables are seated properly and rerun the command.
Repeat the process on other nodes in the cluster.
The structure of the CXFS filesystem configuration was changed with the release of IRIX 6.5.13f. Upgrading to the 6.5.13f release provided an automatic conversion from the old structure to the new structure. However, if you are upgrading directly from 6.5.12f or earlier, (without first installing and running 6.5.13f), you must convert your CXFS filesystem definitions manually.
| Note: If you are upgrading from 6.5.13f or later, you do not need to follow the instructions in this section. Filesystems definitions are automatically and transparently converted when running 6.5.13f. |
After upgrading from 6.5.12f or earlier, you will notice that the CXFS filesystems are no longer mounted, and that they do not appear in the GUI or cmgr queries. To convert all of the old CXFS filesystem definitions to the new format, simply run the following command from one of the 6.5.14f or later nodes in the CXFS cluster:
# /usr/sysadm/privbin/cxfsfilesystemUpgrade |
After running this command, the CXFS filesystems should appear in the GUI and cmgr output, and they should be mounted if their status was enabled and CXFS services are active.
| Caution: This conversion is a one-time operation and should not be run a second time. If you make changes to the filesystem and then run cxfsfilesystemUpgrade for a second time, all of your changes will be lost. |
After all of the IRIX nodes in the cluster have been upgraded to 6.5.14f or later, it is recommended that you destroy the old CXFS filesystem definitions, in order to prevent these stale definitions from overwriting the new definitions if the cxfsfilesystemUpgrade command were to be run again accidentally. To destroy the old CXFS filesystem definitions, enter the following:
# /usr/cluster/bin/cdbutil -c "delete #cluster#clustername#Cellular#FileSystems" |
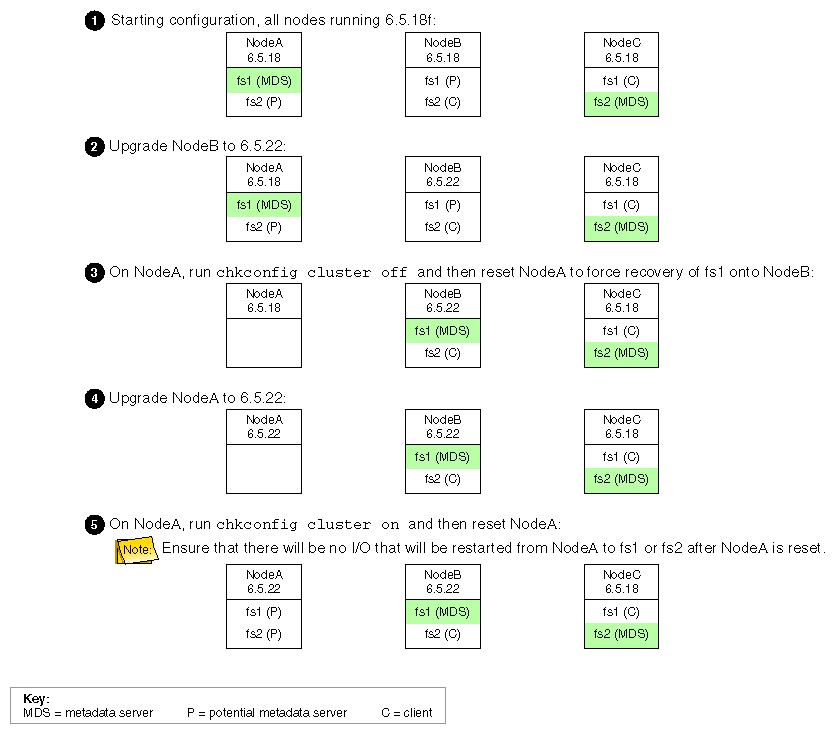
Beginning with IRIX 6.5.18f, SGI supports a policy for CXFS that permits a rolling annual upgrade. This policy allows you to upgrade a subset of the nodes in your cluster from IRIX 6.5.n to n+1 or n+4. This policy lets you to keep your cluster running and filesystems available during the upgrade process.
The upgrade procedure makes use of a standby node, which is a server-capable administration node that is configured as a potential metadata server for a given filesystem, but does not currently run any applications that will use that filesystem. (In a later release, the node will be able to run applications that use other filesystems; however, this feature does not apply to this release.) After the upgrade process is complete, all IRIX nodes should be running the same release.
Each CXFS MultiOS Client release is paired with a given IRIX release; the MultiOS Client release will also support the same IRIX n+1, n+4 release set during an upgrade. For example, the MultiOS 2.3 release supports IRIX 6.5.18, 6.5.19, and 6.5.22. It is recommended that you upgrade all MultiOS Client nodes at least annually. For more information, see the product release notes and the CXFS MultiOS for CXFS Client-Only Nodes: Installation and Configuration Guide.
Sites running 6.5.16 in a supported manner (with a single metadata server for a given filesystem and no potential metadata servers) may override the current restriction to adjacent releases and upgrade directly to 6.5.18.
For sites running 6.5.16 or 6.5.17 in an unsupported manner (that is, attempting to make use of the unsupported potential metadata server feature), the upgrade procedure documented in “Example Procedure: Upgrading from 6.5.18f to 6.5.22” might work; however, this cannot be guaranteed because recovery is not supported in the 6.5.16 and 6.5.17 releases due to its unreliability.
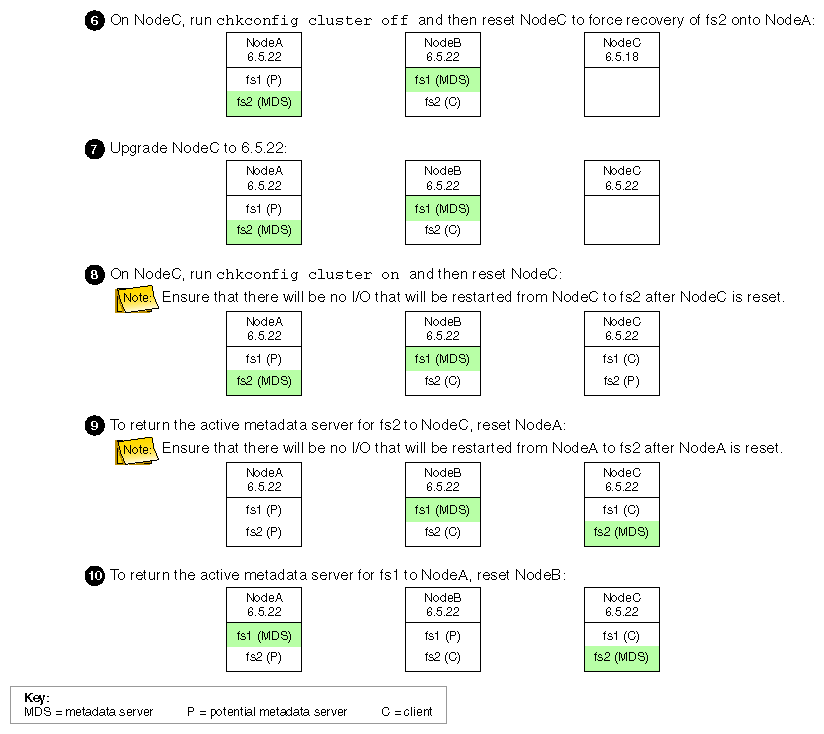
The following figures show an example upgrade procedure for a three-node cluster with two filesystems (fs1 and fs2), in which all nodes are running 6.5.18f.