The DIVO and DIVO-DVC boards support the Video Library (VL) and the Audio Library (AL) programming APIs. The APIs are described in the Digital Media Programming Guide (007-1799-060 or later; hereafter referred to as the DMPG).
This chapter explains
To build programs that run under VL, you must
install the dmedia_dev and dmedia_eoe options
link with libvl
include dmedia/vl.h and dmedia/vl_DIVO.h for device-dependent functionality
The client library for VL is /usr/lib32/libvl.so. The header files for the VL are in /usr/include/dmedia; the main file is vl.h. This file contains the main definition of the VL API and controls that are common across all hardware. Several useful digital media programming examples are in /usr/share/src/dmedia/tools (such as capture/avcapture, capture/avplayback, and vlan/vlan).
For more information on the Video Library and the API usage, see the latest version of the DMPG.
This section explains
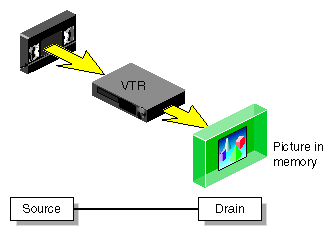
The Video Library defines a basic set of primitives and mechanisms to specify interconnections and controls to achieve the desired setup. The two central concepts for VL are
The basic nodes are a source (such as a VTR) and a drain (such as memory). Figure 2-1 diagrams the simplest VL path, with one of each of these two nodes.
DIVO/DIVO-DVC nodes are further discussed in “VL Nodes for DIVO and DIVO-DVC ”.
VL syntax elements are as follows:
The VL recognizes these classes of objects:
nodes, which are sources, drains, and internal nodes (as discussed in the preceding section)
paths, connecting sources and drains (as discussed in the preceding section)
buffers, for sending and receiving field/frame data to and from host memory
DIVO and DIVO-DVC require the use of DMbuffers (digital media buffers) and not the original ring buffer mechanisms (VL buffers) used with earlier SGI video options. The new buffering scheme is much more flexible and versatile than the older VL buffer-based scheme. See Chapter 5 of the DMPG.
DMbuffers, an abstraction of main memory, allow efficient and API-independent interchange of data between the different digital media libraries. For example, video fields can be captured into DMbuffers via VL and then displayed in graphics using OpenGL. They can also be passed between two processes without the data having to be copied explicitly. Refer to Chapter 5, “Digital Media Buffers,” in the Digital Media Programming Guide for details.
events, for monitoring video I/O status
controls, or parameters that modify how data flows through nodes; for example:
video device parameters, such as sync source
video data parameters such as packing, size, and color space
VL controls fall into two categories:
Both types of VL controls are explained in this chapter with respect to their usage with DIVO and DIVO-DVC.
Use vlGetNode() to specify nodes. This call returns the node's handle, which is used when setting controls or setting up paths. Its function prototype is:
VLNode vlGetNode(VLServer svr, int type, int kind, int number) |
In this prototype, variables are as follows:
| svr | ||||||
| type | Specifies the type of node:
| |||||
| kind | Specifies the kind of node: | |||||
| number | Number of the node in cases of two or more identical nodes, such as two video source nodes. The default value for all kinds is 0. |
VL_ANY can also used as a value for number to reference the first available node of the specificated type and kind.
In general, a path on DIVO and DIVO-DVC has a memory node and a video node. The following fragment creates a digital video input source node and a memory drain node, and creates the path:
VLServer svr;
VLPath path;
VLNode src;
VLNode drn;
                     /*Set up video source node */
VLControlValue timing,format, val;
src = vlGetNode(svr, VL_SRC, VL_VIDEO, VL_ANY);
                     /*Set up memory drain node */
drn = vlGetNode(svr, VL_DRN, VL_MEM, VL_ANY);
                     /* Create source-to-drain path */
if((path = vlCreatePath(svr, VL_ANY, src, drn)) < 0){
     fprintf(stderr,”%s\n”,vlStrError(vlGetErrno()));
     exit(1);
}
                     /* Set up path with shared src and drn node */
vlSetupPaths(svr, (VLPathList)&path, 1, VL_SHARE, VL_SHARE);
|
After nodes are specified, use vlSetControl() to specify parameters:
video nodes: video timing (drain only) and format (for example digital component)
memory nodes: timing, packing, and color space
Controls for each node are defined in “DIVO/DIVO-DVC Controls” later in this chapter, and are summarized in Table 2-1.
This section summarizes VL data transfer categories, and gives the basic steps of creating an application. For DIVO and DIVO-DVC, VL data transfers always involve memory (video to memory, memory to video) and require setting up a DM buffer pool.
In the VL programming model, the process of creating a VL application consists of these steps:
Open a connection to the video daemon (vlOpenVideo()).
Specify nodes on the data path (vlGetNode()).
Create the path (vlCreatePath()).
Optional step: add more nodes to a path (vlAddNode()).
Set up the hardware for the path (vlSetupPaths()).
Specify path-related events to be captured (vlSelectEvents(), vlAddCallback()).
Set input and output parameters (controls) for the nodes on the path (vlSetControl()); video format and timing must be specified.
Create a dmBuffer pool to hold data for memory transfers (vlDMGetParams(), dmBufferSetPoolDefaults(), dmBufferCreatePool(), vlGetTransferSize()).
Register the buffer (vlDMPoolRegister(),vlDMPoolDeregister()).
Start the data transfer (vlBeginTransfer()).
Get the data (vlDMBufferGetValid(), vlDMBufferPutValid(), dmBufferAllocate(), dmBufferAllocateSize(), dmBufferGetPoolState(), dmBufferGetPoolFD(), dmBufferSetPoolSelectSize(), dmBufferMapData(), dmBufferFree()) to manipulate frame data.
Handle data stream events (vlSelectEvents(), vlNextEvent(), vlPending()).
Clean up (vlEndTransfer(), vlDMPoolDeregister(), vlDestroyPath(), vlCloseVideo()).

Note: Error handling (vlPerror()) is accomplished throughout.
To determine the available devices (that is, video options in the workstation, such as the DIVO or DIVO-DVC option board) and the nodes available on them, run vlinfo. To determine possible controls for each device, enter
vlinfo -l |
| Note: VL controls specified as true with vlSetControl() are executed immediately. However, it is not guaranteed that they execute at a specific time. For better precision on the execution of these controls, see “Setting Inline Controls ”. |
To set controls for DIVO/DIVO-DVC nodes, use vlSetControl(). The following example sets video format and timing on a node:
timing.intVal = VL_TIMING_525_CCIR601;
format.intVal = VL_FORMAT_RGB;

if (vlSetControl(svr, path, drn, VL_TIMING, &timing) <0)
{
     vlPerror(“VlSetControl:TIMING”);
     exit(1);
}
if (vlSetControl(svr, path, drn, VL_FORMAT, &format) <0)
{
     vlPerror(“VlSetControl:FORMAT”);
     exit(1);
 }
|
For details on vlSetControl() and vlGetControl(), see the latest version of the DMPG.
Tables in this section summarize
Table 2-1 summarizes supported node controls for the DIVO/DIVO-DVC option.
Table 2-1. DIVO/DIVO-DVC Node Controls
Control | Video Source | Memory Source | Video Drain | Memory Drain |
|---|---|---|---|---|
| X (read-only) |
| X (read only) | |
| X |
| X | |
| X |
| X | |
| X |
| X | |
X |
| X |
| |
X |
| X |
| |
X |
|
|
| |
X |
| X |
| |
X |
| X |
| |
X |
| X |
| |
X |
| X |
| |
X (read-only) | X | X (read-only) | X | |
| X |
| X | |
X |
| X | ||
X |
| X | ||
| X |
| X (read-only) | |
| X |
| X | |
X (read-only) | X | X (read-only) | X | |
|
| X |
| |
|
| X |
| |
X (read-only) | X | X | X | |
X |
| X |
| |
X (read-only) | X (read-only) | X (read-only) | X (read-only) |
Table 2-2 summarizes the values and uses of controls for the DIVO/DIVO-DVC option.
Table 2-2. Controls for the DIVO and DIVO-DVC Option Boards
Control | Values or Range | Use |
|---|---|---|
Aspect (read-only). | Reads aspect ratio. | |
Memory nodes: VL_CAPTURE_FIELDS | Selects type of frame(s) or field(s) to capture. | |
VL_COLORSPACE_RGB (full-range RGB) | Specifies color space of video data in memory. | |
VL_COMPRESSION_NONE | Specifies compression option for video. | |
Specifies if closed-caption should be extracted from input or inserted into output. | ||
VL_DIVO_LOOPBACK_ON | Specifies if the video source on input should be from the output pipe. | |
VL_DIVO_FIELD_DISPLAY_F1F2 | Specifies output field display order. For example, to display only one field of a DVCPRO frame, use VL_DIVO_FIELD_DISPLAY_F1F1. This control is supported only in DV/DVCPRO compression mode on the DIVO-DVC option board. | |
VL_F1_IS_DOMINANT
(Frames that are output are deinterlaced differently depending on the choice of output field dominance. Deinterlacing is specified in the application.) | Identifies frame boundaries in a field sequence; see “Setting Field Dominance”.
| |
| ||
Specifies when the GPI_OUT line is asserted, to control downstream devices in a studio environment. For more information, see “VL Support for the General-Purpose Interface ( GPI)”.
| ||
State: | Sets or gets the state of output_gpi lines. For more information, see “VL Support for the General-Purpose Interface ( GPI)” . | |
Sets the position within the video raster to stuff bits. | ||
Supported packings; see Appendix C, “Pixel Packings and Color Spaces ”, | Sets packing format for memory source or drain node. | |
VL_RICE_C
OMPRESSION_8 | Specifies the component size. | |
VL_RICE_COMPRESSION_422
| Specifies the sampling resolution. | |
stringVal | Sets or gets the SDTI header as an array of bytes (stringVal). | |
VL_SDTI_MODE_OFF | Specifies if the memory node data should be processed as SDTI data. | |
Size plus offset or origin should not exceed the raster dimensions. | ||
Sets sync mode for source or drain; on source, this is set to VL_SYNC_GENLOCK. | ||
VL_DIVO_SYNC_HOUSE | Selects the genlock source: VL_DIVO_SYNC_DBOARD is used when the compressed stream provides a sync source. | |
Sets or gets video timing: | ||
VL_TRIGGER_NONE
| Specifies the conditions under which transfers begin on a path (video nodes only); see “Using VL_TRANSFER_TRIGGER” in this chapter. | |
Reads zoom factor of video stream. |
Compression is handled via enhancements to the VL API; the DIVO and DIVO-DVC boards do not support the Compression Library API.
For DIVO and DIVO-DVC, compression in the VL is supported by adding compression-related controls on memory nodes. The control VL_COMPRESSION specifies the compression. Based on the compression type—Rice, DV (DIVO-DVC only), DVCPRO (DIVO-DVC only), DVCam (DIVO-DVC only), or none—additional controls specify compression-related parameters. Table 2-2 earlier in this chapter summarizes these controls.
| Note: Compression for the DIVO-DVC option is different from compression for DIVO; see “DV and DVCPRO Compression for DIVO-DVC ”. |
The DIVO and DIVO-DVC option boards can use Rice compression, a lossless entropy coding mechanism that provides an average compression of 2:1 while retaining bit-accurate data. In some cases, compression can add to the size of the data being transferred, but is limited to a maximum of 1% increase. Tests at SGI show that this compression mechanism can reduce data in ratios of 2:1 to 6:1.
For encoding, specify the controls VL_COMPRESSION, VL_RICE_COMP_PRECISION, and VL_RICE_COMP_SAMPLING. For decoding, the control information is already embedded in the stream; you need specify only the data type, with the VL_COMPRESSION control. For best memory utilization with Rice compression, use variably sized buffers.
Refer to the source examples (divo_vidtomem.c for encoding and divo_memtovid.c for decoding) in the directory /usr/share/src/dmedia/video/DIVO.
The DIVO-DVC board is capable of additional types of encoding defined in the DV, DVCam, and DVCPRO standards. For DV/DVCam and DVCPRO encoding, specify the control VL_COMPRESSION with the VL_COMPRESSION_DV or VL_COMPRESSION_DVCPRO parameter, respectively. For decoding, the control information is already embedded in the stream; you need specify only the data type, with the VL_COMPRESSION control. DV/DVCam and DVCPRO compression mechanisms can reduce data in the ratio of 5:1.
For 525/60, frame size is 12,000 bytes; for 625/50, frame size is 144,000 bytes. You must specify VL_PACKING as VL_PACKING_DV, as illustrated by the following code fragment.
{
   int GvlPacking;
   VLControlValue val;
   int GvlCspace;
   int GvlCapType;

VL_PACKING_242_8
VL_COLORSPACE_CCIR(0)

GvlCapType = VL_CAPTURE_INTERLEAVED;

   val.intVal = GvlPacking;
   if (vlSetControl(GvlSvr, GvlPath, GvlMemNode, VL_PACKING, &val) < 0)
   vl_error(“vlSetControl(VL_PACKING) on memory node”);
   if (vlGetControl(GvlSvr, GvlPath, GvlMemNode, VL_PACKING, &val) < 0)
   vl_error(“vlGetControl(VL_PACKING) on memory node”);
   if (val.intVal != GvlPacking)
   other_error(“can't set VL_PACKING on memory node”);

   val.intVal = GvlCspace;
   if (vlSetControl(GvlSvr, GvlPath, GvlMemNode, VL_COLORSPACE, &val) < 0)
   vl_error(“vlSetControl(VL_COLORSPACE) on memory node”);
   if (vlGetControl(GvlSvr, GvlPath, GvlMemNode, VL_COLORSPACE, &val) < 0)
   vl_error(“vlGetControl(VL_COLORSPACE) on memory node”);
   if (val.intVal != GvlCspace)
   other_error(“can't set VL_COLORSPACE on memory node”);

   val.intVal = GvlCapType;
   if (vlSetControl(GvlSvr, GvlPath, GvlMemNode, VL_CAP_TYPE, &val) < 0)
   vl_error(“vlSetControl(VL_CAP_TYPE) on memory node”);
   if (vlGetControl(GvlSvr, GvlPath, GvlMemNode, VL_CAP_TYPE, &val) < 0)
   vl_error(“vlGetControl(VL_CAP_TYPE) on memory node”);
   if (val.intVal != GvlCapType)
   other_error(“can't set VL_CAP_TYPE on memory node”);

}
|
Use the VL_DIVO_FIELD_DISPLAY control to specify output field display order. To display only one field of a DVCPRO frame, specify the field. In the following example, VL_DIVO_FIELD_DISPLAY_F2F2 is used:
/* display only field # 2 */
 field_display = VL_DIVO_FIELD_DISPLAY_F2F2;
 val.intVal = field_display;
 if (vlSetControl(GvlSvr, GvlPath, GvlVidNode, VL_DIVO_FIELD_DISPLAY, &val) <0)
     vl_error(“vlSetControl(VL_DIVO_FIELD_DISPLAY) on video node”);
 if (vlGetControl(GvlSvr, GvlPath, GvlVidNode, VL_DIVO_FIELD_DISPLAY, &val) <0)
     vl_error(“vlGetControl(VL_DIVO_FIELD_DISPLAY) on video node”);
 if (val.intVal != field_display)
     other_error(“can't set VL_DIVO_FIELD_DISPLAY on video node”);
|
For the DIVO and DIVO-DVC options, SDTI with embedded DV is handled by means of features in the VL API and hardware support in the input and output pipes. The API includes the following SDTI features:
The 32-bit packing VL_PACKING_SDTI_DV specifies how the signal is stored in memory. The layout for this packing is diagrammed in “SDTI Packing ” in Appendix C in Appendix C, “Pixel Packings and Color Spaces ”.
The VL has two SDTI-related controls on memory nodes:
VL_SDTI_MODE enables or disables SDTI mode. When SDTI is enabled and the payload data type is DV, the start lines for each field are changed for 525 timing: start lines are F1=21, F2=284 instead of the default F1=21, F2=283. (For 625 timing, start lines are the same as the defaults, F1=23 and F2=336.)
VL_SDTI_HEADER sets or gets the SDTI header as an array of bytes; the data structure is explained in this section.
This section consists of the following:
For both DIVO and DIVO-DVC, the control VL_SDTI_HDR overlaps the string variable.
The
SDTI header is defined in vl_divo.h as follows:
                /*  SDTI Header  */
typedef struct {
  u_char did;            /* data id identifier */
  u_char sdid;           /* sec. data id identifier */
  u_char dc;             /* data word count */
  u_char lnum[2];        /* linenumber0 and linenumber1 */
  u_char lnumcrc[2];     /* linenumber0 and linenumber1 crc */
  u_char aai_code;       /* appl identifier and code */
  u_char dst_addr[16];   /* destination address */
  u_char src_addr[16];   /* source address */
  u_char btype;          /* block type */
  u_char crcflag;        /* payload crc flag */
  u_char dextflag;       /* data extension flag */
  u_char reserved[4];    /* reserved words */
}


void init_sdti_header_dv( sdti_hdr_t *  sdti_hdr, VLControlValue *val)
{
  int i;

  sdti_hdr->did           = 0x40; /* see smpte 305M spec */
  sdti_hdr->sdid          = 0x01;
  sdti_hdr->dc            = 0x2E;
  sdti_hdr->lnum[0]       = 0x00;
  sdti_hdr->lnum[1]       = 0x00;
  sdti_hdr->lnumcrc[0]    = 0x00;
  sdti_hdr->lnumcrc[1]    = 0x00;
  sdti_hdr->aai_code      = 0x01;

  for(i=0;i<16;i++) sdti_hdr->dst_addr[i] = 0; /* dst_addr[0] is msb */
  for(i=0;i<16;i++) sdti_hdr->src_addr[i] = 0; /* src_addr[0] is msb */

  sdti_hdr->btype         = DIVO_SDTI_BLOCK_TYPE_FIXED; /* fixed block, no ecc
*/
  sdti_hdr->crcflag       = 0x01;  /* insert CRC */
  sdti_hdr->dextflag      = 0x00;  /* no data extension packets */
  for(i=0;i<4;i++) sdti_hdr->reserved[i] = 0; /* set to zero */

  /* copy sdti header into control string variable */
  bcopy(sdti_hdr,val->stringVal,sizeof(sdti_hdr_t));

}

    /* Set the SDTI Header */
    if (vlSetControl(GvlSvr, GvlPath, GvlMemNode, VL_SDTI_HEADER, &val) < 0)
      vl_error(“vlSetControl(VL_SDTI_HEADER) on memory node”);
|
To multiplex and send SDTI DV, follow these steps:
Enable SDTI mode by setting the VL_SDTI_MODE control.
Set the color space to VL_COLORSPACE_CCIR601.
Set the packing to VL_PACKING_SDTI_DV.
Initialize the SDTI header by setting the VL_SDTI_HEADER control. For an example, see init_sdti_header_dv in /usr/share/src/dmedia/video/DIVO/divo_memtovid.c
Set ysize to the active payload region.
Multiplex DIF frames and send buffers. For an example, see init_sdti_header_dv in /usr/share/src/dmedia/video/DIVO/divo_memtovid.c
To receive and demultiplex SDTI DV, follow these steps:
Enable SDTI mode by setting the VL_SDTI_MODE control.
Set the color space to VL_COLORSPACE_CCIR601.
Set the packing to VL_PACKING_SDTI_DV.
Set ysize to the active payload region.
Receive field buffers and demultiplex DIF frames. For an example, see init_sdti_header_dv in /usr/share/src/dmedia/video/DIVO/divo_memtovid.c
Field dominance identifies the frame boundaries in a field sequence; that is, it specifies which pair of fields in a field sequence constitute a frame. The control VL_FIELD_DOMINANCE allows you to specify whether an edit occurs on the nominal video field boundary (Field 1, or F1) or on the intervening field boundary (Field 2, or F2).
F1 dominant: The edit occurs on the nominal video field boundary.
F2 dominant: The edit occurs on the intervening field boundary.
Whether a field is Field 1 or Field 2 is determined by the setting of bit 9, the F bit, in the XYZ word of the EAV and SAV sequences. The setting means the following:
For Field 1 (also called the odd field), the F bit is 0.
For Field 2 (also called the even field), the F bit is 1.
Figure 2-2 shows fields and frames as defined for digital 525-line and 625-line formats for the DIVO/DIVO-DVC option.[1]
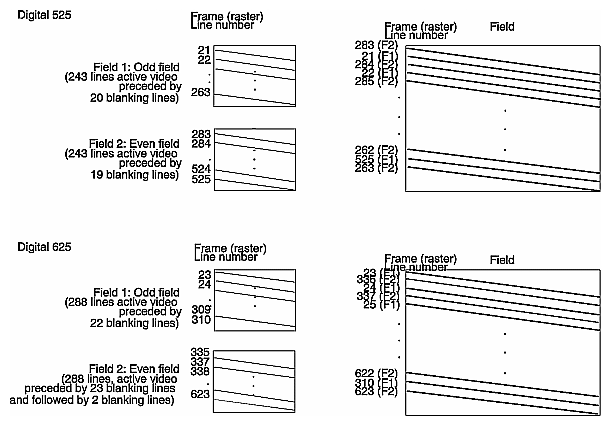
Editing is usually on Field 1 boundaries, where Field 1 is defined as the first field in the video standard's two-field output sequence. 525-line standards send the second (whole) raster line out to begin the first field, and the first (half) raster line out to begin the second field; 625-line standards send the first (half) raster line out to begin the first field, and the second (whole) raster line to begin the second field.
However, some users may want to edit on F2 boundaries, which fall on the field in between the video standard's frame boundary. To do so, use this control, then program your deck to select F2 edits.
If you use component 525-line format, you might need to vary the field dominance choice, depending on the origin of the input material they are to edit.
To output a set of frames, they must be deinterlaced into fields differently, depending on the choice of output field dominance. For example, when F1 dominance is selected, the field with the topmost line must be the first field to be transferred; when F2 dominance is selected, the field with the topmost line must be the second field to be transferred. Deinterlacing must be specified in the application; the following code fragment contains an example of how to consult the field dominance control to determine deinterleave order.
/*
* Set the memory node's timing based upon the video drain's timing,
 * which has been set up by the daemon from the defaults file, or by
 * the user via vcp.
 *
 * When we get around to reading image files, we'll check the file
 * size against the size reported by the VL for this node: if the file
 * size does not match the format's, we'll punt.
 */

int is_525, F1_is_first;
VLControlValue drn timing, dominance;
if (vlGetControl(svr, MEMtoVIDPath, drn, VL_TIMING, &drainTiming) < 0) {
	    vlPerror(“GetControl(VL_TIMING) on video drain failed”);
    exit(1);
}
if (vlSetControl(svr, MEMtoVIDPath, src, VL_TIMING, &drainTiming) < 0) {
    vlPerror(“SetControl(VL_TIMING) on memory source failed”);
    exit(1);
}
/*
 * Read the video drains's field dominance control setting and timing,
 * then set a variable to indicate which field has the first line, so
 * readimage() will know how to deinterleave frames to fields.
 */
if (vlGetControl(svr, MEMtoVIDPath, drn,
    VL_FIELD_DOMINANCE, &dominance) < 0) {
    vlPerror(“GetControl(VL_FIELD_DOMINANCE) on video drain failed”);
    exit(1);
}

is_525 = (drainTiming.intVal == VL_TIMING_525_CCIR601));

switch (dominance.intVal) {
    case VL_F1_IS_DOMINANT:
        if (is_525) {
            F1_is_first = 0;
        } else {
            F1_is_first = 1;
        }
        break;
    case VL_F2_IS_DOMINANT:
        if (is_525) {
            F1_is_first = 1;
        } else {
            F1_is_first = 0;
        }
        break;
    }
|
The DIVO and DIVO-DVC option boards have two GPI connectors, each associated with one of the serial digital video ports. Each port has two transmit and two receive channels, lines 0 and 1 in and out.
The VL API supports the GPI as a device-independent interface. It supports GPI triggers in three vlSetControl() interfaces. The union VLControlValue supports the controls for
output triggering, discussed in “Using VL_GPI_OUT_MODE”
explicitly setting and querying the GPI lines, discussed in “Using VL_GPI_STATE”
setting up triggering to begin transfers on a path, discussed in “Using VL_TRANSFER_TRIGGER”
Note: See Appendix G, “GPI Interface (DIVO Option Only)”, and the section “GPI Interface” in Appendix A for extensive hardware information on the GPI interface for the DIVO board only.
Use VL_GPI_OUT_MODE to program the gpi_out line. Two conditions are supported for asserting the GPI line: transfer_start and transfer_stop. You can have multiple trigger conditions outstanding.
Figure 2-3 diagrams the effect of VL_GPI_OUT_MODE values.
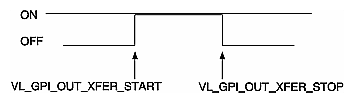
| Note: In this section, OFF is assumed to be low. VL_CLEAR_GPI changes the state of the GPI signal to low. |
The following pseudocode segment illustrates a setup for gpi_out line 1 to toggle at the beginning and end of transfer:
VLControlValue val;

                          /* make sure the GPI line is high */
val.gpi_state.gpi   = VL_GPI_OUT;
val.gpi_state.instance = <which GPI line>;       /* integer */
val.gpi_state.state =  VL_GPI_OFF;
vlSetControl(svr,path,VL_GPI_STATE,&val);

                          /* transfer start */
val.gpi_out.condition = VL_GPI_OUT_XFER_START;
val.gpi_out.instance  = <which GPI output line >;
val.gpi_out.state     = VL_GPI_ON;

vlSetControl(svr,path,VL_GPI_OUT_MODE,&val);

                          /* transfer stop */
val.gpi_out.condition = VL_GPI_OUT_XFER_STOP;
val.gpi_out.instance  = <which GPI output line >;
val.gpi_out.state     = VL_GPI_OFF;

vlSetControl(svr,path,VL_GPI_OUT_MODE,&val);
|
To clear all outstanding trigger controls on a particular line, use the gpi_state control with the clear flag.
Use VL_GPI_STATE to query the state of the input GPI lines and to set or get the state of output GPI lines. The states are ON, OFF, PULSE (transition for one field time), and CLEAR.
The following code fragment clears all output triggers on the specified line:
val.gpi_state.gpi   = VL_GPI_OUT;
val.gpi_state.instance = <which GPI line>;
val.gpi_state.state =  VL_GPI_CLEAR;

vlSetControl(svr,path,VL_GPI_STATE,&val);
|
To get the GPI state on an input line, use
val.gpi_state.gpi = VL_GPI_IN;
val.gpi_state.instance = <which GPI line>;
vlGetControl (svr, path, VL_GPI_STATE, &val);
|
The VL_TRANSFER_TRIGGER control specifies the conditions under which transfers begin on a path based on external GPI triggers. This control is valid only on video nodes.
The following code illustrates an input GPI-based trigger transfer setup:
VLTransferDescriptor desc;
int num_images = 30;   	/* 1 second of video */
int trigger = TRUE;		/* enable trigger transfers */

if (trigger) {
   val.xfer_trigger.triggerType = VL_TRIGGER_GPI;
   val.xfer_trigger.value.instance = 1;     /* GPI line 1 */
   desc.trigger = VLDeviceEvent;
}
else {   /* reset for subsequent transfers */
    val.xfer_trigger.triggerType = VL_TRIGGER_NONE;
    desc.trigger = VLTriggerImmediate;
}

vlSetControl(svr, path, src, VL_TRANSFER_TRIGGER, &val);

desc.mode = VL_TRANSFER_MODE_DISCRETE;
desc.count = num_images;
desc.delay = 0;

vlBeginTransfer(svr, path, 1, &desc);
|
| Note: The trigger type is a persistent device control setting and remains valid until reset. Thus the VL_TRANSFER_TRIGGER control must be set to VL_TRIGGER_NONE if subsequent transfers are of a nontrigger type. |
Over-the-wire electrical time-code signals are used as clocks by which one master device can drive the input or output of data by other slave devices. Each tick of the clock consists of a unique signal that represents a time code.
VITC time code is a standardized part of a 525- or 625-line video signal. The code itself occupies lines in the vertical blanking interval of each field of the video signal. Each VITC code word contains a time code, 32 user bits, an F1/F2 field indicator, and other useful information. People use the user bits to store information such as reel and shot number for indexing footage. Under certain circumstances, the original VITC recorded with footage can go along with that footage as it is edited, so that you can produce an edit list or track assets for a final prototype edit.
The DIVO and DIVO-DVC options always extract VITC information from the fields as they are captured and pass this information to the application as buffer information associated with the dmBuffer. To extract this information, call vlDMBufferGetVideoInfo(). In the structure returned, a valid bit (validinfo) indicates if the VITC is valid. Refer to the programming example divo_vitc.c in the directory /usr/share/src/dmedia/video/DIVO.
To insert VITC, fill the DMBufferVideoInfo* structure and call the function vlDMBufferSetVideoInfo().
To parse a VITC image out of a pixel buffer, you can use a VITC parser included in libdmedia (see dmVITC(3dm)); see /usr/share/src/dmedia/video/vitc.c for sample code.
The VL provides several ways of handling data stream events, such as completion or failure of data transfer, vertical retrace event, loss of the path to another client, lack of detectable sync, or dropped fields or frames. The method you use depends on the kind of application you are writing:
For a strictly VL application, use
vlSelectEvents() to choose the events to which you want the application to respond
vlCallback() to specify the function called when the event occurs
your own event loop or a main loop (vlMainLoop()) to dispatch the events
For an application that also accesses another program or device driver, or if you are adding video capability to an existing X or OpenGL application, set up an event loop in the main part of the application and use the IRIX file descriptor (FD) of the event(s) you want to add.
For more information on these functions, see Chapter 4 in the Digital Media Programming Guide.
Table 2-3 summarizes events for DIVO/DIVO-DVC. For these options, this table supersedes the table of events in Chapter 14, “VL Event Handling,” in the DMPG; DIVO and DIVO-DVC support only the events listed in Table 2-3.
Table 2-3. DIVO/DIVO-DVC Events
Event | Use |
|---|---|
VLSyncLost | Sync is not detected |
VLStreamStarted | Stream started delivery |
VLStreamStopped | Stream stopped delivery |
VLSequenceLost | A field/frame was dropped |
VLControlChanged | A control on the path has changed |
VLTransferComplete | A field/frame transfer has completed |
VLTransferFailed | A transfer has failed and DMA is aborted |
VLEvenVerticalRetrace | Vertical retrace event for an even field |
VLOddVerticalRetrace | Vertical retrace event for an odd field |
VLDeviceEvent | A device-specific event |
VLTransferError | A transfer error was discovered; field may be invalid |
Because of the asynchronous nature of the implementation, controls executed with vlSetControl() have no guarantees as to when they are executed once transfers are in progress. However, in certain situations, it is useful to be able to specify when controls on a path are executed; for example, to play out video clips with different packings or color-space formats without having to stop transfers while a memory-to-video operation is in progress.
Inline controls specify control changes to happen between buffers. For example, if you want to play out two video clips that have different packing formats in memory, the application would set up the path, queue the buffers from the first clip, set up inline controls to match the next clip, and queue the buffers from the second clip. The syntax for usage is
int vlSetControlInLine(VLServer svr, VLPath path, VLNode node,
     VLNode refnode, VLControlType control, VLControlValue *val)
|
In this syntax, refnode is the reference node, identifying a unique connection in a path with more than two nodes.
Inline controls are generally applied on a memory node being used as the source node. Control changes are queued to the hardware along with the buffers and are executed in order. To change packing control inline, for example, use
VLNode mem; |
mem = vlGetNode(svr, VL_SRC, VL_MEM, VL_ANY); val.intval = VL_PACKING_444_12; vlSetControlInLine(svr, path, mem, mem, VL_PACKING, &val); |
To capture graphics to video, you can use OpenGL to read pixels into memory. However, the coordinate system differs between video and Open GL; under OpenGL, the origin is at the lower left corner and in video, origin is in the upper left corner. To adjust for this difference, the image must be inverted in memory before it is sent to the DIVO board for output.
Besides sending an image out to the DIVO board, you can use the GVO graphics option to get zero-latency transcoding to CCIR 601-2 digital video.
The DMediaInfo structure reports the Unadjusted System Time (UST) and VITC information.
The DIVO and DIVO-DVC options make use of the error events noted in Chapter 4 of the DMPG, as well as VLTransferErrorEvent, which reports nonfatal video transfer errors, including error detection and handling (EDH) errors. The VLTransferComplete and VLSequenceLost events also report the Media Stream Count ( MSC) of the field or frame transferred or failed.
[1] The line numbers for the DIVO/DIVO-DVC option diverge slightly from those defined in SMPTE 259M.