While the simple application in Chapter 3 demonstrated the most important X programming techniques, it was far from a complete application. This chapter describes a calculator program that provides for calculations in several bases. This program has a more robust event loop than the simple application in Chapter 3 and demonstrates the use of the resource manager routines for integrating user preferences.
Our basic window program in Chapter 3, “Basic Window Program” did not do all the things an application normally should do. We should have more complete communication with the window manager, parse the command line, and merge these options with the user's defaults to set up user-preferred colors and miscellaneous options. This chapter describes and demonstrates these techniques with a real application, basecalc.
The basecalc application is a programmer's calculator that allows integer calculations in binary, octal, decimal, and hexadecimal and conversions between these bases. It is not quite as complicated as xcalc, the standard calculator for X, but it demonstrates X techniques just as well. basecalc also does base conversions, logical operations, and unsigned arithmetic, which xcalc does not.
Only the sections of the program that illustrate X concepts are shown and described in this chapter. The entire program is shown in Appendix D, The basecalc Application.
This program has one characteristic that is not strictly correct in the X environment. It has only one allowable size. If the window manager refuses its request for that size or its main window is reduced in size by the user, it should print a message indicating that it cannot operate in that space. Luckily, most window managers honor the application's size hints and refuse to resize the window.
Figure 14-1 shows basecalc on the screen. It is a calculator which can perform integer math in decimal, octal, hexadecimal, or binary and can convert values between any of these bases. The calculator may be operated with the pointer by pressing any pointer button on the calculator pads or with the keyboard by typing the same symbols shown on the calculator face.
See the Preface for information on how to get the example source code.
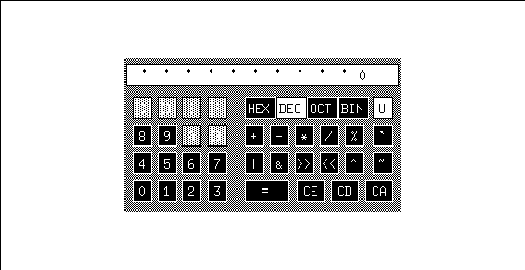
The long horizontal window along the top of the calculator is the display, in which the values punched on the calculator and the results are displayed. The digits (0 to 9) and letters (A to F) in the left-hand portion of the calculator keypad are for entering values. The top row of the right-hand portion of the keypad is for base selection. These can be used either to set the current base of calculations or to convert a value between bases. Only one of the base indicators is highlighted at a time.
Only valid numbers in the current base are allowed to be entered. Valid pads are black, while invalid ones are light gray. When a pad is triggered by pressing a pointer button, it flashes white, and the operation or value indicated by the pad is executed if the pointer button is released in the same pad. The pad also responds to the pointer entering or leaving the window while a pointer button is pressed.
The calculator also operates from the keyboard. Numbers, letters, and special characters can be typed in (or pasted from another application) to represent all the functions except Clear Entry (CE). The Backspace key also performs this function.
This application runs on any X system, since it uses only the colors black and white. It achieves the appearance of different levels of gray by creating a pattern with differing amounts of black and white. It also provides command line arguments for colors and uses them if the user specifies them and if connected to a color screen.
Here is the list of available functions and how they are used. If you do not plan to be using basecalc, skip to “Include Files” because you will not need to know how to use basecalc from the desktop.
All operations work in all bases. You may shift bases at any point in any calculation. The last of any series of consecutive operators pressed will be acted upon.
| +, -, *, / | Normal addition, subtraction, multiplication, and division. A number is entered, then one of these operators, then another number, and finally the equal sign, Enter key, or any operator. The result will then be displayed in the window. If the last character entered was an operator, you can continue specifying numbers and operators in alternation. | |
| | , & | AND and OR. Used just like the addition operator. The “|” and “&” symbols on the keyboard trigger this function. | |
| << , >> | Shift Left and Shift Right. Used just like the addition operator. Enter the number to be shifted, then the “>>” or “<<” pad (or the “>” or “<” keys), and then the number of bits to shift the number, followed by the “=” or Enter key. | |
| ^ | Exclusive OR. Used just like the addition operator. Sets all bits that are in either number but not both. Available from the caret (^) key. | |
| % | Mod (remainder after division). Used like the addition operator. Available on the percent (%) key. | |
| ‘ | Change sign. This is a unary operator, since it performs its function immediately on the current contents of the display. Its results depend on whether the calculator is in signed or unsigned mode. If in unsigned mode, the result is the unsigned equivalent of a negative number. This function is available from the left single quote key. | |
| ~ | One's complement. This is a unary operator. It changes all the bits in the value. | |
| CE | Clear Entry. Erases the last value entered. The Backspace key also performs this function. | |
| CD | Clear Digit. Erases the last digit entered. | |
| CA | Clear All. Clears all operator and value registers. | |
| U or S | Unsigned or Signed. Specifies whether all other operations should be performed in signed or unsigned mode. | |
| = | Compute. The Return key also performs this function. |
These mathematical operations have nothing to do with X, and how they are implemented is not described here. They are provided so that you can use the program if you have the code and so you can more easily understand the complete code in Appendix D, The basecalc Application. In this chapter, we are going to concentrate on the aspects of the program that are standard to X applications. On that note...
The include files used in Example 14-1 are the standard ones, except for the few needed to perform system calls to get the user's home directory, current Rubout key, etc. The <X11/Xresource.h> file is necessary to use the resource manager.
Example 14-1. basecalc -- include files
#include <X11/Xlib.h> #include <X11/Xutil.h> #include <X11/Xresource.h> #include <X11/cursorfont.h> #include <stdio.h> #ifdef SysV #include <termio.h> #else #include <sgtty.h> #include <sys/ttychars.h> #endif SysV #include <ctype.h> #include <pwd.h> /* Global declarations file for this application */ #include "basecalc.h" |
The constant definitions and global variables declared or defined in ./basecalc.h are shown above the routines in which they are used in the basecalc example program. You can take a look at the entire include file in Appendix D, The basecalc Application.
The main is a very short and straightforward outline for the major routines to follow.
Example 14-2. basecalc -- the main
initTty is not shown in this chapter, but it is included in Appendix D, The basecalc Application. It simply performs a few system calls to determine which keys are being used for erase, delete, and interrupt.
The following sections describe each routine called in the main. Each section will begin with a brief description of the routine, followed by the declarations from basecalc.h that are needed with that routine and then the code.
This section describes and demonstrates the use of the resource manager in a typical application. For an additional theoretical description of the resource manager, see Chapter 13, “Managing User Preferences”
As described in Chapter 13, “Managing User Preferences” the user's default values for options are normally found in the XA_RESOURCE_MANAGER property on the root window. That property is normally set by the user with the xrdb program. For compatibility, if there is no XA_RESOURCE_MANAGER property defined (either because xrdb was not run or if the property was removed), your program should assume that the defaults can be found in a file called .Xdefaults in the user's home directory.
Note that XGetDefault(), described in Chapter 13, “Managing User Preferences” only deals with some of this complexity. It does not read the XA_RESOURCE_MANAGER property, and it does not merge in the command line arguments. That is why, in this example, we have used a different, more thorough technique, using the native resource manager calls.
Example 14-3 shows a sample resource database file with two options for basecalc.
For a complete description of preference matching rules, see Chapter 13, “Managing User Preferences” The basecalc.base preference sets the base with which the calculator will start and is here specified as binary (base 2). The basecalc.unsigned preference specifies whether the calculator should start up in signed mode or unsigned mode.
XrmInitialize() must be called before any other resource manager function. (It simply sets up a default XrmRepresentation type for strings, but that fact does not affect how the resource manager is used in applications.) After that, the first thing to be done is to parse the command line so that we can read the display argument out of it before opening the display. parseOpenDisp does this, loading all the command line options that match resources in the option table into a database for later merging with the user's defaults. Take a look at the code in Example 14-4, and then we'll explain it.
Example 14-4. basecalc -- the parseOpenDisp routine
The large options table (opTable) defines all the command line arguments that XrmParseCommand() is going to look for. It describes not only what flag to look for but also the style of each option. Some options are a simple flag, others are a flag followed by a value with no space or with a space, and so on. The options table also specifies what to call each option when searching for it in the database.
Example 14-5 shows the structure that defines the options table.
Example 14-5. XrmOptionDescRec, XrmOptionDescList, and XrmOptionKind declarations
typedef struct {
   char *option;            /* Option specification string in argv */
   char *resourceName;      /* Binding and resource name (without
                             * application name) */
   XrmOptionKind argKind;   /* Which style of option it is */
   caddr_t value;           /* Value to provide if XrmoptionNoArg */
} XrmOptionDescRec, *XrmOptionDescList;
typedef enum {
   XrmoptionNoArg,          /* Value is specified in
                             * OptionDescRec.value */
   XrmoptionIsArg,          /* Value is the option string itself */
   XrmoptionStickyArg,      /* Value is chars immediately following
                             * option */
   XrmoptionSepArg,         /* Value is next argument in argv */
   XrmoptionResArg,         /* Resource and value in next argument
                             * in argv */
   XrmoptionSkipArg,        /* Ignore this option and next argument
                             * in argv */
   XrmoptionSkipLine        /* Ignore this option and the rest of
                             * argv */
} XrmOptionKind;
|
The styles of command line arguments allowed are as follows:
| XrmoptionNoArg | If this flag is present, take the value in the value member (the last column) of the options table. For example, the -u (unsigned) option for the calculator indicates that the value should be off and the calculator should begin in unsigned mode. | |
| XrmoptionIsArg | The flag itself indicates something without any additional information. In the case of the calculator, -x or -h indicates that it should start up in hexadecimal mode. | |
| XrmoptionStickyArg | The value is the characters immediately following the option with no white space intervening. This is not used in the calculator, but it is like the arguments for uucico, where -sventure means to call system venture. | |
| XrmoptionSepArg | The next item after the white space after this flag is the value of the option. For example, the option -fg blue would be of this type and would indicate that blue is the value for the resource specified by -fg. | |
| XrmoptionResArg | The resource name and its value are the next argument in argv after the white space after this flag. For example, the flag might be -res and the resource name/value might be basecalc*background:white. | |
| XrmoptionSkipArg | Ignore this option and the next argument in argv. | |
| XrmoptionSkipLine | Ignore this option and the rest of argv. |
As XrmParseCommand() parses the command line, it removes arguments that it finds in the options table from argv and argc. Therefore, if argc is nonzero after XrmParseCommand(), at least one of the command line arguments was illegal. The best thing to do is print both the illegal options (by printing argv) and the correct option syntax.
If all the options were correctly parsed, then it is time to extract the display name so that we can connect with the display. We need to connect now because we want to get the user's resource database from the server to merge with the command line arguments we already have. If there was no display specified on the command line, we use NULL as usual to connect to the server indicated in the UNIX environment variable DISPLAY. We set the global variable screen_num to the default screen number so that we can use it in future macro calls.
It would be possible (and actually preferable) to search the other local databases, namely the app-defaults/* and .Xdefaults files, for a display name before connecting to the display. This was not done in basecalc because of an oversight.
The mergeDataBases routine shown in Example 14-6 reads in options from four sources, merges them together in the proper order, and then merges in the database obtained from the command line. As described in Chapter 13, “Managing User Preferences” we will use the R4 set of resource files and merging order since it's a lot less complicated than the R5 order defined by the Xt Intrinsics:
Classname file in the directory specified by the XUSERFILESEARCHPATH or XAPPLRESDIR environment variables.
Property set using xrdb, accessible through the XResourceManagerString() macro or, if that is empty, the .Xdefaults file.
XENVIRONMENT environment variable or, if not set, .Xdefaults-hostname file.
Command line arguments.
Example 14-6 shows the global declarations and the routine. This routine is quite similar to the routine in the Xt Toolkit that performs the same function (that was its origin).
Example 14-6. basecalc -- the GetUsersDataBase routine
XrmGetFileDatabase() reads the application defaults file and loads it into a database, returning a pointer to the database. This database should contain the default values for each configurable variable used in the program. This file should look just like a user preference file, and it should parallel every option in the command line options table. In case this file is unavailable, the application should also have hardcoded defaults for all these values, but it should not have to use them.
Note that Example 14-6 gets the user's database set by xrdb from the value returned by the XResourceManagerString() function. This function returns a pointer to a string stored in the Display structure. This string is set by XOpenDisplay() to the value of the XA_RESOURCE_MANAGER property on the root window of screen 0. [56] This string can easily be translated into a database with XrmGetStringDatabase().
The extractOpts routine performs the final merging of the defaults database with the command line database and then reads options out of the database and sets program variables appropriately. The program in Example 14-7 does not take advantage of all the options supported in the options table, but it is ready to be expanded to do so.
Example 14-7. basecalc -- the extractOpts routine
The variables that are used to access the data returned from the database are background, Base, iconGeostr, iconOnly, foreground, Geostr, and Unsigned. The routine then calls XrmGetResource() for each resource, which places the data which resulted from the combination of the command line and the resource database into user-accessible variables. Geostr and iconGeostr are used to set up the window manager size hints. Later in the code, the variables background, Base, foreground, iconOnly, and Unsigned will also be used.
The next step is to get the standard geometry strings from the database, parse them, and use these or the defaults to set the window manager hints to match. This program repeats this process for the main window and for the icon. Strictly speaking, it is not necessary to set window manager hints for the icon, and they are not used for that purpose in this program.
XParseGeometry() returns a bitmask which indicates which parts of the geometry string were actually set on the command line or in the resource database. There are symbols to indicate each bit in this mask, and they are:
GetOpts calls Usage when the user tries to specify dimensions for the main window or icon, since this program cannot deal with that complexity.
Example 14-8. basecalc -- the Usage routine
/* Print message to stderr and exit */
Usage ()
{
   fprintf (stderr,
           "%s: [-iconic] [-unsigned] [-hex|x|dec|oct|binary]\
      [-display <display>] [-geometry <geometrystring>]\
      [-iconGeometry <icongeometrystring>\n",
      calcName ? calcName : "basecalc");
   exit (1);
}
|
The initCalc routine in Example 14-9 performs three major functions: it loads the font to be used in all text, creates GCs for foreground and background of the calculator, and then sets the initial pixmaps for all pads. The windows for each pad do not exist yet.
Again, we'll begin with the declarations that are used in the routine.
Example 14-9. basecalc -- declarations for initCalc
/* Pattern for disabled buttons (Light Gray) */
#define lgray_width 16
#define lgray_height 16
static char lgray_bits[] = {
   0x88, 0x88, 0x22, 0x22, 0x88, 0x88, 0x22, 0x22,
   0x88, 0x88, 0x22, 0x22, 0x88, 0x88, 0x22, 0x22,
   0x88, 0x88, 0x22, 0x22, 0x88, 0x88, 0x22, 0x22,
   0x88, 0x88, 0x22, 0x22, 0x88, 0x88, 0x22, 0x22};
/* Background pattern for calculator (Dark Gray) */
#define gray_width 16
#define gray_height 16
static char gray_bits[] = {
   0xaa, 0xaa, 0x55, 0x55, 0xaa, 0xaa, 0x55, 0x55,
   0xaa, 0xaa, 0x55, 0x55, 0xaa, 0xaa, 0x55, 0x55,
   0xaa, 0xaa, 0x55, 0x55, 0xaa, 0xaa, 0x55, 0x55,
   0xaa, 0xaa, 0x55, 0x55, 0xaa, 0xaa, 0x55, 0x55};
#define   WHITE     0
#define   BLACK     1
#define   DARKGRAY  2
#define   LIGHTGRAY 3
int pressedColor =      WHITE;
int unpressedColor =   BLACK;
int disabledColor =   LIGHTGRAY;
int displayColor =      WHITE;
#define NBUTTONS 38
struct windata {
   int   color;   /* Color */
   char   *text;   /* Pointer to the text string */
   int   x;      /* x coordinate of text */
   int   y;      /* y coordinate of text */
   int   value;   /* 0 to 16 for number, symbol for operator */
   int   type;   /* Digit, operator, conversion, or special */
} windata[NBUTTONS] = {
   { 1, "                               0 ", 2, 3, 0, WTYP_DISP },
   { 0, "C", 5, 3, 12, WTYP_DIGIT },
   { 0, "D", 5, 3, 13, WTYP_DIGIT },
   { 0, "E", 5, 3, 14, WTYP_DIGIT },
   { 0, "F", 5, 3, 15, WTYP_DIGIT },
   { 0, "8", 5, 3,  8, WTYP_DIGIT },
   { 0, "9", 5, 3,  9, WTYP_DIGIT },
   { 0, "A", 5, 3, 10, WTYP_DIGIT },
   { 0, "B", 5, 3, 11, WTYP_DIGIT },
   { 0, "4", 5, 3, 4, WTYP_DIGIT },
   { 0, "5", 5, 3, 5, WTYP_DIGIT },
   { 0, "6", 5, 3, 6, WTYP_DIGIT },
   { 0, "7", 5, 3, 7, WTYP_DIGIT },
   { 0, "0", 5, 3, 0, WTYP_DIGIT },
   { 0, "1", 5, 3, 1, WTYP_DIGIT },
   { 0, "2", 5, 3, 2, WTYP_DIGIT },
   { 0, "3", 5, 3, 3, WTYP_DIGIT },
   { 0, "CA", 6, 3, OPR_CLRA, WTYP_SPECIAL },
   { 0, "CE", 6, 3, OPR_CLRE, WTYP_SPECIAL },
   { 0, "CD", 6, 3, OPR_CLRD, WTYP_SPECIAL },
   { 0, "=", 17, 2, OPR_ASGN, WTYP_OPERATOR },
   { 0,  "+", 5, 3, OPR_ADD, WTYP_OPERATOR },
   { 0,  "-", 5, 3, OPR_SUB, WTYP_OPERATOR },
   { 0,  "*", 5, 4, OPR_MUL, WTYP_OPERATOR },
   { 0,  "/", 5, 3, OPR_DIV, WTYP_OPERATOR },
   { 0,  "%", 5, 3, OPR_MOD, WTYP_OPERATOR },
   { 0,  "|", 5, 3, OPR_OR,  WTYP_OPERATOR },
   { 0,  "&", 5, 3, OPR_AND, WTYP_OPERATOR },
   { 0,  ">>",1, 3, OPR_SHR, WTYP_OPERATOR },
   { 0,  "<<",0, 3, OPR_SHL, WTYP_OPERATOR },
   { 0,  "^", 5, 3, OPR_XOR, WTYP_OPERATOR },
   { 0, "HEX", 2, 3, 16, WTYP_CONVERSION },
   { 0, "DEC", 2, 3, 10, WTYP_CONVERSION },
   { 0, "OCT", 2, 3,  8, WTYP_CONVERSION },
   { 0, "BIN", 2, 3,  2, WTYP_CONVERSION },
   { 0, "U",  5, 3,  OPR_UNS, WTYP_SPECIAL },
   { 0, "`",  5, 3,  OPR_NEG, WTYP_OPERATOR },
   { 0, "~",  5, 3,  OPR_NOT, WTYP_OPERATOR },
};
/* Font for all numbers and text */
char *myFontName =    "8x13";
/* For keeping track of colors */
GC    fgGC;
GC    bgGC;
|
The data in lgray and gray are for making pixmaps for tiling in various shades of gray. This program is written to operate correctly on any kind of display. If the display is simple monochrome without grays, you can still get gray shades by creating different pixmaps with slightly different ratios of black and white pixels. The light gray pixmap is used for disabled pads, which are not valid in the current base. The dark gray pixmap is used for the background of the calculator. Simple pixel values of BlackPixel() and WhitePixel() are used for valid and selected pads. The symbols BLACK, WHITE, DARKGRAY, and LIGHTGRAY are defined to clarify the code. If foreground and background colors are specified on the command line, they will also be used in the pixmaps, and their colors will be mixed.
The windata structure provides information about each subwindow on the calculator: the color, text, position relative to the individual pad subwindows, value (digit or symbol), and type of pad. The first window in the list of data is the display window, where the entered values and results are shown. As you can see, the data for all the windows is initialized, except for the color, which is set in initCalc. None of these values change during the operation of the program except the color and the value in the display window.
The type member of windata indicates which of the four major classes of pads the window fits in. These are WTYP_CONVERSION, WTYP_DIGIT, WTYP_OPERATOR, and WTYP_SPECIAL and represent digits, operators, conversions (bases), and special keys. The special keys are Clear All (CA), Clear Digit (CD), Clear Entry (CE), and Unsigned (U). Each pad within each type is identified with the value member of windata. For digits, this is the digit itself, and for operators, conversions, and special keys, it is a symbol representing each key.
Last but not least, fgGC and bgGC are two GCs which are used to save the colors between which the pads are changed. The pads have to change back and forth between black and white frequently, and having one GC for each reduces the traffic to the server.
Without further ado, Example 14-10 shows the initCalc routine.
Example 14-10. basecalc -- the initCalc routine
/* Initialize calculator options */
initCalc ()
{
   register int win;
   register int found = -1;
   XGCValues values;
   extern char lgray_bits[];
   if ((theFont = XLoadQueryFont (display, myFontName)) == NULL) {
      (void) fprintf(stderr, "basecalc: can't open font %s\n",
            myFontName);
      exit(-1);
   }
   /* Make the utility pixmaps */
   grayPixmap = makePixmap(gray_bits, gray_width, gray_height);
   lgrayPixmap = makePixmap(lgray_bits, lgray_width, lgray_height);
   /* Make the utility gc's */
   values.font = theFont->fid;
   values.foreground = foreground;
   fgGC = XCreateGC(display, DefaultRootWindow(display),
         GCForeground|GCFont, &values);
   values.foreground = background;
   values.function = GXcopy;
   bgGC = XCreateGC(display, DefaultRootWindow(display),
         GCForeground|GCFont|GCFunction, &values);
   /* Loop through buttons, setting disabled buttons
     * to Color Light Gray; also, find the window which
     * corresponds to the starting display base; also
     * add ascent to y position of text */
   for (win = 1; win < NBUTTONS; win++) {
      if (windata[win].type == WTYP_CONV &&
            windata[win].value == Base) {
         found = win;
      } else
         if (windata[win].type == WTYP_DIG &&
               windata[win].value >= Base) {
            windata[win].color = disabledColor;
         } else
         if (windata[win].type == WTYP_SPEC &&
               windata[win].value == OPR_UNS) {
            if (Unsigned)
               windata[win].text = "U";
            else
               windata[win].text = "S";
            windata[win].color = pressedColor;
         }
         else
            windata[win].color = unpressedColor;
      windata[win].y += theFont->max_bounds.ascent;
   }
   windata[0].y += theFont->max_bounds.ascent;
   if (found >= 0) {
      winBase = found;
      windata[found].color = pressedColor;
   } else {
      (void) fprintf(stderr, "basecalc: can't use base %d\n",
            Base);
   exit(-1);
   }
   windata[0].color = displayColor;
}
|
The first action in this routine is to load the font. The process of loading and using a font should be familiar to you from the discussion and examples in Chapter 6, “Drawing Graphics and Text”
The routine then calls makePixmap to make pixmaps out of the lgray and gray data in the include file. This routine calls XCreatePixmapFromBitmapData() to convert a single-plane pixmap into a pixmap with depth suitable for tiling. Then initCalc creates two GCs, each with a different foreground color. These are used later in drawButton.
Now initCalc begins a loop through all the window data set up in the array of structures called windata. The first operation within the loop is to adjust the position of text in each button according to the font information. Then the pad colors are set according to the Base and Unsigned variables. These variables have default values (10 and U), but they may have been updated according to the command line or the resource database.
Finally, initCalc sets the color of the display window and the current base pad. If the base is not valid, this will not have been caught until now, so the routine prints out a message and exits.
The makeWindows routine creates a cursor, sets up attributes, and creates the main window, all the pad windows, and the display window. It also creates the icon pixmap from data and then uses it as the background attribute for creating the icon window. The icon will be tiled with this pixmap independent of the icon size. Finally, all the standard properties and window manager hints are set.
There is nothing in makeWindows that you have not seen in previous examples, so we will not show it here. Look at the code in Appendix D, The basecalc Application, if you are interested.
selectEvents selects events for all the windows of the application.
Example 14-11. basecalc -- the selectEvents routine
selectEvents ()
{
   int win;
   /* Window behind calculator */
   XSelectInput (display, calcWin, KeyPressMask|KeyReleaseMask);
   /* Where results are drawn */
   XSelectInput (display, dispWin, ExposureMask);
   /* Pad windows */
   for (win = 1; win < NBUTTONS; win++)
      XSelectInput (display, Buttons[win].ID,
         ExposureMask|ButtonPressMask|ButtonReleaseMask|
         EnterWindowMask|LeaveWindowMask);
}
|
The entire calculator window requires key events, because we want to be able to operate the calculator from the keyboard as well as with the pointer.
The display window (dispWin) requires exposure events, because it must be able to refresh itself for the usual reasons.
All other windows (pads) require exposure events for refresh, button events for selection, and border crossing events so that the button only needs to be released within a pad to activate the pad. This last feature makes it easier to work quickly with the calculator.
The routine in Example 14-12 processes events. The top portion of takeEvents converts key events to the corresponding button event, and then the bottom sets the colors and flags and draws the button in the new color. Key codes are mapped to ASCII with XLookupString(), and keyToWin is called to get the offset into windata that is represented by this key. When key events occur, the appropriate pad is flashed.
Example 14-12. basecalc -- the takeEvents routine
takeEvents ()
{
   XEvent Event;
   register int win;
   register int Pressed = False;
   register int inWindow = False;
   char buffer[10];
   register char *keyChars = buffer;
   register int keyDown = False;
   int i, nbytes;
   while (1) {
      /* Get event if key not down */
      if (!keyDown)
         XNextEvent (display, &Event);
      else
         Event.type = KeyRelease;
      /* Map keyboard events to window events */
      if (Event.type == KeyPress || Event.type == KeyRelease) {
         nbytes = XLookupString (&Event, buffer,
            sizeof(buffer), NULL, NULL);
         if (Event.type == KeyPress)
            {
            Event.type = ButtonPress;
            keyDown = True;
            }
         else
            {
            for (i=0; i<60000; i++)
               ; /* Wait */
            Event.type = ButtonRelease;
            }
         if ((Event.xbutton.window =
            keyToWin (keyChars, nbytes)) == None){
            keyDown = False;
            continue;
         }
      }
      for (win=0; win < NBUTTONS; win++)
         if (Buttons[win].ID == Event.xbutton.window)
            break;
      switch (Event.type) {
      case ButtonPress:
         if (windata[win].color == disabledColor)
            break;
         Pressed = win;
         if (!keyDown)
            inWindow = True;
         windata[win].color = pressedColor;
         drawButton (win, 0);
         break;
      case LeaveNotify:
         if (Pressed != win)
            break;
         inWindow = False;
         windata[win].color = unpressedColor;
         drawButton (win, 0);
         break;
      case EnterNotify:
         if (Pressed != win)
            break;
         inWindow = True;
         windata[win].color = pressedColor;
         drawButton (win, 0);
         break;
      case ButtonRelease:
         if (windata[win].color == disabledColor ||
             Pressed != win) {
            keyDown = False;
            break;
         }
         Pressed = False;
         windata[win].color = unpressedColor;
         if (keyDown || inWindow)
            winPressed (win);
         keyDown = False;
         inWindow = False;
         drawButton (win, 0);
         break;
      case Expose:
         drawButton (win, 1);
         break;
      }
      XFlush(display);
   }
} |
This routine simply sets colors and draws the text in a pad. Example 14-13 shows the drawButton routine.
Example 14-13. basecalc -- the drawButton routine
The following is a brief description of all the subroutines of basecalc that were not shown in this chapter. All of these can be seen in full in Appendix D, The basecalc Application.
| convButton | Changes the current base and converts a value, if any. | |
| digitButton | Gets a digit and assigns it to Value. | |
| displayVal | Calculates appropriate format string for base. | |
| initTty | Performs system calls to get user's current erase, delete, and interrupt characters. | |
| keyToWin | Translates a keycode as if a pad had been selected. | |
| makePixmap | Makes a pixmap from bitmap data, shown and described in Chapter 6, “Drawing Graphics and Text” | |
| operButton | An operation. Either does it or waits for next value and = . | |
| printInBase | Composes the string that should be displayed. Called from Sprintf. | |
| specButton | Clears a digit, an entry, or all, or toggles unsigned mode. | |
| Sprintf | A modified version of sprintf, the standard C utility, which does not print in binary. Sprintf calls printInBase. | |
| winPressed | Determines whether pad pressed was a digit, an operator, a conversion, or a special pad. |
[56] Note that because the XA_RESOURCE_MANAGER property is read by XOpenDisplay(), it is read only once, during application startup. Therefore, any changes to this property after startup will not be reflected in the application. This property (and all the other resource files) is for initial startup information only.