This chapter provides information on installing and removing drives and parts on the front of the Octane workstation, behind the bezel. Installing a hard drive is an easy task requiring no tools or screws. It is unlikely that you will need to replace the light module, frontplane, system fan, or external plastics. Replacing the system fans, frontplane, and external plastics are complicated and lengthy tasks, and are best performed by an experienced user.
The following topics are covered in this chapter:
This section tells you how to install internal drives in the Octane workstation. Internal drives include the system disk drive, secondary hard disk drives, and DAT and DLT drives.
| Caution: Drives can be easily damaged. Handle your drive carefully; do not drop it or handle it roughly. |
Unsupported devices may not work with the Octane workstation, and may cause problems with supported products.
All internal devices have a 3.5-inch form factor.
Set addresses manually only on external SCSI devices; internal SCSI devices (drives) are on a separate bus and are automatically given an address when they are inserted. Each bus has a unique address: Bus 0 (internal devices) has addresses such as 0-1, 0-2, 0-3; the system drive is SCSI ID 0-1, the option drive above it is SCSI ID 0-2, and the option drive at the top of the Octane workstation is SCSI ID 0-3. Bus 1 (external devices) has addresses such as 1-1, 1-2, 1-3.

Tip: To determine the total capacity and megabytes available on your disks, go to the Toolchest > System > File System Manager and click the Get Info button.
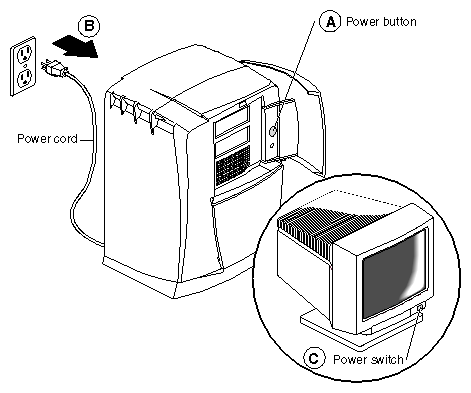
To shut down and power off the system, follow these steps:
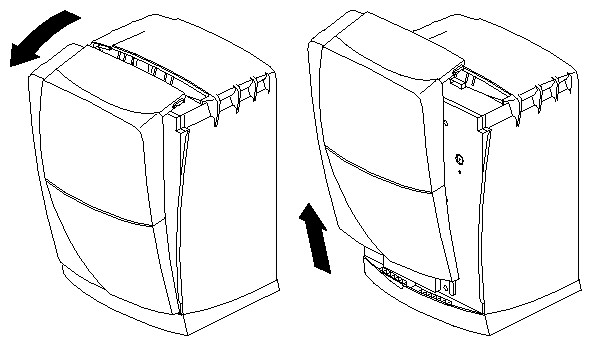
Open the front cover.
Press and release the power button to shut down the software and power off the system. The system powers off automatically. (Step A)
Press the monitor power switch to turn off your monitor. (Step B)
Disconnect the power cable from the back of the workstation. (Step C)
To remove the bezel, you first shut down and power off the system. If you have not already done so, go to “Shutting Down and Powering Off the System”. Then return here and follow these steps:
To prepare the Octane workstation before installing an internal drive, see “Shutting Down and Powering Off the System” and follow the directions through removing the bezel.
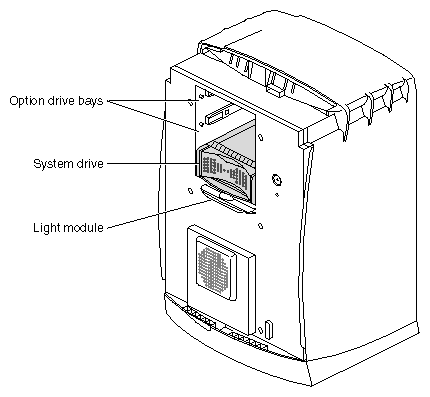
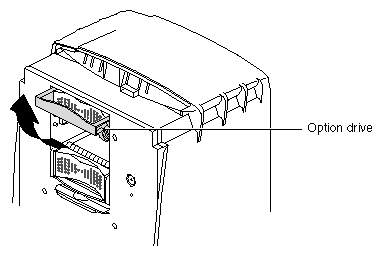
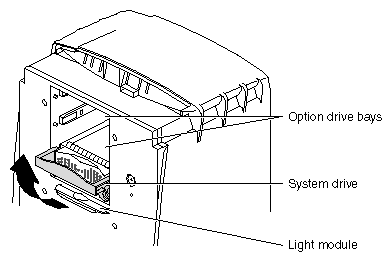
The option drive bays are the two top drive bays. Install an option drive in either one.
The Octane workstation automatically assigns an address to an internal drive. The system drive is SCSI ID 0-1, the drive directly above it is SCSI ID 0-2, and the upper option drive is SCSI ID 0-3.
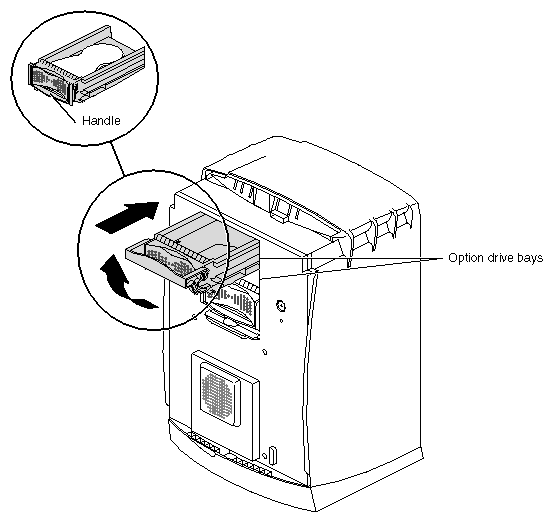
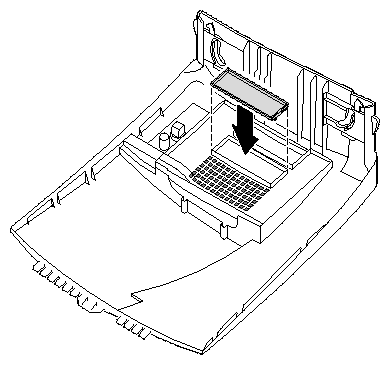
Lift the handle on the drive to a horizontal position, and slide the drive into the drive bay. The drive handle is the same color as the drive. See Figure 7-7.
Slide the drive in gently until you feel solid resistance. The drive is connected to the frontplane when the front of the drive is flush with the chassis.

Caution: Pushing the drive into the frontplane with force can damage the drive.
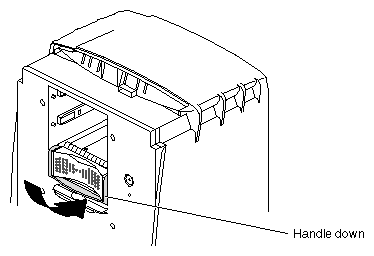
With the drive completely inserted, rotate the handle downward to lock the drive in the workstation.
You have completed installing an option drive and are ready to remove the blank panel on the bezel.
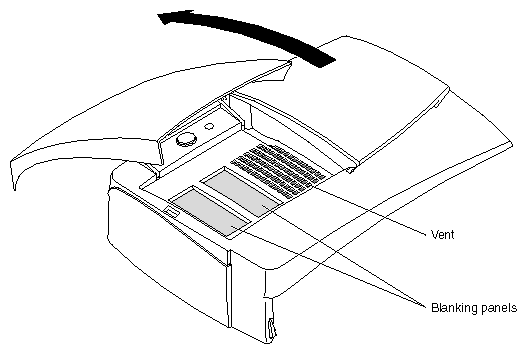
After installing a new option drive, you remove a blank panel from the bezel before replacing the bezel.
Place the bezel on a flat surface so that the door is facing up.
Open the door.
Locate the blank panel for the drive bay in which you installed the option drive.
Press down on the blank panel. It pops out the back of the bezel.
Keep the blank panel. You must replace it if you ever remove the drive.
Caution: To prevent damage to your Octane workstation, you must place a blank panel in the bezel if you have removed a drive. The blank panel ensures proper airflow through the workstation. Go to “Replacing the Bezel”.
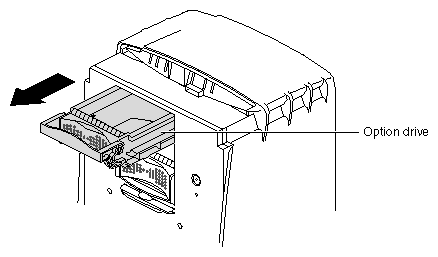
To remove an internal option drive, go to “Shutting Down and Powering Off the System” and follow the instructions through removing the bezel. Then return here.
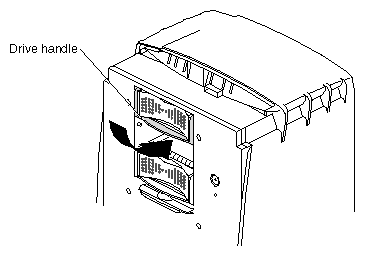
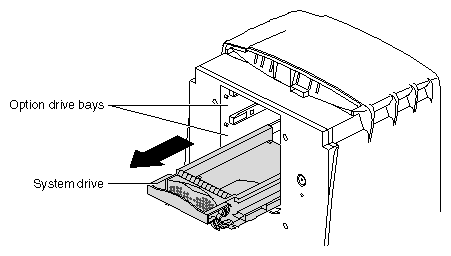
Lift the drive handle to unlock the drive.
Pull the drive directly toward you to remove it from the drive bay.
To install a drive in the option drive bay, go to “Installing an Internal Option Drive”.
To leave the drive bay empty, replace the blank panel before replacing the bezel, go to the next section.
If you removed a secondary drive and do not intend to replace it, you must inform the system that the drive is no longer there and replace the blank panel.
Remove the bezel. See “Removing the Bezel”. Then return here for instructions on replacing the blank panel.
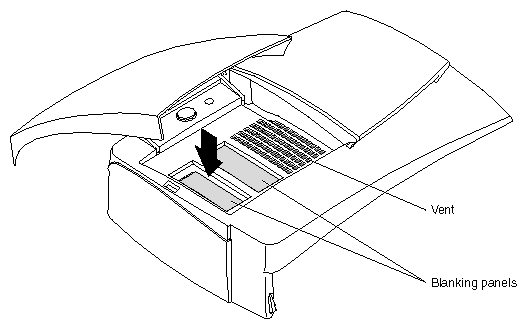
Place the bezel face down on the flat surface with the door closed. (Take care to place the bezel on a surface that does not scratch or mar the surface.)
Locate the appropriate opening for the blank panel, opposite the empty drive bay, and place the blank panel in it.
Press the blank panel until both sides snap firmly into place.
For more information, from the Toolchest > Help > Online Books > End User bookshelf, choose the Personal System Administration Guide and search for “Removing a Disk.”
To replace the system drive, you must shut down the Octane workstation and remove the bezel. If you have not completed these steps, go to “Shutting Down and Powering Off the System” and follow the instructions through removing the bezel.
| Caution: Do not remove the system drive unless you have a new drive to replace it. The drive needs to remain in place to prevent damage to the Octane workstation. |
The SCSI ID of the system drive is 0-1.
Locate the system drive.
Raise the handle to a horizontal position.
Pull the system drive out of the Octane workstation.
Replace the system drive.
Lift the handle.
With the handle fully extended, gently slide the drive into the drive bay. The drive is connected to the frontplane when the front edge of the drive is flush with the chassis.
Caution: Pushing the system drive in with force can damage the drive.
Rotate the handle down to lock the system drive to the workstation.

Go to “Replacing the Bezel” and follow the instructions through powering on the Octane workstation. When you see the login screen, you are ready to log in. Return to this section to test the internal drive.
The workstation automatically sets up the system software for most internal devices you install and places an icon on the desktop.
Once you install the drive, follow these steps to check that the system recognizes the new drive.
Log in to your account. For more information on logging in, refer to “Logging Into the Octane Workstation”.
If the device is installed correctly, you see an icon for it on the desktop. Double-click the icon to set up the drive.
You can also use the System Manager to check that the drive is shown correctly.
From the Toolchest > System > System Manager > Hardware and Devices, choose Disk Manager. You see a list of installed drives.
Choose the drive, and click the Get Info button.
If the drive you installed does not appear, power off the system and make sure the drive is completely seated in the slot. Then restart the system and check the System Manager listing again.
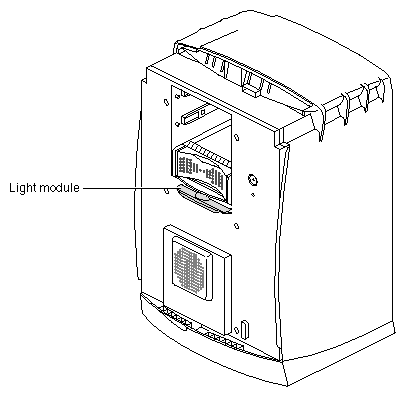
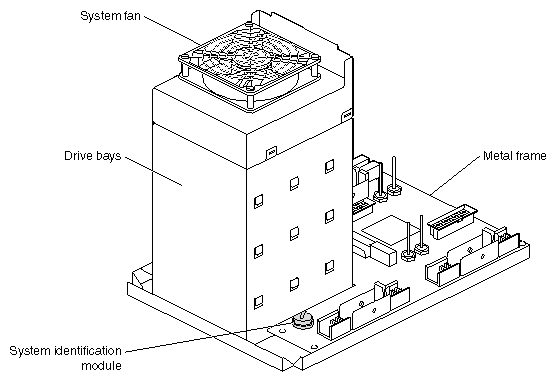
The light module provides the light for the light bar on the front of the Octane workstation. The light module is located on the sheet-metal face, behind the bezel.
To replace the light module, go to “Shutting Down and Powering Off the System” and follow the instructions through removing the bezel. Then return to this section and follow the instructions below.
The light module is directly under the system drive.
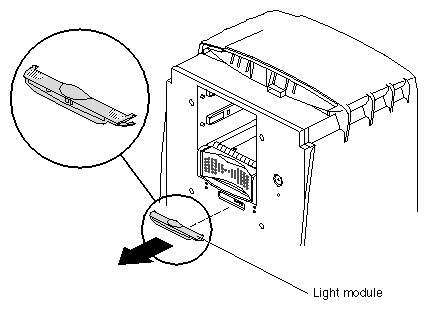
Squeeze both top and bottom wings together at both ends of the light module and gently pull straight back.
If the light module does not release, squeeze more firmly until it releases from the workstation.
Discard the module.
Insert the new light module.
Align the two hollow plastic pins on the module with the two solid metal pins on the sheet metal cap.
Slide the module onto the sheet-metal face until the module snaps into place. Make sure both sides snap firmly into place.

You have finished the light module installation and are ready to replace the bezel. Go to “Replacing the Bezel” and follow the instructions through powering on the Octane workstation.
| Caution: The components on the frontplane module are extremely sensitive to static electricity; you must wear the wrist strap while working with the frontplane module. |
| Caution: The components inside the Octane workstation are extremely sensitive to static electricity; you must wear the wrist strap while replacing parts inside the workstation. |
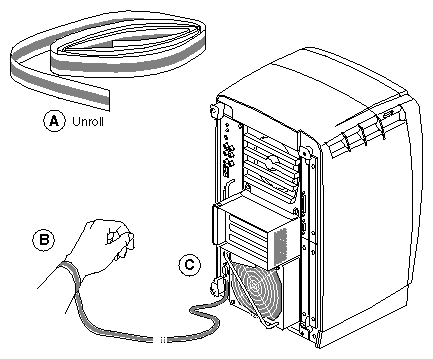
Unwrap the first two folds of the band and wrap the exposed adhesive side firmly around your wrist. (Step A)
Unroll the rest of the band and peel the liner from the copper foil at the opposite end. (Step B)
Attach the copper foil to the module you are removing: system module, XIO module, frontplane module, PCI module. Otherwise, use any convenient and exposed electrical ground, such as a metal part of the Octane workstation. (Step C)
Replacing the frontplane module requires a number of steps from preparing the workstation to removing modules. Before you begin, find some bookmarks to help you organize your task.
Also see the diagrams of the workstation in the front of Chapter 1 of this guide to learn the workstation's part names.
Be sure to have the replacement part beside you before removing the frontplane module.
To replace the system fan you perform the following tasks. Instructions for completing the tasks follow the task list.
Prepare the workstation: shut down and power off, remove the bezel, and attach the wrist strap.
Remove the system drive, option drives, and light module.
Remove all the cables and modules from the back of the workstation.
Remove the frontplane module.
Remove and the system fan.
Reinstall everything and start the system.
Go to “Shutting Down and Powering Off the System” and follow the instructions through removing the bezel. Then return to this section.
On the back of the Octane workstation:
Disconnect the system module from the chassis by unscrewing the captive screws and pulling the system module an inch or two from the chassis, or remove it. (See Chapter 2 for help disconnecting or removing this module.) Then return to this section.
Disconnect the PCI module from the chassis by unscrewing the captive screws and pulling the PCI module an inch or two from the chassis, or remove it. (See Chapter 4 for help disconnecting or removing this module.) Then return to this section.
Disconnect the power supply from the chassis by unscrewing the captive screws and pulling the power supply an inch or two from the chassis, or remove it. (See Chapter 3 for help disconnecting or removing this module.) Then return to this section.
Disconnect the XIO module from the chassis by unscrewing the captive screws and pulling the XIO module an inch or two from the chassis, or remove it. (See Chapter 5 for help disconnecting or removing this module.) Then return to this section.
On the front of the Octane workstation:
Remove the system drive and any option drives. Go to “Replacing the System Drive” and “Removing Internal Option Drives” to remove the system drive and any option drives that are installed.Then return to this section.
Remove the light module. Go to “Replacing the Light Module” for instructions on removing the light module. Then return to this section.
You are ready to begin removing the frontplane module.
If you have not already done so, go to “Removing and Installing the Frontplane Module and System Identification Module” and follow the instructions before you begin with this section.
Place an antistatic bag on a clean, antistatic surface. Your desktop works well.
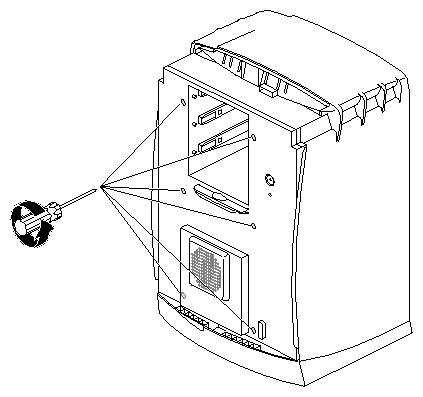
Loosen the six captive screws holding the frontplane module to the chassis until the screws are loose in their sockets.
Place your hand inside the drive bay, and lift the frontplane module out of the chassis.
Caution: The frontplane module is large and unwieldy. Steady it with you free hand on the edge of the frame as you remove it from the chassis.
Gently place it face down, on a clean, antistatic surface.
To adjust the position of the frontplane module, handle it by the metal frame to avoid damaging components.
If you are replacing the frontplane module with a new frontplane module, go to the next section. You must remove the system identification module from the old frontplane module and place it on the new frontplane module.
If you removed the frontplane module as part of the task of replacing the system fan, go to “Removing and Installing the System Fan” for further instructions.
Remove the system identification module only when replacing the frontplane module.
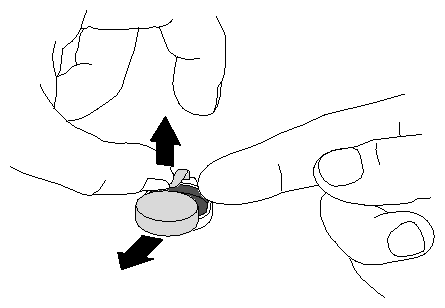
Remove the system identification module.
Lift up on the metal retaining clip.
Slide the system identification module to the side and out.
Place the system identification module on the new frontplane.
Lift up on the retaining clip.
Slide the system identification module under the clip.
You are ready to install the frontplane. Go to the next section for instructions on installing the frontplane.
If you have not already done so, go to “Removing and Installing the Frontplane Module and System Identification Module” and follow the steps through removing the frontplane module and system identification module. Then return here. You are ready to install the new frontplane module in the Octane workstation.
Grasp the replacement frontplane module by the metal frame on the edge of the front plane.
Lift the frontplane module into place and gently insert it into the Octane workstation.
Tighten the six captive screws.
Replace the system drive and any option drives.
Replace the light module.
On the back of the Octane workstation, insert or connect to the frontplane:
You have finished replacing the frontplane module and system identification module and are ready to replace the bezel.
Go to “Replacing the Bezel” and follow the instructions through powering on the Octane workstation.
Replacing the system fan requires a number of steps from preparing the workstation to removing modules. Before you begin, find some bookmarks to help you organize your task.
Also see the diagrams of the workstation in the front of Chapter 1 of this guide to learn the workstation's part names.
Have the replacement part beside you before remove the system fan.
To replace the system fan you perform the following tasks. Instructions for completing the tasks follow the task list.
Prepare the workstation: shut down and power off, remove the bezel, and attach the wrist strap.
Remove the system drive, option drives, and light module.
Remove all the cables and modules from the back of the workstation.
Remove the frontplane module.
Remove and the system fan.
Reinstall everything and start the system.
Follow the instructions below to replace the system fan.
Go to “Shutting Down and Powering Off the System” and follow the instructions through removing the bezel. Then return to this section, step 2.
Go to “Replacing the System Drive” and “Removing Internal Option Drives” to remove the system drive and any option drives that are installed. Then return to this section for instructions on removing the frontplane module.
Remove the light module. Go to “Replacing the Light Module” for instructions on removing the light module. Then return to this section.
Go to “Removing and Installing the Frontplane Module and System Identification Module” and follow the instructions through step 5. (Do not remove the system identification module.) Then return here for instructions on removing and replacing the fan.
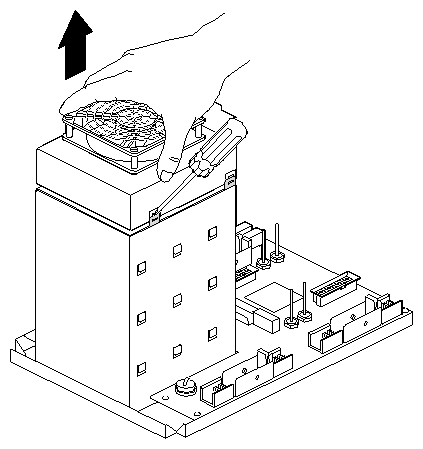
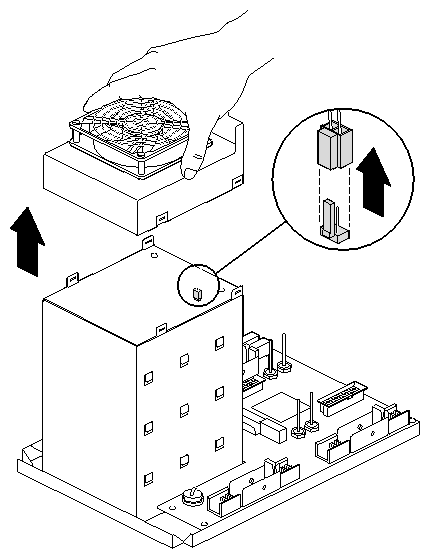
Locate the system fan. It is attached to the back of the drive bay.
Using a flatsided screwdriver, slide the tip of the screwdriver between the tab and fan.
Tilt the screwdriver to release the fan from the pressure of the tab.
Partially lift the fan from the back of the drive bays.
Gently pull up on the cable connector.
Discard the old fan.
Gently slide the new cable connector onto the connector on the back of the drive bay.
Place the new fan on the back of the drive bay. The fan snaps into place when properly aligned.
To replace the frontplane module in the chassis, go to “Installing the Frontplane Module”. Follow the instructions at the end of that section to replace the bezel and power on the Octane workstation.

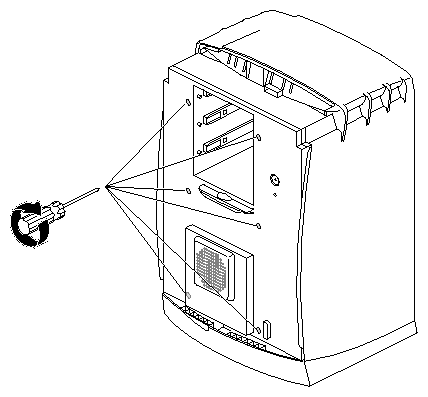
To remove the plastics, top or base, you must shut down the system and remove the bezel. Go to “Shutting Down and Powering Off the System” and follow the instructions through removing the bezel. Then return to this section for instructions on removing the plastics.
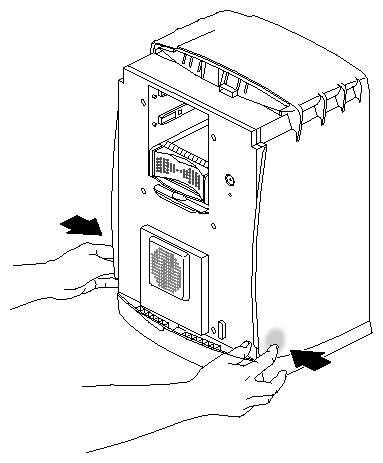
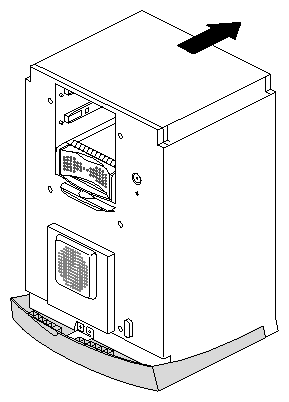
Locate the two areas to press to release the top cover.
Press on these areas and hold.
While pressing inward on both areas, pull the cover toward the front. The cover should slide forward. If the cover does not slide forward, press harder to release the catches, and slide the cover forward.
After the cover is forward, lift it straight up and off the chassis.
Replace the new plastic cover.
Slide the cover straight down over the chassis.
Slide the cover back until it snaps into place.The cover snaps into place when it is correctly aligned.

To remove the plastic base, you need to shut down the system, remove the bezel, and remove the top plastic cover.
To shut down the system, go to “Shutting Down and Powering Off the System” and follow the steps through removing the bezel.
Then go to “Removing and Installing the Plastics: Top and Base”, the section directly before these instructions, and remove the plastic top cover. Then return to this section and begin with step 1.
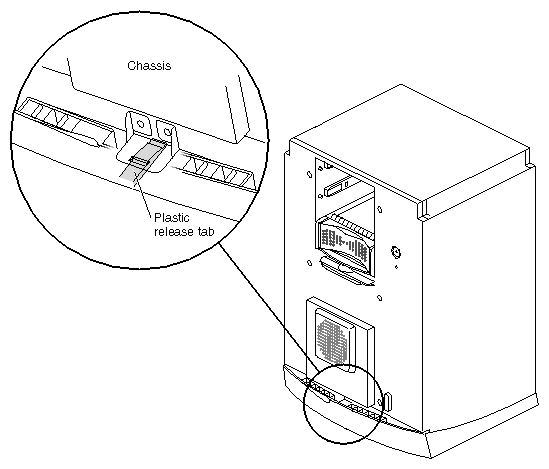
On the base of the workstation, locate the plastic tab located in front of the metal tab with an arrow.
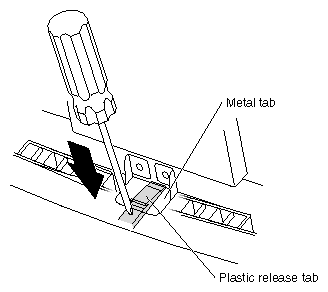
Use a flat-sided screwdriver to press down on the plastic release tab.
While pressing down on the tab, slide the chassis back about one and one half inches, until it stops. See Figure 7-34.

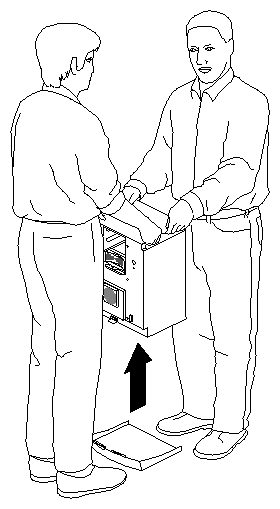
Warning: Do not attempt to lift the Octane workstation by yourself. It is heavy and requires two people to safely lift. Place the new plastic base on a clean surface.
Align the first four tabs on each side of the chassis with the slots in the base and lower the chassis onto the base.
Slide the chassis forward about one and one half inches until it locks to the base.
Place the plastic cover over the chassis and snap it into place.
You are finished replacing the plastic base and are ready to replace the bezel.
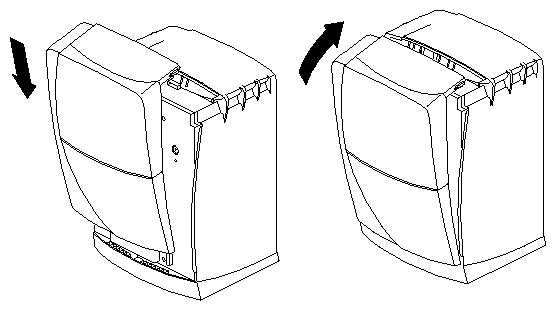
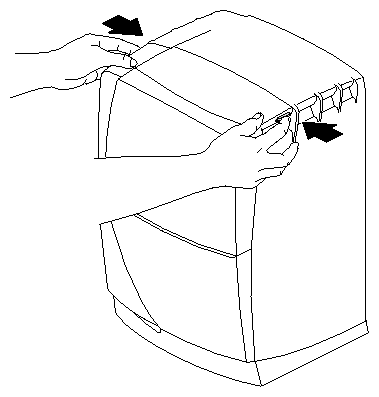
Replace the bezel.
Lower the bezel into the lower edge of the chassis.
Hook the bezel in place.
Rotate the bezel back and into closed position.
You can hear the latches snap into place when the bezel is fully installed.
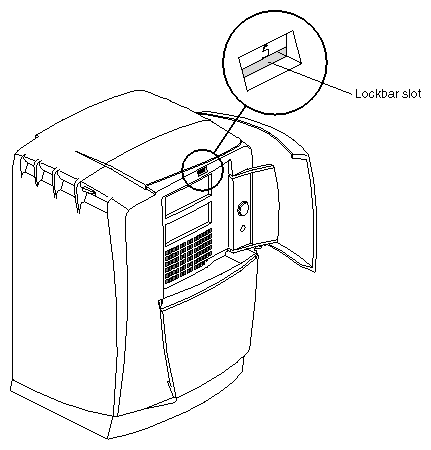
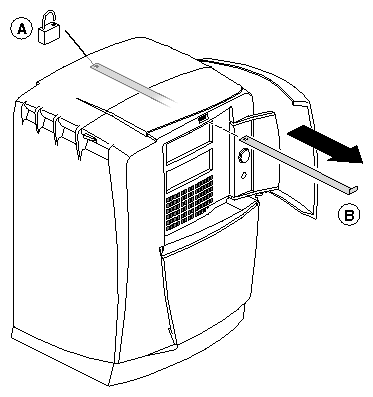
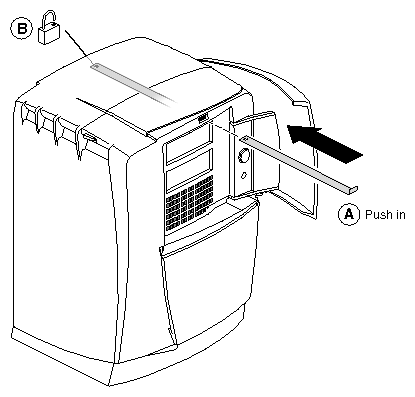
To replace the lockbar, go to the next step. Otherwise, skip to “Powering On the Octane Workstation”.
Open the door on the front of the Octane workstation.
Insert the lockbar into the front of the workstation with the angled end up. (Step A)
Insert and close the lock at the back of the Octane workstation. (Step B)
You are now ready to power on the Octane workstation.
