This chapter contains the following sections:
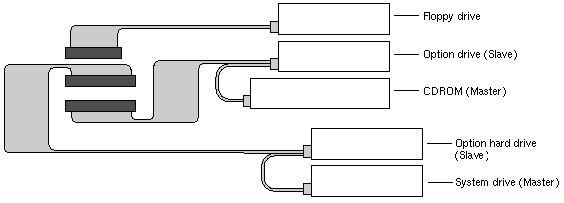
The Silicon Graphics 320 visual workstation supports Ultra DMA EIDE internal drives. It has bays for three removable media drives—two 3½" drives (floppy and option drive) and one 5¼" drive (CDROM)—and two hard disk drives.
Refer to Figure 4-1 for correct cabling and configuration information for the internal EIDE drives.
Shut down the system and turn off the power. For detailed instructions, see “Shutting Down the System”.
Unplug the power cord from the back of the system.
Remove the side and front covers.
For detailed instructions, see “Removing the Side Cover” and “Removing the Front Cover”.
If necessary, set the jumpers on the drive. To set the jumpers, refer to the labeling on the back of the drive or to the documentation that came with the drive.
If you are installing a floppy disk drive in the top 3 1/2” bay, you do not need to set any jumpers. Go to step 5.
If you are installing a drive in the bottom 3 1/2” bay, set the drive jumpers to Slave.
If you are installing a drive in the 5 1/4” bay, set the drive jumpers to Master.
Locate two drive sleds—one to attach to each side of the drive.
If you are replacing a drive, remove the old drive, then remove the sleds from the drive.
For detailed instructions, see “Removing a Removable Media Drive”.
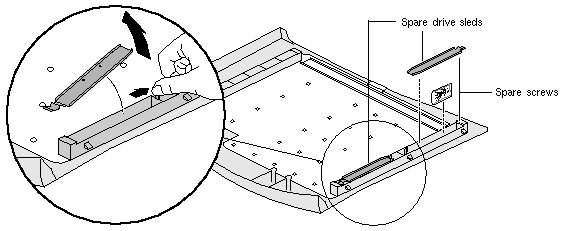
If you are not replacing a drive, remove two sleds from the side panel, as shown in Figure 4-2. Also remove the spare screws from the lower right edge of the side panel.
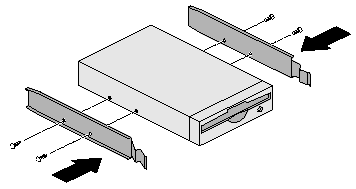
Attach a sled to each side of the drive, as shown in Figure 4-3.
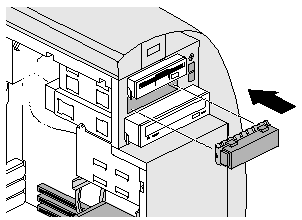
If there is a blank panel covering the drive opening in the system, remove it, as shown in Figure 4-4.
Save the panel. In the future, if you remove the drive and leave the bay empty, you will need to reinstall the panel.
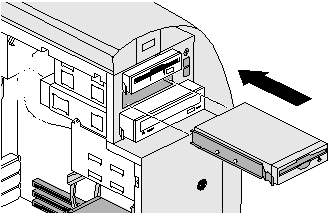
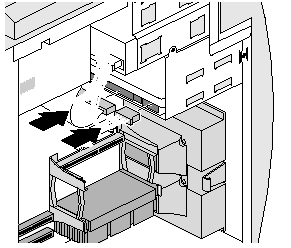
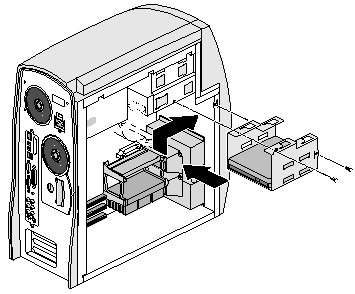
Slide the drive into the drive bay until it snaps into place, as shown in Figure 4-5.
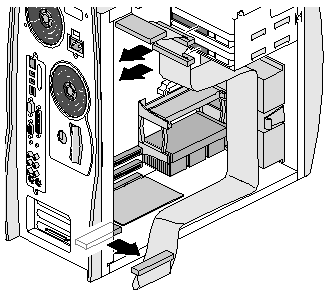
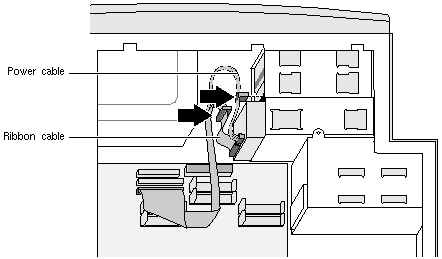
Connect the power and ribbon cables, as shown in Figure 4-6. To see a more detailed diagram of the correct ribbon cabling for the drives, refer to Figure 4-1.
Replace the front and side covers.
For detailed instructions, see “Replacing the Front Cover” and “Replacing the Side Cover”.
Reattach the power cord.
Turn on the system. For detailed instructions, see “Turning On the System”.
You can check to make sure the system recognizes the drive by selecting Start > Programs > Administrative Tools > Disk Administrator from the Windows NT task bar. See the Help in the Disk Administrator for information on using it.
If the system does not recognize the drive, shut down and reopen the system. Then:
Check to make sure the power and ribbon cables are correctly attached to the back of the drive (see Figure 4-1).
Check the jumpers on the drives to verify they are set to Slave for a drive in the bottom 3½" bay and to Master for a drive in the 5¼" bay.
Close and reboot the system. If the system still does not recognize the drive, either the drive or a cable may be faulty. Contact your support representative.
Shut down the system and turn off the power. For detailed instructions, see “Shutting Down the System”.
Unplug the power cord from the back of the system.
Remove the side and front covers.
For detailed instructions, see “Removing the Side Cover” and “Removing the Front Cover”.
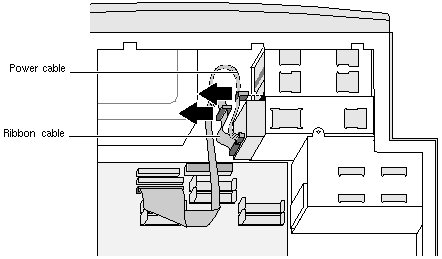
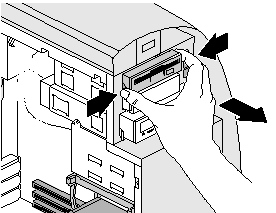
Disconnect the power and ribbon cables from the back of the drive, as shown in Figure 4-7.
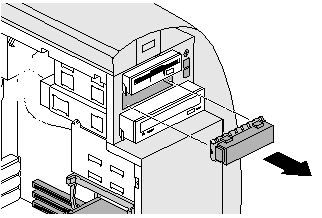
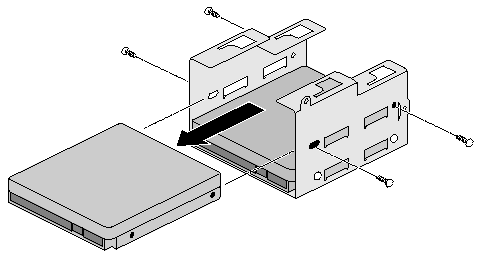
From the front, pinch the drive sled tabs on the sides of the drive and pull the drive out, as shown in Figure 4-8.
If you are not reinstalling the drive, remove the sleds and store them inside the side cover of the system (see Figure 4-2) or if you are installing another drive, attach the sleds to the new drive (see “Installing a Removable Media Drive”).
If you are not reinstalling a drive, install the blank panel in the bay opening, as shown in Figure 4-9.
Replace the front and side covers.
For detailed instructions, see “Replacing the Front Cover” and “Replacing the Side Cover”.
Reattach the power cord.
Turn on the system. For detailed instructions, see “Turning On the System”.
Shut down the system and turn off the power. For detailed instructions, see “Shutting Down the System”.
Unplug the power cord from the back of the system.
Remove the side cover. For detailed instructions, see “Removing the Side Cover”.
If any hard drives are currently installed, disconnect the cables from the backs of the drives, as shown in Figure 4-10.
If you have internal SCSI drives installed, see “Disconnecting the SCSI PCI Option Card Internal Cable” for information on disconnecting the SCSI cable from these drives.
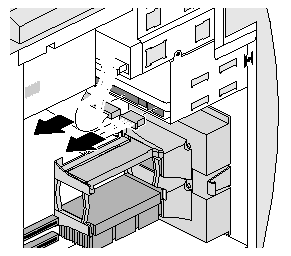
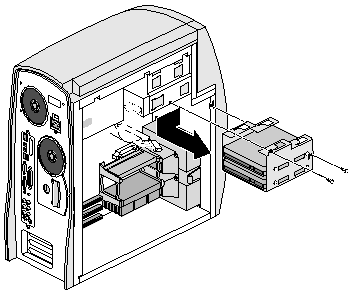
Remove the drive bracket from the system, as shown in Figure 4-11.

Caution: Space is tight, so avoid contact with the DIMMs while installing the bracket. If you are replacing a drive, remove the old drive from the bracket. For detailed instructions, see “Removing an Internal Hard Drive”.
Set the jumpers on the drive. To set the jumpers, refer to the labeling on the back of the drive or to the documentation that came with the drive.
If you are installing a system drive, set the drive jumpers to Master.
If you are installing an option drive, set the drive jumpers to Slave.
If you are installing SCSI drives, set the system drive to SCSI ID 0 and the secondary drive to a number from 1 to 15, excluding number 7 and any numbers taken by other SCSI drives.
Remove four screws from the bag of screws located inside the side panel. (Refer to Figure 4-2.)
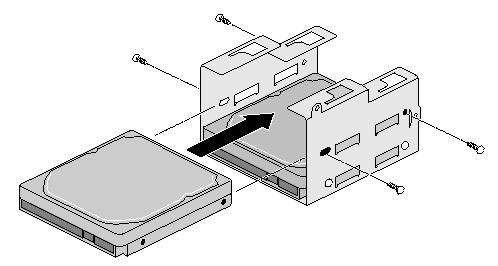
Insert the drive into the bracket. If you are installing a system drive, install it in the bottom slot.
Insert and tighten the four screws, as shown in Figure 4-12.
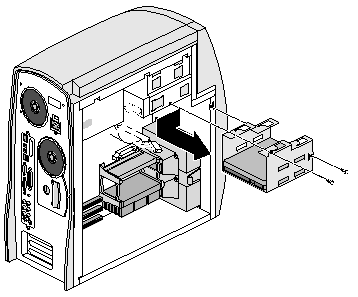
Install the bracket in the drive slot, as shown in Figure 4-13.
Caution: Space is tight, so avoid contact with the DIMMs while installing the bracket. Position the drive bracket behind the drive slot.
Push the bracket up so the tabs on the top of the bracket align with the openings in the drive slot. Slide the bracket towards the front of the system until it stops.
Insert and tighten the two screws.
Attach the power and ribbon cables to the back of the drive (or drives, if two are installed), as shown in Figure 4-14. To see a more detailed diagram of the correct ribbon cabling for the drives, refer to Figure 4-1.
If you are installing internal SCSI drives, see “Attaching the SCSI PCI Option Card Internal Cable” for information on attaching the SCSI cable to these drives.
Replace the side cover. For detailed instructions, see “Replacing the Side Cover”.
Reattach the power cord.
Turn on the system. For detailed instructions, see “Turning On the System”.
You can check to make sure the system recognizes the drive by selecting Start > Programs > Administrative Tools > Disk Administrator from the Windows NT task bar. See the Help in the Disk Administrator for information on using it. (To see SCSI devices, select Start > Control Panel, double-click SCSI Adapters, then click the + next to PCI SCSI Card.)
If the system does not recognize the drive, shut down and reopen the system. Then:
Make sure the power and ribbon cables are correctly attached to the back of the drive (see “Configuration and Cabling for Internal Ultra33 EIDE Drives” for EIDE drives).
Make sure the jumpers are correctly set.
If you have internal SCSI drives, make sure the drives have unique ID assignments.
Close and reboot the system. If the system still does not recognize the drive, either the drive or a cable may be faulty. Contact your support representative.
To remove an internal hard drive:
Shut down the system and turn off the power. For detailed instructions, see “Shutting Down the System”.
Unplug the power cord from the back of the system.
Remove the side cover. For detailed instructions, see “Removing the Side Cover”.
Detach the cables from the back of the drive (or both drives, if two are installed), as shown in Figure 4-15.
If you have internal SCSI drives installed, see “Disconnecting the SCSI PCI Option Card Internal Cable” for information on disconnecting the SCSI cable from these drives.
Remove the drive bracket from the system, as shown in Figure 4-16.
Caution: Space is tight, so avoid contact with the DIMMs while removing the bracket. Remove the four screws holding the drive to the bracket and pull out the drive, as shown in Figure 4-17.
If you are installing another drive, see “Installing an Internal Hard Drive”.
Install the bracket in the drive slot, as shown in Figure 4-18.
Caution: Space is tight, so avoid contact with the DIMMs while removing the bracket. Position the drive bracket behind the drive slot.
Push the bracket up so the tabs on the top of the bracket align with the openings in the drive slot. Slide the bracket towards the front of the system until it stops.
Insert and tighten the two screws.
Attach the power and ribbon cables to the back of the drive if one is installed, as shown in Figure 4-19.
If you are installing internal SCSI drives, see “Attaching the SCSI PCI Option Card Internal Cable” for information on attaching the SCSI cable to these drives.
Replace the side cover. For detailed instructions, see “Replacing the Side Cover”.
Reattach the power cord.
If you still have a system drive installed, turn on the system. For detailed instructions, see “Turning On the System”.
If the system does not recognize the drive, see “Verifying and Troubleshooting Internal Hard Drive Installation” for troubleshooting information.
If you purchased an optional SCSI PCI card and internal drives, refer to Figure 4-20 to attach the cable to the card and to the internal SCSI drives. See Chapter 5, “Option Cards,” for information on installing or removing a SCSI PCI card. For information on attaching SCSI devices and verifying and troubleshooting their installation, see Appendix C.

If you purchased an optional SCSI PCI card and internal drives, refer to Figure 4-21 to disconnect the cable from the card and internal SCSI drives. See Chapter 5, “Option Cards,” for information on installing or removing a SCSI PCI card.