This chapter provides overview information on how SGI Onyx 3000 series graphics system bricks and other components are cabled together, provides important cabling cautions and warnings, and shows graphics system configuration and cabling examples. This chapter also describes how to cable monitors, keyboard and mouse, and speakers to your graphics system. This information is covered in the following sections:
-

Warning: Before installing, operating, or servicing any part of this product, please read the “Safety Instructions” in Appendix B.
All the bricks (except the D–brick) in the SGI Onyx 3000 graphics system are connected to each other with a NUMAlink cable connected to the appropriate connectors on each brick.
| Warning: All NUMAlink cabling between the SGI Onyx 3000 series graphics system bricks must be performed by an SGI support service engineer (SSE). |
| Note: The D–brick connects to an I–brick or a P–brick through the cabling of the Gigabit Interface Connector (GBIC) port on the D–brick to a PCI card (host bus adapter [HBA] card) connector on an I–brick or a P–brick. |
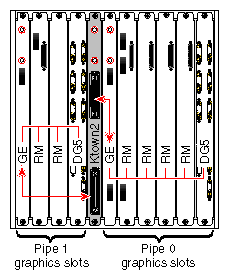
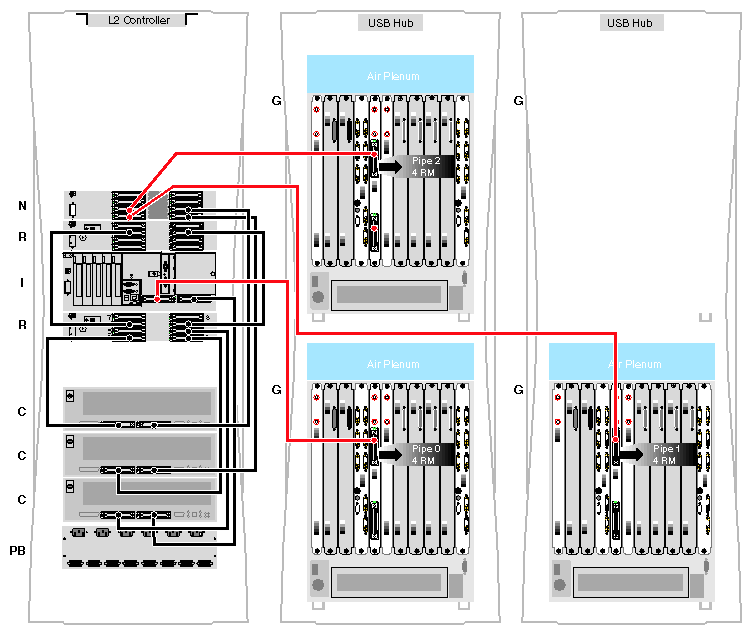
The G–brick must connect to a C–brick through an I/O brick (I–, X–, or N–brick). The two connectors on the Ktown2 board, which sits between the two InfiniteReality graphics pipes (board sets) on the G–brick as shown in Figure 3-1, connect each pipe on the G–brick with the I/O brick.
As you face the G–brick rear panel, the top connector connects the pipe 0 (rightmost graphics board set), and the bottom connector connects the pipe 1 (leftmost graphics board set) to the I/O brick.
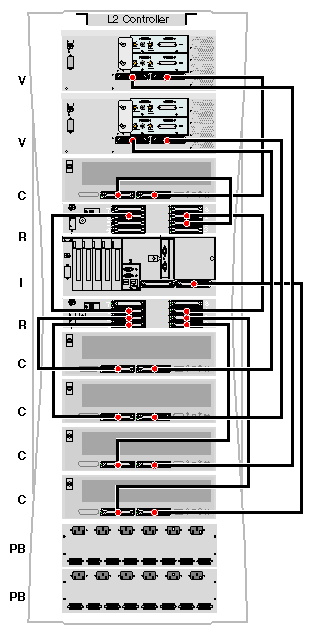
The V–brick connects directly to a C–brick through one of its two connectors. Each V–brick can house as many as two InfinitePerformance graphics pipes. Each InfinitePerformance graphics pipe requires a dedicated C–brick.
Observe the following cautionary guidelines if you need to move the NUMAlink cables:
Avoid bending the cables tighter than a 3-inch (7.62–cm) inside radius.
Avoid stepping on the cables.
Avoid “hot–plugging” in or removing cables while the system is running. This can hang or crash the entire graphics rack system.
Warning: All NUMAlink cabling between the SGI Onyx 3000 series graphics system bricks must be performed only by an SGI support service engineer (SSE).
This section describes examples of single-rack and multirack graphics system configurations. All configurations contain the following major hardware components:
One or more C-brick compute enclosures with either two or four 64-bit processors and as much as 8 GB of main memory.
Power bay(s) for each graphics rack system. Note that racks that house only G-bricks do not use power bays.
L2 controller that connects and controls individual L1 “brick” controllers within the rack system.
G-brick with one or two InfiniteReality graphics pipes (board sets) or a V–brick with one or two InfinitePerformance graphics pipes (V12 graphics boards). (Each graphics system can have either a G–brick or V–brick, but not both.)
I-brick containing a system disk, CD-ROM drive, USB ports, digital audio, serial, and PCI interfaces.
Multirack systems can hold additional C–bricks, I/O, or graphics bricks, and individual hardware components can be added to suit growing graphics, computational, and I/O requirements.
| Note: The N–brick is only an option with an InfiniteReality graphics system that includes a G–brick. The N–brick can be used in place of an X–brick or an extra I–brick to connect as many as four C–bricks with as many as four G–bricks. This is a space saving and cost effective solution when you do not require the additional I/O capability provided with an X–brick or extra I–brick. |
The SGI Onyx 3000 series graphics system racks provide cable management hardware for all interconnect cables.
This section shows three examples of SGI Onyx 3000 series graphics system cabling configurations with G–bricks with InfiniteReality graphics pipes.
Figure 3-2 shows a configuration example of one graphics rack system with one InfiniteReality graphics pipe (with 4 RMs) in one G–brick.
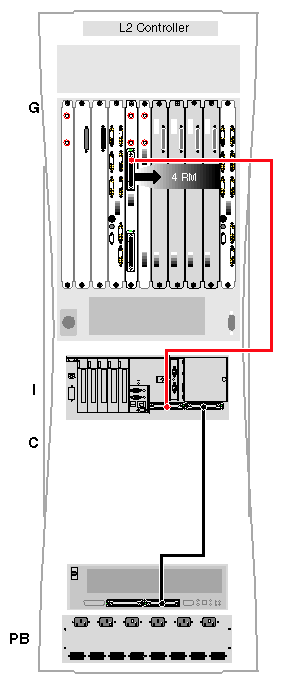
Figure 3-3 shows a configuration example of a graphics system in two racks with three InfiniteReality pipes (one 4–RM pipe in one G–brick, and a 2–RM pipe and a 4–RM pipe in a second G–brick).
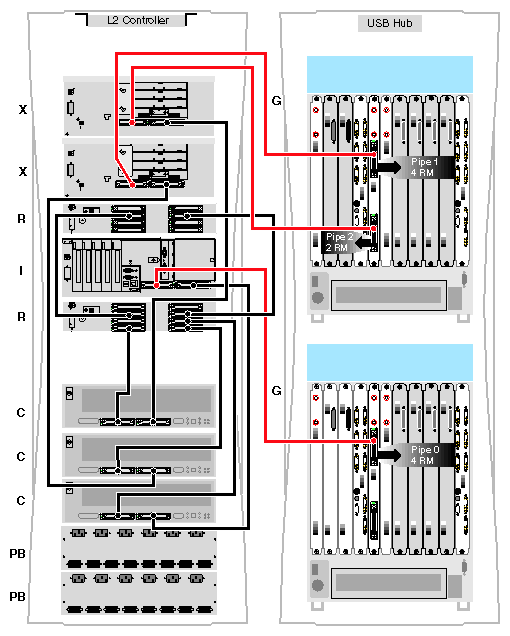
Figure 3-4 shows a configuration example of a graphics system in three racks with three InfiniteReality graphics pipes (with 4 RMs each) in three G–bricks.
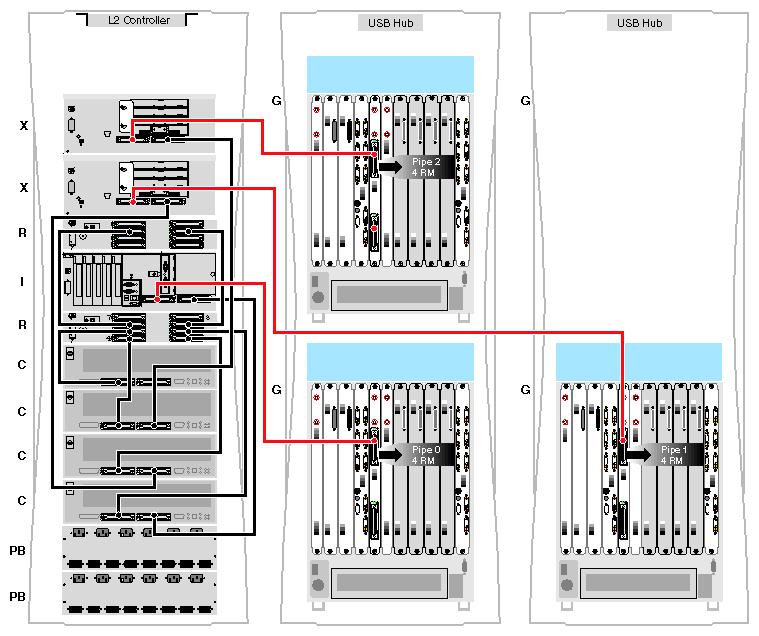
Figure 3-5 shows an example of a graphics system configuration in three racks, with three G–bricks, with a 4–RM InfiniteReality pipe in each G–brick, and one N–brick.
Figure 3-5. Configuration Example: Three Racks with Three G–bricks (with One Pipe Each) and One N–brick
 |
This section shows an example of an SGI Onyx 3000 series graphics system cabling configuration with V–bricks with InfinitePerformance graphics pipes.
Figure 3-6 shows a single-rack cabling example with two V–bricks with two InfinitePerformance pipes each.
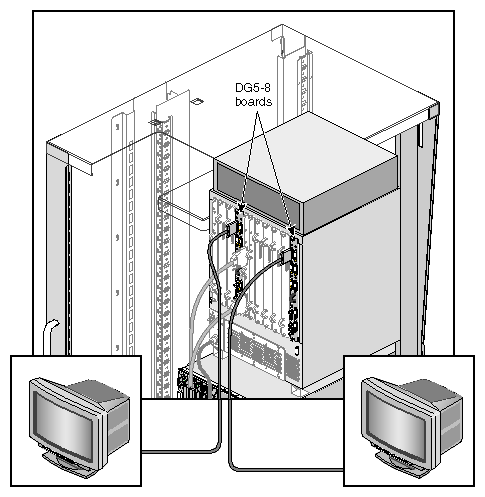
This section describes how to cable various monitors to a DG5 board on a G–brick and how to cable a monitor on a V–brick.
Three cable options are offered for using different types of monitors with the DG5 (see Figure 3-7):
13W3-13W3: For use with the 24-inch Silicon Graphics SuperWide™ monitor and other compatible monitors.
13W3-five BNCs: Separate connectors for R, G, B, horizontal sync, and vertical sync for monitors that require these separate connectors.
13W3-13W3HV: Two separate BNC connectors for horizontal and vertical sync (for example, for synchronizing video out “genlocking”).

Caution: To avoid possible damage to your graphics system, use only the cables specified to connect the monitor to the SGI Onyx 3000 series graphics system rackmount chassis.
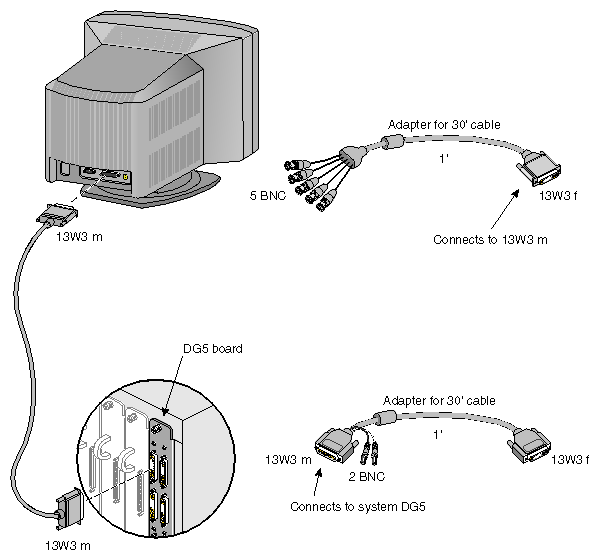
Each cable ordered connects to a 13W3 port on one of the DG5 boards in the G-brick.
Figure 3-8 shows a connection example with two monitors attached to separate DG5 boards in the G-brick.
| Note: The default monitor resolution supported by the 24-inch Silicon Graphics SuperWide monitor is 1920 x 1200 at 66 Hz. The maximum output bandwidth is about 300 Mpix/sec. With two monitors, each at 1920 x 1200 at 66 Hz resolution, the speed is about 188 Mpix/sec. If you connect more than two monitors to a DG5 board, you must use a combination of lower– and higher–resolution monitors that are within the limit of 300 Mpix/sec. |
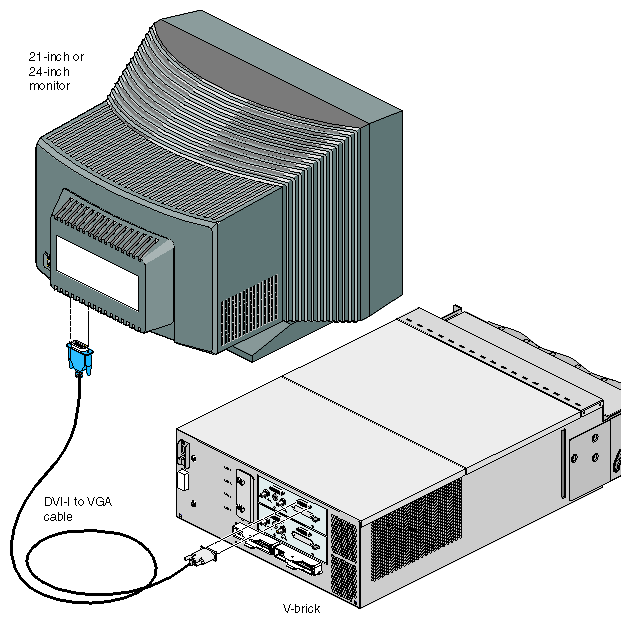
Use the Digital Video Interface–Integrated (DVI–I) to VGA cable to connect one of the two DVI-I (analog and digital) V12 board connectors to a VGA connector on a 24– or 21–inch VGA monitor. (See Figure 3-9.)
| Note: The V12 board 13W3 connector, which is blocked, is not operable. |
Your graphics system is shipped with a standard 101-key USB keyboard and a USB mouse.
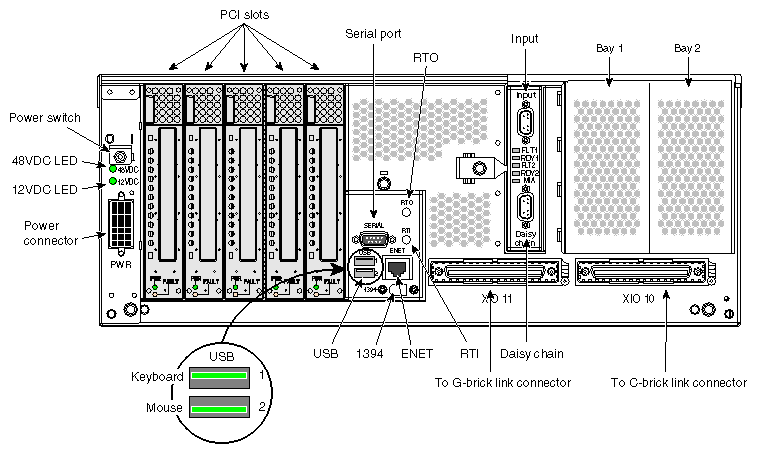
For keyboard and mouse applications directly adjacent to the system, you may plug cables not longer than 10 feet (3m) directly to the primary keyboard and mouse USB ports located on the rear panel of the I-brick. Figure 3-10 shows the location of these USB connectors.
You connect the four-port USB local extender (LEX) and remote extender (REX) using 30 feet (9m) of Category 5 (Cat 5) cable.
You can make additional keyboard and mouse connections using the primary system I-brick USB ports and an additional local/remote extender assembly (LEX and REX). You can also use additional USB ports on the rear panel of an optional I-brick.
The SGI Onyx 3000 series USB hub supports maximum keyboard and mouse cable lengths of as long as 328 feet (100 m) with the help of USB local extender.
The SGI Onyx 3000 series graphics systems use USB to provide keyboard and mouse input.
The flexibility of USB, and the lack of persistent hardware identification, means that the mappings between a keyboard and mouse pair and an X display must be managed with a configuration file. This means that manual configuration is necessary. See the following section, “Keyboard and Mouse Device IDs”, for instructions.
The command ioconfig(1m) is used to establish persistent logical device numbers for each keyboard and mouse in an SGI Onyx 3000 series graphics system. When the system first initializes the USB hardware, it scans each USB bus looking for devices. Initially, these devices are assigned a device ID of -1. Later in the boot process, ioconfig(1m) is run. This assigns device IDs based on the contents of the file /etc/ioconfig.conf.
If the device is already represented in ioconfig.conf, the associated device ID is assigned. If the device is new (not already in ioconfig.conf), a new device ID is allocated and assigned, and a corresponding entry is appended to the ioconfig.conf file.
Each line in the ioconfig.conf file is a two-column entry. The left column is the numeric logical device ID (0 in our example), and the right column is the hardware path pointing to the device. For example:
0 /hw/module/001c13/Ibrick/xtalk/15/pci/5/usb/1/1/keyboard 0 /hw/module/001c13/Ibrick/xtalk/15/pci/5/usb/1/2/mouse |
| Note: The device IDs are unique only among devices of a given type. Different device types may use overlapping device IDs. |
For USB devices, the hardware path is divided into two parts, the USB controller prefix, and the USB relative path. The controller prefix is the portion of the path up to and including the component “usb.” For example:
/hw/module/001c13/Ibrick/xtalk/15/pci/5/usb |
The controller prefix encodes the hardware components leading to the USB controller. In the previous example, the controller path indicates that there is a USB controller at PCI slot 5 on the I-brick connected to C–brick 001c13.
The USB relative path is the portion of the path after the “usb” component. This path indicates the path leading from the controller to the actual device. The path is a series of numeric components terminated with a device type. The numeric components represent USB hub port numbers. You can think of the '/' separator as representing a hub, and the numeric component as a port on that hub.
Multiple numeric components represent multiple layers of USB hubs, with the left-most component representing the root hub, or the hub built into the USB controller.
The following example indicates a keyboard device attached to port 1 of a hub, which is attached to port 1 of the root hub:
.../usb/1/1/keyboard |
The following example shows a mouse attached to port 2 of the same hub:
.../usb/1/2/mouse |
You can use the hinv command to display a device's ID. See the hinv(1) man page for additional information.
The device ID of a keyboard or mouse determines under which /dev/input directory the keyboard or mouse is placed. A keyboard or mouse with device ID 0 will be placed under /dev/input (for historical reasons), while a device with an ID greater than 0 will be placed under /dev/inputX (where X is the numeric device ID).
When the X Windows server starts, the -devdir option controls which directory is searched for input devices. By default, /dev/input is used.
The keyboard and mouse may be connected directly to USB ports 1 and 2 on the back of the I-brick. The use of an extender and a hub is described in the following paragraphs.
The Onyx 3000 USB extender configuration consists of an I-brick, a 4-port USB hub and extender, a keyboard, and a mouse. Before booting, the system should be configured as follows:
I-brick USB port 1
4–port hub
Keyboard on hub port 1
Mouse on hub port 2
During the first boot, the USB driver discovers the keyboard and mouse, and ioconfig assigns them each an ID of 0. They appear to the system as /dev/input/keyboard and /dev/input/mouse, and the X server will use them as its default input devices.
If it becomes necessary to reconfigure the keyboard or mouse layout, manual configuration is necessary. Reasons for reconfiguration may include:
Adding a new keyboard and mouse
Adding hubs
Moving a keyboard and mouse
Follow these steps to reconfigure the keyboard and mouse setup:
Run /usr/gfx/stopgfx to shut down the graphics subsystem.
Add or move devices as necessary.
Run /sbin/ioconfig -f /hw to assign temporary device IDs.
Edit the /etc/ioconfig.conf file.
Re–run /sbin/ioconfig -f /hw if you made changes in step 4.
Restart the graphics subsystem using the command /usr/gfx/startgfx.
Steps 4 and 5 are the keys to binding the devices in your new configuration to the correct IDs. Because a keyboard and mouse with the same ID are put in the same /dev/inputX directory, you must make sure that the keyboard and mouse pair used by a given X server has the same ID.
Because ioconfig does not know what device IDs to assign automatically for new devices, step 3 may not assign the correct IDs. You can change the device IDs manually by editing /etc/ioconfig.conf and then re–running ioconfig.
The /dev/input/keyboard and /dev/input/mouse entries are always created, even if a keyboard and/or mouse with device ID 0 are not present. This allows the default X server to run without a keyboard or mouse physically attached for manufacturing checkout purposes.
| Note: If you boot the system in this mode and plug in a keyboard or mouse after the system is running, you must restart the graphics subsystem to use the devices. To perform the process of adding a keyboard and mouse, see “Reconfiguration”. |
The graphics rack system is shipped with a standard Ethernet connector located on the rear of the I-brick. You can order optional PCI or XIO boards for additional Ethernet connections.
This section describes how to connect audio speakers to your SGI Onyx 3000 series graphics system. The speakers connect to a PCI board installed in the I–brick. This section describes the PCI board to which the audio speakers connect and then describes how to connect the audio speakers to this board.
The SGI Onyx 3000 series products use a PCI board (installed in the I-brick) for system audio output. This section lists the audio features available as well as the connector pinouts. See Figure 3-11.
| Warning: Do not use first– or second–generation audio boards (P/N 030-0950-00x) with SGI Onyx 3000 or SGI Origin 3000 series systems. System damage or fire will result. |
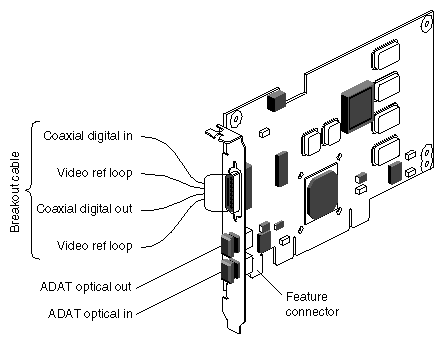
Table 3-1 lists the features and specifications of the PCI audio board.
Table 3-1. PCI Audio Board Specifications
Feature | Specification |
|---|---|
Synchronization | Locks to professional video (via video sync) and audio equipment with professional jitter attenuation. Accepts video reference input, and generates AES11 grade 2 (10 ppm) clocks. |
Input sample rates | Continuous between 32 kHz and 48 kHz. |
Output sample rates | 32 kHz, 44.1 kHz, and 48 kHz. |
Jitter attenuation | For 44.1 k-Hz or 48-kHz sample rates. |
Video reference loop–through | 75-ohm BNC connectors, breakout cable. |
Coaxial digital audio input | AES-3id 75-ohm BNC connector, breakout cable. AES11 synchronization input (for audio clock rates). AES3 professional 2-channel 24-bit digital. Compatible with IEC958, S/PDIF consumer 2-channel digital. |
Feature | Specification |
Coaxial digital audio outputs | AES-3id 75-ohm BNC connector, breakout cable. AES11 synchronization output. AES3 professional 2-channel 24-bit digital. Compatible with IEC958, S/PDIF consumer 2-channel digital. |
Optical digital input | 12.8-Mbps SHARP multimode plastic fiber optic connector, PCI I/O panel. 8-channel, 24-bit ADAT optical interface. Compatible with IEC958, S/PDIF consumer 2-channel digital. |
Optical digital output | 12.8 Mbps SHARP multimode plastic fiber optic connector, PCI I/O panel. 8-channel, 24-bit ADAT optical. Compatible with IEC958, S/PDIF consumer 2-channel digital. |
| Note: IEC958 standards are now covered by IEC60958. |
Table 3-2 shows the pinouts for the DB15 connector for video synchronization and AES-3id digital audio through the breakout cable.
Table 3-2. DB15 Connector Pinout Assignments
Pin | Assignment |
|---|---|
1 | COAXIAL DIGITAL_IN GND |
2 | COAXIAL DIGITAL_IN |
3 | VID_REF |
4 | VID_REF GND |
5 | VID_REF |
6 | VID_REF GND |
7 | NOT CONNECTED |
8 | CHASSIS GND |
9 | COAXIAL DIGITAL_OUT |
10 | NOT CONNECTED |
11 | COAXIAL DIGITAL_OUT GND |
12 | NOT CONNECTED |
13 | CHASSIS GND |
14 | CHASSIS GND |
15 | NOT CONNECTED |
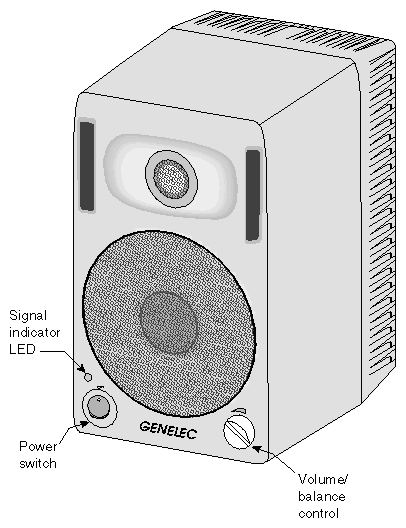
Each graphics system uses a pair of digital audio speakers. These speakers connect to the system PCI-based digital audio output port. The speakers, like the one shown in Figure 3-12, have the following features:
96-kHz/24-bit digital audio interface.
AES/EBU digital audio and analog audio inputs.
Single-knob stereo pair volume and balance control.
Warning: Each of the speakers weighs 12.5 pounds (5.7 kg). Speakers placed off the ground should be secured or enclosed to prevent them from falling and causing injury to personnel or damage to equipment.
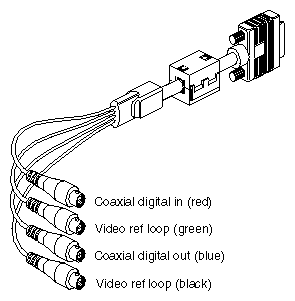
The speakers connect to the PCI system audio card using an audio breakout cable (see Figure 3-13) and a BNC cable combination connection. To connect the speakers, follow these steps:
Locate the PCI audio card in the I-brick at the back of your system rack, and connect the audio breakout cable to the DB15 connector. Note that the breakout cable has four BNC connections (you will use only the blue one).
Connect one end of the BNC audio cable to the AES-3id digital audio connection on the breakout cable (the blue BNC connector).
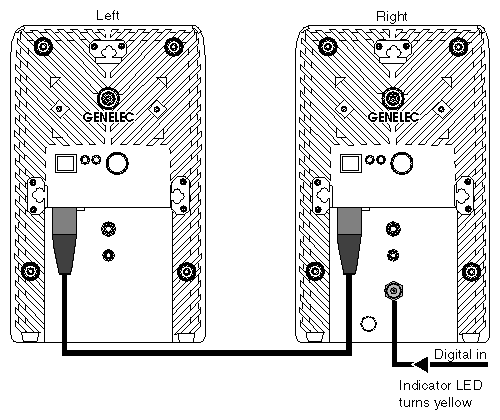
Connect the other end of the BNC audio cable to the back of the right speaker. (See Figure 3-14.)
Connect the left and right speakers together with the cable provided.
Note the following operating information prior to using your speakers:
The “commercial” version of the speakers are labeled Model 2029B. The SGI version is the Model 2029B-Y, which differs in the following ways:
The digital input on the right (master) speaker is equipped with a BNC input connector (the commercial version has an XLR connector).
Each speaker in a pair is labeled as either 2029BL-Y (left) or 2029BR-Y (right).
Each speaker is equipped with its own power cord.
The speakers are dual-voltage (switchable between 110 V and 220 V operation).
Each speaker has its voltage switch set to 220 V operation as a default. If you are in North America or other locations using 110 V sources, you need to manually switch to 110 V.
Caution: If the voltage select switch is set to 110 V and the speaker is plugged into 220 V, the speaker fuse will blow. If the switch is set to 220 V and the speaker is plugged into 110 V, the speaker will not function properly, and the speaker fuse may blow.
The speaker's status LED indicates the following:
Green indicates the presence of an analog input signal (not used in SGI Onyx 3000 series graphics system configurations).
Yellow indicates the presence of a valid digital input signal.
Red indicates a problem is detected with the digital input signal.
Figure 3-15 shows the location of the controls and connectors on the back of the right speaker.
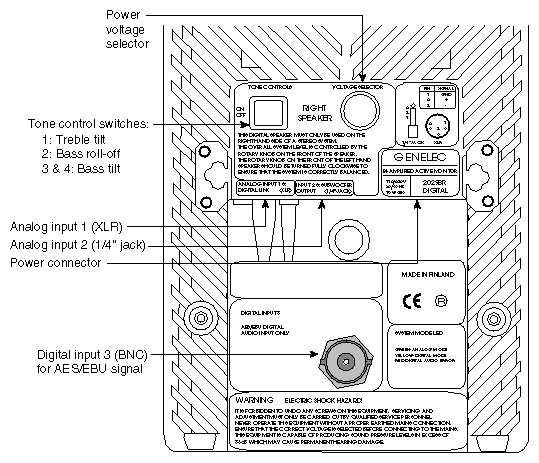
Figure 3-16 shows the connector used on the speaker-to-speaker interconnect cable.