This chapter describes the function and physical components of the 2U-high SGI memory and expansion (MPX) module, which can add local memory (DIMMs) and four PCI/PCI–X card slots to your system. Specifically, this chapter includes the following information:
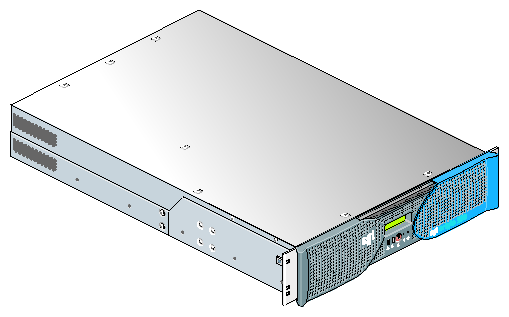
Figure 4-1 shows a front panel and side view of the MPX module.
The MPX module includes the following features:
The L1 controller manages and monitors the functions of the MPX module, such as system temperature. The system includes an L1 controller display system that processes error messages.
The module can have one or two power supplies. The second power supply is redundant to assure that your server will always have power.
The L1 port (type B, USB [Universal Serial Bus]) connector connects the module to an L2 controller.
The NUMAlink port connects to a compute module.
The Crosstown2 XIO port enables the server to connect to an InfiniteReality graphics pipeline.
The console port is an RS-232 DB-9 serial connector used to connect a system console, which is used monitor and manage your system.
Four 64-bit PCI and PCI–X card slots on two busses can contain 33-MHz and 66-MHz PCI cards, and 66-MHz and 100-MHz PCI–X cards.
The MPX module architecture includes the components discussed in the following subsections
The IP53 node board consists of the following components:
Eight dual-inline memory module (DIMM) slots allow installation of DIMMs to provide 1 to 8 GB of main memory to local memory bank pairs on your server system. For more information, see the subsection that follows.
The Bedrock ASIC (or hub ASIC) enables communication between memory and I/O devices. For more information, see “Bedrock ASIC”.
The serial ID EEPROM contains component information.
Three VRMs convert incoming voltages to voltages required by components.
Each MPX module has from 1 to 8 GB of local memory, which includes main memory and directory memory for cache coherence.
Local memory is provided by DIMMs, which contain double data rate synchronous dynamic random-access memory (DDR SDRAM chips), installed in two or more DIMM slots located on the MPX module.
These eight DIMM slots are laid out into one group of even–numbered slots 0, 2, 4, and 6, and a second group of odd-numbered slots 1, 3, 5, and 7, as shown in Figure 4-2.
DIMMs are installed one per DIMM slot, and two at a time, so that the two DIMMs provide local memory for the same pair of banks (see Table 4-1). Conversely, DIMMs are also removed two at a time, so that removing the two DIMMs removes local memory for the same pair of banks.
For example, if you install a DIMM in slot 0, you must also install a DIMM in slot 1 to provide local memory for bank pair 0 and 1. And conversely, if you remove a DIMM from slot 0, you must also remove a DIMM from slot 1 in order to remove local memory from bank pair 0 and 1.
| Note: The two DIMMs that compose a bank pair must be the same size; however, the bank pairs can differ in memory size. |
Table 4-1 lists the DIMM slots and the corresponding bank pairs to which local memory is provided.
Table 4-1. DIMM Slots and Corresponding Bank Pairs
DIMM in Slot Number | Provides Local Memory for Bank Pair Numbers |
|---|---|
0[a] | 0 and 1 |
1 | 0 and 1 |
2 | 2 and 3 |
3 | 2 and 3 |
4 | 4 and 5 |
5 | 4 and 5 |
6 | 6 and 7 |
7 | 6 and 7 |
[a] The first two DIMMs must be installed in DIMM slot 0 and DIMM slot 1. | |
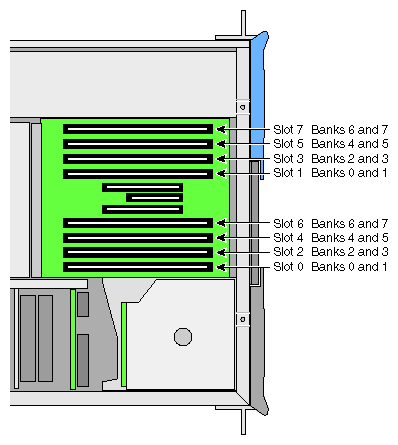
Table 4-2 lists the DIMM sizes that the IP53 node boards support.
Table 4-2. Memory DIMM Specifications
DIMM Capacity | Chip Capacity | Total Memory Capacity |
|---|---|---|
512 MB | 128 MB | 2 DIMMs (1 bank pair): 1 GB 8 DIMMs (4 bank pairs): 4 GB |
1 GB | 256 MB | 2 DIMMs (1 bank pair): 2 GB 8 DIMMs (4 bank pairs): 8 GB |
The Bedrock ASIC enables communication among the memory, network, and I/O devices. It controls all activity within the node board; for example, error correction and cache coherency. The Bedrock ASIC also supports page migration.
The Bedrock ASIC consists of the following:]
A central crossbar (XB) provides connectivity between the Bedrock ASIC interfaces.
A memory/directory interface (MD) controls all memory access.
A network interface (NI) is the interface between the crossbar unit and the NUMAlink 3 interconnect.
An I/O interface (II) allows I/O devices to read and write memory (direct memory access [DMA] operations).
The interface board contains the following components:
L1 controller logic.
Power supply interface.
NUMAlink connector.
XIO connector.
Switching regulators.
Connectors to the IP53 node board and the PCI riser card.
The PCI riser card provides the following:
PIC ASIC.
Connectors that connect the PCI riser card to the interface board.
Four PCI/PCI–X card slots (64 bit, 3.3 V) and a slot for a VPro V12 graphics board. (The slot for the VPro V12 graphics board is located on the backside of the PCI riser card.)
The MPX module can contain one or two power supplies; the second power supply is optional and is required only when you want redundant power. The power supply can input 110/220 VAC and output 500 W (12 VDC, 5 VDC, and -12 VDC).
Both power supplies are hot–swappable. They are located at the front right side of the module. The primary power supply is the left supply and the redundant power supply is the right supply.
This section describes the external components of the MPX module, which are located in the front and rear panels.
This section describes the front panel controls and indicators of the MPX module, as shown in Figure 4-3.
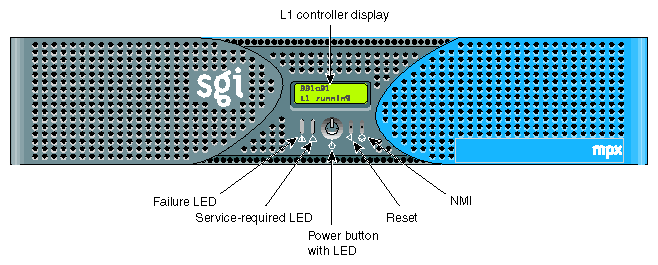
The front panel of the MPX module has the following items:
L1 controller display. A liquid crystal display (LCD) displays status and error messages that the L1 controller generates.

Note: See the SGI L1 and L2 Controller Software User's Guide (007-3938-00x) for more information on the L1 controller. Power button with LED. Press this button to power on the internal components. Alternatively, you can power on the internal components at a system console. The LED illuminates green when the internal components are on.
Reset button. Press this button to reset the internal processors and ASICs. The reset will cause a memory loss. (To perform a reset without losing memory, see the NMI button information that follows.)
NMI button. Press the NMI (non-maskable interrupt) button to reset the internal processors and ASICs without losing memory. Register data and memory are stored in a /var/adm/crash file.
Service-required LED. This LED illuminates yellow to indicate that an item has failed or is not operating properly, but the MPX module is still operating.
Failure LED. This LED illuminates red to indicate that a failure has occurred and that the MPX module is down.
This section describes the rear panel connectors, PCI/PCI–X slots, and LEDs of the MPX module, as shown in Figure 4-4.
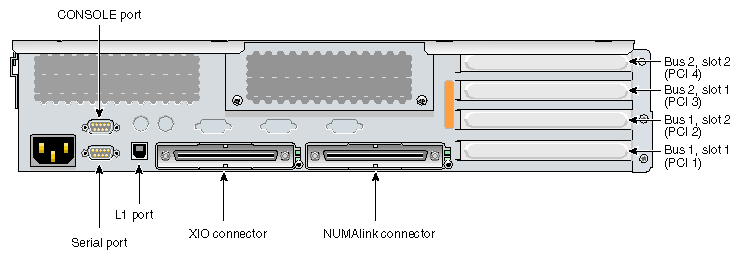
The rear panel of the MPX module has the following items:
Power connector. This connector connects the MPX module to an AC power outlet.
Console port. This DB–9 serial port (console and diagnostic port) enables you to connect a system console to the L1 controller on the MPX module.
Serial port. This DB-9 RS-232/RS-422 serial port, which connects a serial device such as a printer or modem to the module, is not operable.
L1 port (USB type B). This Universal Serial Bus (USB) type B connector connects the MPX module's L1 controller to an L2 controller.
XIO connector. This Crosstown2 connector connects the MPX module to an InfiniteReality graphics pipeline. This connection is made with a NUMAlink 3 cable at 800 MB/s in each direction.
XIO connector LEDs. The XIO connector has two LEDs. These LEDs are located to the right of the XIO connector. One LED lights yellow to indicate that both the MPX module and the InfiniteReality graphics pipeline to which the MPX module is connected are powered on. The other LED lights green when the MPX module link to the graphics pipeline is established.
NUMAlink connector. This NUMAlink 3 connector connects the MPX module to one of the following modules: base compute module, expansion compute module, NUMAlink module, or PCI expansion module. This connection is made with a NUMAlink 3 cable at 1.6 GB/s in each direction.
NUMAlink 3 LED. The NUMAlink 3 connector has two LEDs. These LEDs are located to the right of the NUMAlink 3 connector. One LED lights yellow to indicate that the MPX module and the module to which it is connected are powered on. The other LED lights green when the link between the MPX module and the module to which it is connected is established.
PCI/PCI–X slots (bus 1, slot 1; bus 1, slot 2; bus 2, slot 1; bus 2, slot 2). These slots are labeled from bottom to top PCI 1, PCI 2, PCI 3, and PCI 4. Two of these slots are on one bus, and two slots are on another. These 64-bit slots can contain 33-MHz and 66-MHz PCI cards, or 66-MHz and 100-MHz PCI–X cards. (For an updated list of supported cards, see SGI Supportfolio at http://support.sgi.com.)
Note: If you run PCI and PCI–X cards on the same bus at the same time, the PCI–X card will run on PCI mode. And if you run cards of different speeds on the same bus, the highest speed card will run at the speed of the slower card. For example, if a card is running at 100 MHz in one slot of a bus, and a card is running at 33 MHz in the second slot of the same bus, both cards will run at 33 MHz.
This section lists the internal MPX module configuration options such as the number of DIMMs that can be installed in the MPX module to increase its local memory.
This section also lists external MPX module configuration options that can enhance the performance of the Origin 350 server system. For example, the a server system configuration can include an MPX module together with a base compute module, a 2U SGI TP900 storage system to expand storage, and a PCI expansion module to increase I/O capabilities.
PCI and PCI–X cards and memory (DIMMs) are the configurable internal components of the MPX module.
As a customer, you can configure PCI and PCI-X cards and memory. See Chapter 4, “Installing and Removing Customer-replaceable Units,” for information about installing and removing these items to reconfigure your MPX module.
| Warning: To prevent personal injury or damage to your system, only trained SGI system support engineers (SSEs) can service or configure internal components of the MPX module that are not specifically listed as serviceable and configurable by customers. |
The MPX module can be configured together with the following items to expand the function of your server system:
Every system must include a base compute module. The base compute module can have 2 or 4 processors, up to 8 GB of local memory, an optional DVD-ROM, one or two SCSI disk drives, and two PCI/PCI-X and one PCI slots. The fourth slot includes an IO9 card that adds various connectors to your system, including a serial daughtercard.
The system expansion compute module, which is interconnected to the base compute module via a NUMAlink 3 cable, adds processors, memory, and four PCI/PCI-X card slots. It may or may not include an IO9 card, but it does not have a serial daughtercard.
The 4U PCI expansion module adds PCI slots, but no processors, no memory, and no IO9 card. There are two versions of the PCI expansion module: one module has 12 PCI slots that support 3.3-V or universal PCI cards and the other module has 6 PCI slots that support 5-V or universal PCI card and 6 slots that support 3.3-V or universal PCI cards. For more information about this module, see the PCI Expansion Module User's Guide (5.0-V Support and/or 3.3-V Support) (007-4499-00x).
The TP900 storage module provides additional storage to the system. See SGI Total Performance 900 Storage System User's Guide (007-4428-00x), for information about this module. The Origin 350 server system supports other storage modules. For information, see “Storage Expansion” in Chapter 2.
The NUMAlink module connects two or more modules. See Chapter 5, “NUMAlink Module” for information about this module.
The Origin 350 server system can be configured with an MPX module in many different ways to satisfy your computing needs. This section shows two sample configurations.
Figure 4-5 shows an Origin 350 server system on a table top that includes the following items:
An MPX module adds 8 GB of local memory and four PCI/PCI–X card slots to your system.
A 2U base compute module has 4 processors, 8 GB of local memory, and two PCI/PCI–X and one PCI card slots. (Because the fourth lowermost slot comes with a factory-installed IO9 PCI 66 MHz card, the slot right above it, which is on the same bus as the slot in which the IO9 PCI card is installed, can only accommodate a PCI card that runs at a speed of 66 MHz or slower.)
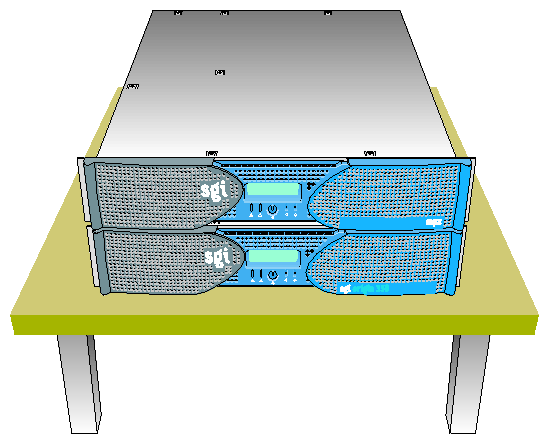
Figure 4-6 shows an Origin 350 server system rackmounted in a 17U rack that includes the following items (from top to bottom in the rack):
A 4U PCI expansion module adds 12 PCI card slots to the server system.
An MPX module adds 8 GB of local memory and four PCI/PCI–X card slots.
A NUMAlink module (router) interconnects all the modules together into one server system.
A 2U system expansion compute module adds 4 processors, 8 GB of local memory, and four PCI/PCI–X card slots.
A 2U base compute module adds 4 processors, 8 GB of local memory, and two PCI/PCI–X and one PCI card slots. (Because the fourth lowermost slot comes with a factory-installed IO9 PCI 66 MHz card, the slot right above it, which is on the same bus as the slot in which the IO9 PCI card is installed, can only accommodate a PCI card that runs at a speed of 66 MHz or slower.)
A power bay.
Figure 4-6. System with PCI Expansion Module, MPX Module, NUMAlink Module, System Expansion Compute Module, and a Base Compute Module

Table 4-3 lists the bandwidth characteristics of the MPX module.
Table 4-3. Bandwidth Characteristics of the MPX Module
Characteristic | Peak Bandwidth | Sustainable Bandwidth |
|---|---|---|
NUMAlink channel | 3.2 GB/s full duplex 1.6 GB/s each direction | ~1420 MB/s each direction |
Xtown2 channel | 2.4 GB/s full duplex 1.2 GB/s each direction | ~1066 MB/s half duplex ~1744 MB/s full duplex, ~872 MB/s each direction |
Main memory | 3200 MB/s | 2140 MB/s |
SYSAD | 1600 MB/s | ~1400 MB/s |
Table 4-4 lists the specifications for the MPX module.
Table 4-4. MPX Module Specifications
Characteristic | Specification |
|---|---|
Height | 3.44 in. (8.74 cm) |
Width | 17.06 in. (43.33 cm) |
Depth | 27 in. (68.58 cm) (with bezel) |
Weight | 37.80 lb (17.18 kg) minimum configuration; 44.50 lb (20.23 kg) maximum configuration[a] |
Input power | 120 - 240 VAC |
[a] Weight will vary depending on whether your system has one or two power supplies and on the amount of DIMMs installed. | |