This chapter explains how to access and use the basic hardware interfaces and operating controls on your new system. Details on properly powering the system on or off are provided near the end of the chapter.
Your Onyx 350 system comes with SGI professional installation services. Optional setup of keyboards, mice, speakers, and monitors is provided in case you need to reconfigure or add to your installation. Always start by reading the precautions in the next section.
See the following sections to reconfigure or add to your system installation:
See the following sections to properly power your system on and off and to monitor your system:
Before using your system, familiarize yourself with the safety information in this section. For additional safety and regulatory information, see Appendix B, “Safety Information and Regulatory Specifications”.
Observe electrostatic discharge (ESD) precautions during the entire installation process to eliminate possible ESD damage to the equipment.
Wear an SGI-approved wrist strap when you handle any ESD-sensitive device to eliminate possible ESD damage to equipment. Connect the wrist strap cord directly to earth ground.
| Warning: Before installing, operating, or servicing any part of this product, read the safety information in Appendix B. |
Observe the following safety measures when working with your system.
Do not move the system while it is connected to power.

Warning: Keep fingers and conductive tools away from high-voltage areas. Failure to follow these precautions will result in serious injury or death. The high-voltage areas of the system are indicated with high-voltage warning labels. Ensure that a qualified electrician has properly installed the power receptacles.
Power off the system only after the system software has been shut down in an orderly manner.
Set all circuit breakers to the OFF (0) position before you unplug or plug in the system power cord(s).

Caution: If you power off the system before you halt the operating system, data may be corrupted or lost.
Your Onyx 350 graphics system comes with a choice of monitor types and sizes. Depending on your application and system requirements, you may have one or more of the following:
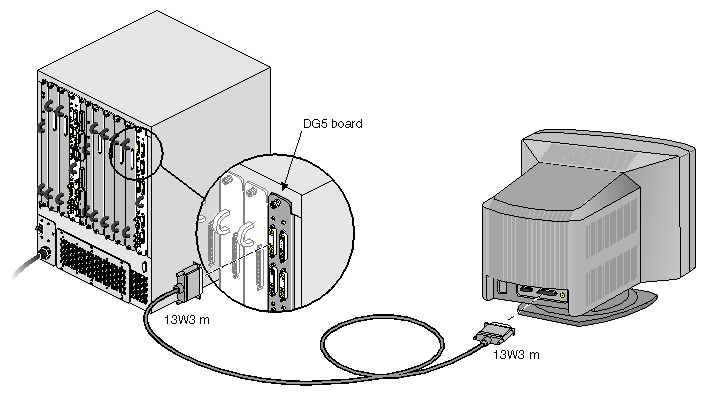
InfiniteReality graphics system monitors connect to the DG5 board located in the IR graphics module via a 30-ft. (9.1-m) 13W3 monitor cable.
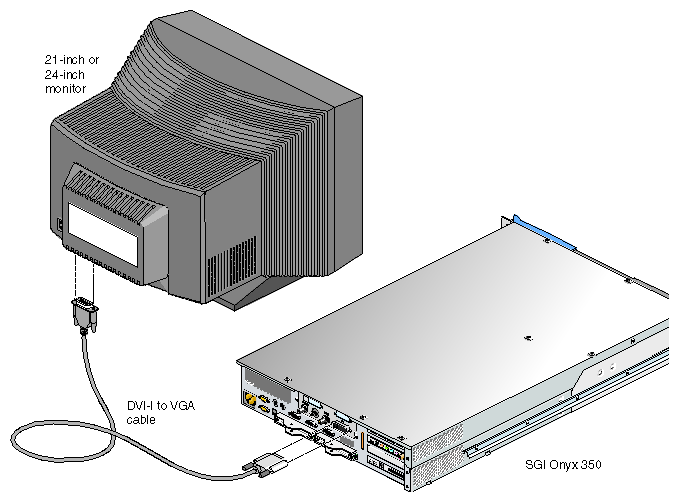
InfinitePerformance graphics systems use the DVI monitor connector on the rear of the graphics/compute module. It can connect using either of the following:
Digital (LCD) display DVI-D connection cable
Analog DVI-A cable to a CRT or LCD display
Caution: Ensure that the electrical rating on the monitor label matches the outlet voltage range (100–120 VAC or 220–240 VAC) before you plug in the monitor.
When you use a monitor in locations that do not have the appropriate outlets, contact your SGI system support engineer (SSE) before plugging in the monitor power cable.
Plug in and turn on your monitor as described in the documentation that accompanies your monitor.
| Note: If you are using a monitor that was not shipped with your Onyx 350 graphics system and it has adjustable RGB connectors, ensure that they are in the 75-ohm position; otherwise, the monitor displays incorrect colors. |
The default monitor resolution supported by the Onyx 350 graphics system SuperWide monitor is 1920 x 1200 at 66 Hz. The maximum output bandwidth is approximately 300 Mpix/s. With two monitors, the transfer rate of each monitor at a resolution of 1920 x 1200 at 66 Hz is approximately 188 Mpix/s. If you connect more than two monitors, you must use a combination of low– and high-resolution monitors that are within the limit of 300 Mpix/s.
To change the default video format for your monitor, use the setmon command. For more information about the setmon command options, see the setmon(1G) man page.
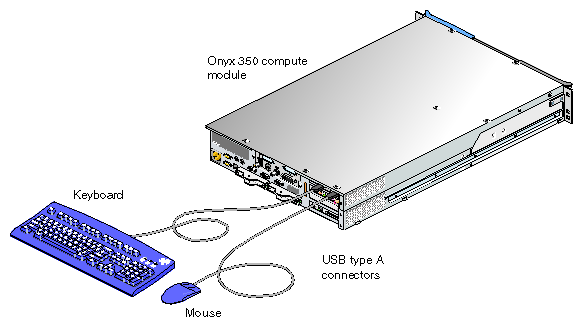
To use your monitor, your graphics system is shipped with a standard 101-key USB keyboard and a USB mouse. You can plug the keyboard and mouse directly into the USB connectors of an Onyx 350 compute module (see Figure 2-3), or you can use a USB extender that allows you to place the keyboard and mouse up to 328.68 feet (100 m) from the Onyx 350 compute module (see Figure 2-4). The subsections that follow discuss these additional keyboard and mouse topics:
“Reconfiguring the Keyboard and Mouse Manually”

Note: You can have one keyboard and one mouse per standard graphics pipe (up to a maximum of eight per system). The optional local extender (LEX) receives AC power from the power distribution unit (PDU) in the rack. A 6-ft. (1.82-m) adapter cable connects the extender's power adapter to the PDU. The remote extender (REX) does not use an external power source.

The ioconfig(1m) command establishes logical device numbers for each keyboard and mouse in an Onyx 350 system. When the system first initializes the USB hardware, it scans each USB bus looking for devices. Initially, these devices are assigned a device ID of -1. Later in the boot process, the ioconfig(1m) command assigns device IDs based on the contents of the file /etc/ioconfig.conf.
If the device is already represented in ioconfig.conf, the associated device ID is assigned. If the device is new (not already in ioconfig.conf), a new device ID is allocated and assigned, and a corresponding entry is appended to the ioconfig.conf file.
Each line in the ioconfig.conf file is a two-column entry. The left column is the numeric logical device ID (0 in our example), and the right column is the hardware path pointing to the device. Note the following example:
0 /hw/module/001c01/IXbrick/xtalk/15/pci-x/usb/0/1/keyboard 0 /hw/module/001c01/IXbrick/xtalk/15/pci-x/usb/0/2/mouse |
The device IDs are unique only among devices of a given type. Different device types may use overlapping device IDs.
For USB devices, the hardware path is divided into two parts: the USB controller prefix, and the USB relative path. The controller prefix is the portion of the path up to and including the component “usb.” Note the following example:
/hw/module/001c13/IXbrick/xtalk/15/pci-x/4/usb |
The controller prefix encodes the hardware components leading to the USB controller. In the previous example, the controller path indicates that there is a USB controller at PCI slot 4 of the compute module located at 001c13.
The USB relative path is the portion of the path after the “usb” component. This path indicates the path leading from the controller to the actual device. The path is a series of numeric components terminated with a device type. The numeric components represent USB hub port numbers. You can think of the '/' separator as representing a hub and the numeric component as a port on that hub.
Multiple numeric components represent multiple layers of USB hubs, with the leftmost component representing the root hub, or the hub built into the USB controller.
The following example indicates a keyboard device attached to port 1 of a hub, which is attached to port 1 of the root hub:
.../usb/1/1/keyboard |
The following example shows a mouse attached to port 2 of the same hub:
.../usb/1/2/mouse |
You can use the hinv command to display the ID of a device. See the hinv(1) man page for additional information. Note that the hinv command only confirms the presence of the devices.
The device ID of a keyboard or mouse determines under which /dev/input directory the keyboard or mouse is placed. A keyboard or mouse with device ID 0 will be placed under /dev/input (for historical reasons), while a device with an ID greater than 0 will be placed under /dev/inputX (where X is the numeric device ID).
When the X Window System server starts, the -devdir option controls which directory is searched for input devices. By default, /dev/input is used.
Onyx 350 base modules come standard with four USB ports and two PS/2 ports. The default connection for keyboard and mouse is USB. This way, multi-pipe systems will allow up to eight simultaneous, independent users to be connected to the system (may require optional USB hubs). For backwards compatibility with existing infrastructures, it is also possible to use PS/2 as the primary keyboard/mouse connection instead. In this case the following setup changes need to be considered.
The keyboard/mouse entries in /etc/ioconfig.conf are added automatically during hardware discovery at boot time. By default, the USB entries will get automatically added first, followed by the PS/2 entries. At subsequent reboots, the existing entries in /etc/ioconfig.conf will not be changed, but additional entries will be added using the next higher logical device numbers. For example, these entries might appear after booting a system with a USB keyboard/mouse pair connected to the same module (001c01) as the PS/2 keyboard/mouse pair:
0 /hw/module/001c01/IXbrick/xtalk/15/pci-x/0/1/keyboard 0 /hw/module/001c01/IXbrick/xtalk/15/pci-x/0/1/mouse 1 /hw/module/001c01/IXbrick/xtalk/15/pci-x/0/1/pckb 1 /hw/module/001c01/IXbrick/xtalk/15/pci-x/0/1/pcms |
For Onyx 350, the USB connections take precedence over the PS/2 connections regardless of the brick order.
If the opposite order is desired, you may edit the /etc/ioconfig.conf to contain the following:
0 /hw/module/001c01/IXbrick/xtalk/15/pci-x/0/1/pckb 0 /hw/module/001c01/IXbrick/xtalk/15/pci-x/0/1/pcms 1 /hw/module/001c01/IXbrick/xtalk/15/pci-x/0/1/keyboard 1 /hw/module/001c01/IXbrick/xtalk/15/pci-x/0/1/mouse |
The numbers on the left in this file determine the ordering of the connections. After you edit the file, new numbers will take effect at the next reboot, or at the next usage of the ioconfig -f /hw command.
If it becomes necessary to reconfigure the keyboard or mouse layout, manual configuration is necessary. Reasons for reconfiguration may include the following:
Adding a new keyboard and mouse
Adding hubs
Moving a keyboard and mouse
To reconfigure the keyboard and mouse setup, follow these steps:
Run /usr/gfx/stopgfx to shut down the graphics subsystem.
Add or move devices as necessary.
Run /sbin/ioconfig -f /hw to assign temporary device IDs.
Edit the /etc/ioconfig.conf file.
Re–run /sbin/ioconfig -f /hw if you made changes in step 4.
Restart the graphics subsystem using the command /usr/gfx/startgfx.
Steps 4 and 5 allow you to bind the devices in your new configuration to the correct IDs. Because a keyboard and mouse with the same ID are put in the same /dev/inputX directory, you must ensure that the keyboard and mouse pair used by a given X server has the same ID.
Because ioconfig does not know what device IDs to assign automatically for new devices, step 3 may not assign the correct IDs. You can change the device IDs manually by editing /etc/ioconfig.conf and then re–running ioconfig. The /dev/input/keyboard and /dev/input/mouse entries are always created, even if a keyboard and/or mouse with device ID 0 are not present. This allows the default X server to run without a keyboard or mouse physically attached for manufacturing checkout purposes.
Running the ioconfig.conf command or rebooting the system causes new keyboards and mice to be added to the ioconfig.conffiles using the next higher device IDs. Steps 4 and 5 are only needed if you change the device IDs.
To move keyboards or mice to different ports, follow steps 4 and 5. Otherwise the old location information remains (within the ioconfig.conf file)even after the new positions are added.
| Note: If you boot the system in this mode and plug in a keyboard or mouse after the system is running, you must restart the graphics system (repeat steps 1, 3, and 6 from the previous sequence) to use the devices. |
If the ioconfig.conf file needs to be re-created using all the default device IDs, rename or remove the ioconfig.conf file and reboot the system. At system startup all operational devices plugged into the system are put into a new ioconfig.conf file.
Your Onyx 350 is available with different optional audio interfaces and speaker sets. If your system speakers were set up by SGI professional services, the optional audio speakers should be ready to use. If you need to alter the Onyx 350 audio/speaker setup, follow the information in the document that comes with your speakers to properly site, install, and operate them.
The following sections describe how to power on and power off individual modules or your entire Onyx 350 system as follows:
-
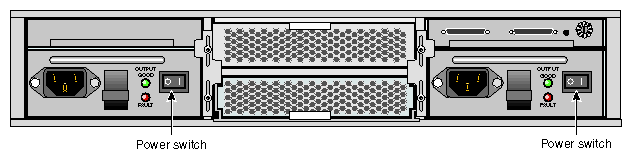
Note: The following information applies to the InfiniteReality graphics modules, Onyx 350 compute modules, the NUMAlink module, and PCI expansion modules. You must manually power on a TP900 storage module by placing the power switch(es) in the | position. See Figure 2-5.
To reconnect your system power if it has been unplugged, follow these steps:
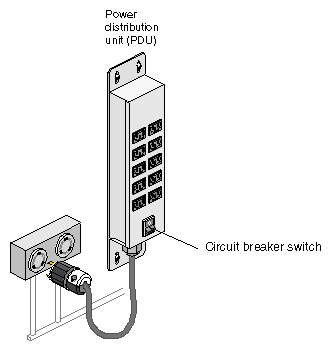
Ensure that the circuit breaker on the power distribution unit is in the OFF (O) position.
Connect the power cord to a grounded power outlet. Plugging in the power cord grounds the rack.
To prepare to power on the system, follow these steps:
Confirm that the power cables between the following components are secure:
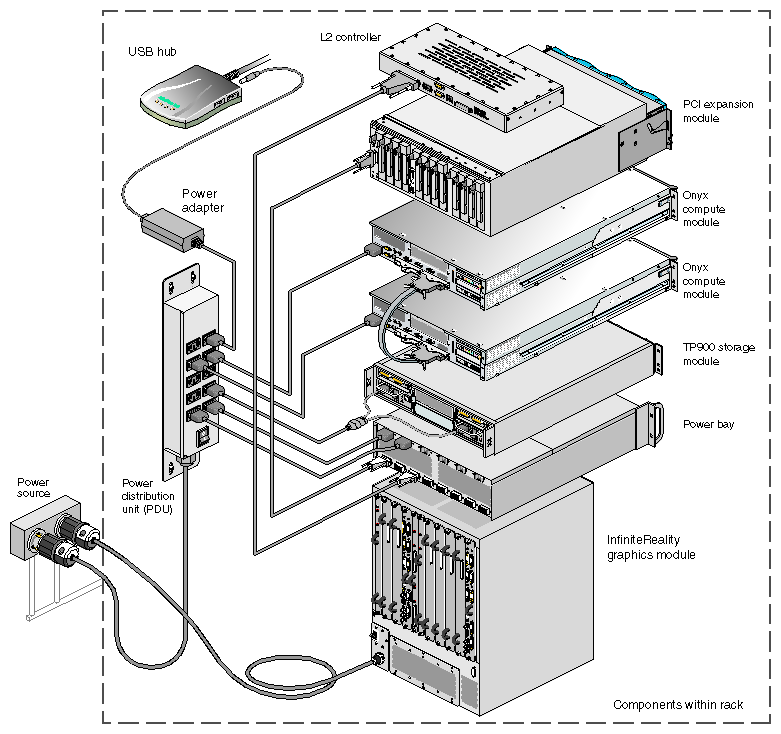
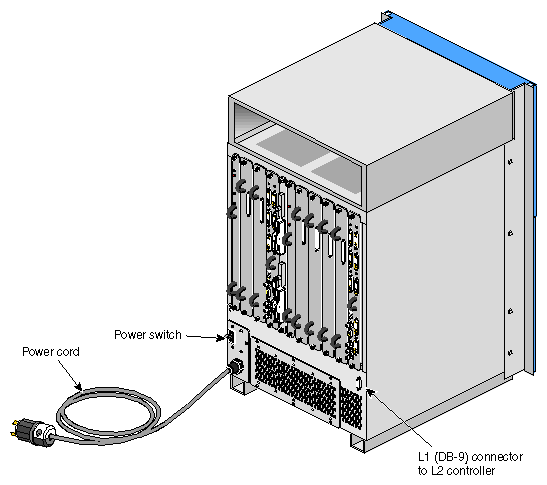
Between the InfiniteReality graphics module(s) and the external power receptacle(s) (see Figure 2-6).
Between the power bay and the following modules: DC-powered 4U PCI expansion module(s), and L2 controller module (see Figure 2-6).
Between the power distribution unit (PDU) and the following components:
Onyx 350 compute or compute/graphics module(s) or optional MPX modules
optional AC-powered NUMAlink module, USB hub, or TP900 module(s)
L2 controller power supply, power bay, or optional additional PDU
Between the PDU and the external power receptacle.
Figure 2-6 shows the connection between an InfiniteReality graphics module and an external power receptacle. It also shows the PDU and power bay connections to the other components within a system that contains a DC-powered NUMAlink module.
Connect the system modules to the power distribution unit (PDU) in your system rack.
Confirm that the cables between the L2 controller and the InfiniteReality graphics module are secure (see Figure 2-7)
Note: If the InfiniteReality graphics module resides in a separate rack, the graphics module connects to a USB hub; the USB hub connects to the L2 controller. The USB hub shown in the illustration may be different than the one installed in your system.
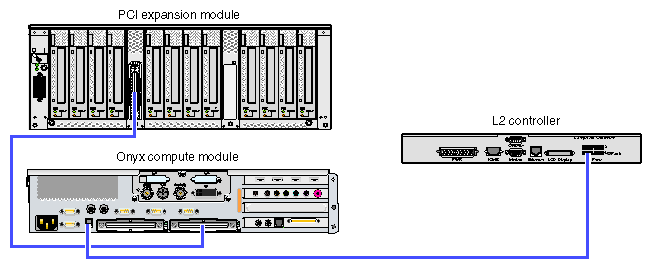
If your system does not have a NUMAlink module, the Onyx 350 compute/graphics modules connect directly to the L2 controller (see Figure 2-8).
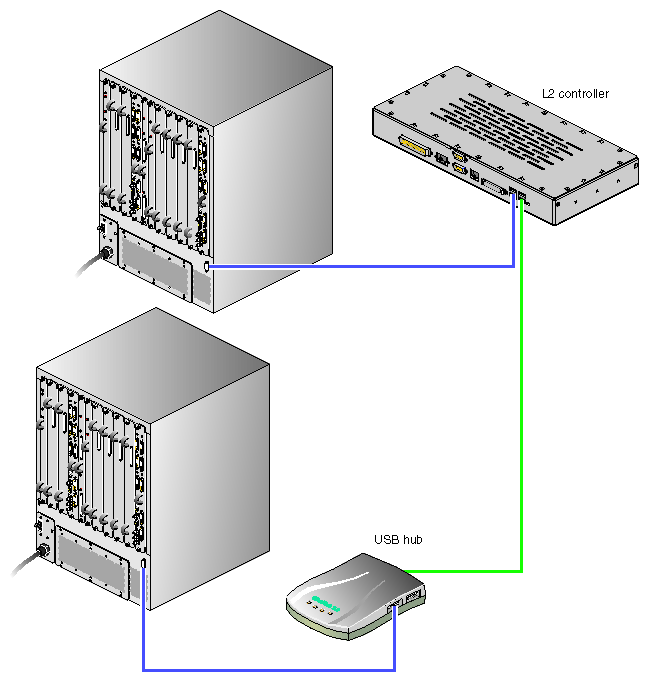
Figure 2-8 shows how the Onyx 350 compute/graphics modules in an InfiniteReality graphics system that does not contain a NUMAlink module connect to an L2 controller. The top module communicates with the L2 controller via its NUMAlink connection to the bottom Onyx 350 compute/graphics module. Likewise, if a system contains one compute/graphics module and one 4U PCI expansion module, the 4U PCI expansion module connects to the L2 controller via its NUMAlink connection to the Onyx 350 compute/graphics module as shown in Figure 2-9.

| Note: The L2 controller is optional for IP systems without the NUMAlink module. |
Ensure that the power switch on any optional DC-powered 4U PCI expansion module that you want to power on is set to the On (|) position. The power switch is located in the upper-left corner of the module (see Figure 2-9). This switch enables the L1 controller of the DC-powered 4U PCI expansion module(s) to power on after you turn on the circuit breaker of the PDU.
Note: The Onyx 350 compute/graphics, MPX, and AC-powered NUMAlink modules do not have power switches; when the PDU circuit breaker is on, their L1 controllers are powered on. Note: Complete the power preparation steps in this section before you set the power switch of the InfiniteReality graphics module to the ON position. The InfiniteReality graphics module does not plug into the PDU; therefore, when you set the power switch to the ON position, the L1 controller of the graphics module powers on. Ensure that the power receptacles for the IR graphics module (if installed) and the PDU are sourced and grounded from the same breaker box. For additional information on this topic, contact your SGI system support engineer (SSE).
Note that the L2 controller comes standard with all NUMAlink-connected Onyx 350 InfinitePerformance and InfiniteReality systems.
This section explains how to power on the system either at the system console or with the power buttons.
| Warning: Turn off equipment before you install or remove power cords. The rackmount system operates on 200-240 VAC. Use extreme caution when you work around this voltage. |
To power on the graphics system at the system console, follow these steps:
If the monitors and other peripherals are equipped with voltage select switches, verify that they are set for the appropriate AC voltage and plug them in. Note that they are normally plugged into sources outside the rack system.
Turn on the circuit breaker switch of the PDU as shown in Figure 2-10.
Set the power switch of the InfiniteReality graphics module (if applicable) to the ON position. Figure 2-11 shows the location of the power switch.
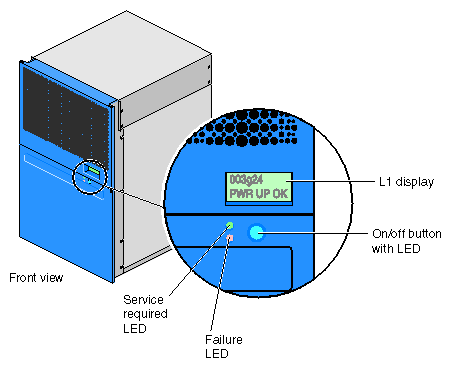
Verify that all of the L1 controllers display “L1 running.” If any L1 controllers are not running, contact your SGI system support engineer (SSE).
At the system console, access the L2 controller by entering the following command:
$> /stand/sysco/bin/12term
From the L2 prompt, display the system configuration by entering the following command:
L2> cfg
This command lists the modules that the L2 controller detects in the system and their system controller addresses. If a module that you want to power on does not appear in the list, it will not power on. Ensure that the module's L1 controller is running and that it is cabled properly.
From the L2 prompt (L2>), power on an individual module by entering the following command. (If you want to power on the entire system, proceed to step 8.)
L2> r <rack#> s <slot#> pwr u
For example, to power on an Onyx 350 compute module in rack 1, slot 18, enter the following command:
L2> r 1 s 18 pwr u
The slot number is the unit number of the module within the rack. For more information about L1 and L2 controller commands and unit numbers, see the SGI L1 and L2 Controller Software User's Guide (P/N 007-3938-00x).
If you want to power on several selected modules of a rack at the same time, you must enter the rack number followed by the slot numbers of the modules that you want to power on. For example, to power on the modules in slots 18, 20, and 22, enter the following command:
L2> r 1 s 18,20,22 pwr u
If you want to power on the entire system, enter the following command:
L2> pwr u
(The default setting for the pwr u command is all racks and slots.)
When the L2 prompt appears, you will not see the output that is produced during the power-on procedure unless you redirect the keyboard input from the L2 controller to the normal console by entering the following:
L2> ctrl-d
When the power-on procedure completes, the System Maintenance Menu appears on the system console or the graphics monitor. Select Start System (option 1) to boot the IRIX operating system.
If your system does not have a system console, you can power on your system manually by using power buttons. Each module that has an L1 controller has a power button with an LED; this button is located on the front of the module (see Figure 2-12). The TP900 storage module power switch(es) are located at the rear of the module (refer again to Figure 2-5).
To power on the graphics system, follow these steps:
If the monitors and other peripherals are equipped with voltage select switches, verify that they are set for the appropriate AC voltage and plug them in. Note that they are normally plugged into sources outside the rack system.
Set the power switch(es) of any InfiniteReality graphics module(s) to the ON position as shown in Figure 2-11.
Set the power switch(es) of the TP900 storage module(s) to the ON position.
Verify that all of the L1 controllers display “L1 running.” If any L1 controllers are not running, recheck the power connections. If the power is properly connected and the system does not respond, contact your SGI system support engineer (SSE).
Press the power buttons that are located on the front of the modules that you want to power on. Always power on any 4U PCI expansion or InfiniteReality graphics modules first. Next, power on the NUMAlink module and then any other optional modules. Last, power on the Onyx 350 compute/graphics modules starting with the base unit or “global master” (usually the lowest compute module in the rack).
The power button LEDs illuminate when the modules are powered on.
When the power-on procedure completes, the System Maintenance menu appears on the graphics monitor. Select Start System (option 1) to boot the IRIX operating system.
This section explains how to power off individual modules or your entire system either at the system L2 controller console or with the power buttons.
| Note: The system should be powered off only for routine maintenance or repair. |
The following information applies only to InfiniteReality graphics modules, Onyx 350 compute/graphics modules, the optional NUMAlink module, and MPX expansion modules.
You must manually power off the TP900 storage module by placing the power switch(es) in the 0 position, see Figure 2-13.
To power off your system at the system console, follow these steps:
Shut down the IRIX operating system by entering the following command:
# init 0
To access the L2 prompt, direct the keyboard input to the L2 controller by entering the following:
$> ctrl-t
From the L2 prompt (L2>), power off an individual module by entering the following command. (If you want to power off the entire system, proceed to step 4.)
L2> r <rack#> s <slot#> pwr d
For example, to power off an Onyx 350 compute module in rack 1, slot 18, enter the following command:
L2> r 1 s 18 pwr d
The slot number is the unit number of the module within the rack. For more information about L2 commands and unit numbers, see the SGI L1 and L2 Controller Software User's Guide (P/N 007-3938-00x).
If you want to power off several selected modules from the rack at the same time, enter the rack number followed by the slot numbers of the modules that you want to power off. For example, to power off the modules in slots 18, 20, and 22, enter the following command:
L2> r 1 s 18,20,22 pwr d
If you want to power off all of the modules within the rack, enter the following command:
L2> pwr d
(The default setting for the pwr d command is all racks and slots.)
“Powered Down” appears on the L1 display when the module is powered off. The L1 controller is still powered on.
To power off an L1 controller of a DC-powered 4U PCI expansion, or InfiniteReality graphics module, set the power switch to the OFF position. The power switch of the DC-powered 4U PCI expansion module is located in the upper-left corner of the rear of the module. The power switch of the InfiniteReality graphics module is located in the lower-left corner of the rear of the module.
Note: The Onyx 350 compute and AC-powered NUMAlink modules do not have power switchs. To power off their L1 controllers, (and cut off all AC power to the unit) unplug the individual modules from the PDU.
| Note: The system should be powered off only for routine maintenance or repair. |
To manually power off a system with no L2 controller (using power buttons), follow these steps:
Shut down the IRIX operating system by entering the following command:
# init 0
Press the power buttons on the front of the modules that you want to power off. You can power off the modules in any order.
To power off an L1 controller of a DC-powered 4U PCI expansion, or InfiniteReality graphics module, set the power switch to the OFF position. The power switch of the DC-powered 4U PCI expansion module is located in the upper-left corner of the rear of the module. The power switch of the InfiniteReality graphics module is located in the lower-left corner of the rear of the module.
To remove all AC power from the system modules, move the switch on the rack's PDU to the off position. Alternately, you can disconnect the power cable from the back of an individual module.
Note: The Onyx 350 compute/graphics modules and optional AC-powered NUMAlink modules do not have power switchs. To power off their L1 controllers, (and cut off all AC power to the unit), unplug the individual modules from the PDU.
You can monitor your SGI Onyx graphics system from the following sources:
You can view individual module (IR graphics, compute, MPX, NUMAlink, and 4U PCI expansion) status and error messages by using each module's L1 controller display. For example, you can determine whether the fans of a particular module are operating properly.
You can monitor the status of the optional TP900 storage modules by viewing the LEDs on the front and the rear of the modules.
The location and basic connection/functions of the L1 and optional L2 controllers have been generally discussed and illustrated in this chapter. For more information on using these system controllers, see the SGI L1 and L2 Controller Software User's Guide (P/N 007-3938-00x). For information on replacing an L1 controller, see the section “Replacing an L1 Controller Display” in Chapter 7.
Your system is available with several optional components. For a complete list of options, check with your SGI sales representative. You may need to install these optional components after you set up your system. For more information on installing these optional components, see Chapter 7, “Installing and Removing Customer-replaceable Units”.