This chapter tells you how to install:
internal drives
external SCSI devices
serial devices
To install a peripheral, you must first install the hardware, and then bring up the system software so the system recognizes the peripheral.
This section tells you how to install internal drives in a IRIS Indigo workstation. Internal drives include the system disk drive, a secondary hard disk drive, a floppy disk drive, and a DAT drive.
 | Caution: Drives are sensitive pieces of equipment. Handle your drive carefully. Do not drop it or otherwise abuse it. |
To install the drive, follow these steps:
Power down the system.
Choose “System Shutdown” from the System toolchest.
The Toolchest is in the upper left corner of your screen.
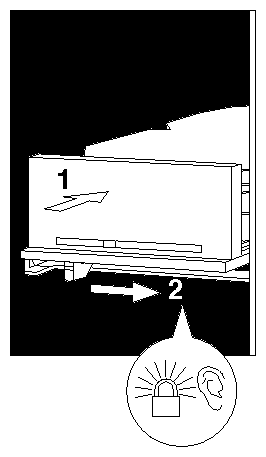
Turn off the power switch on the back of the Indigo chassis, as shown in Figure 4-1.
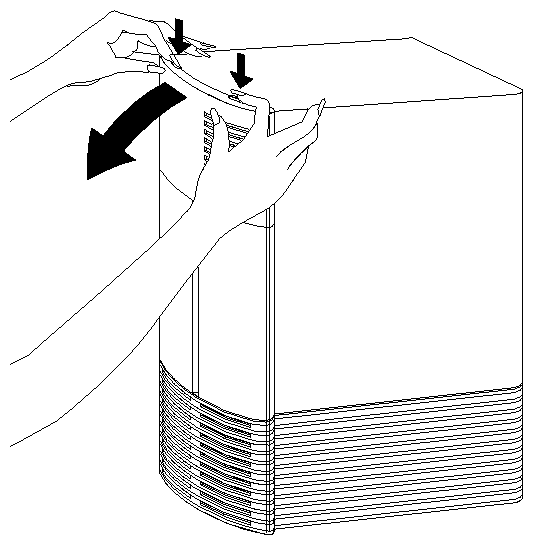
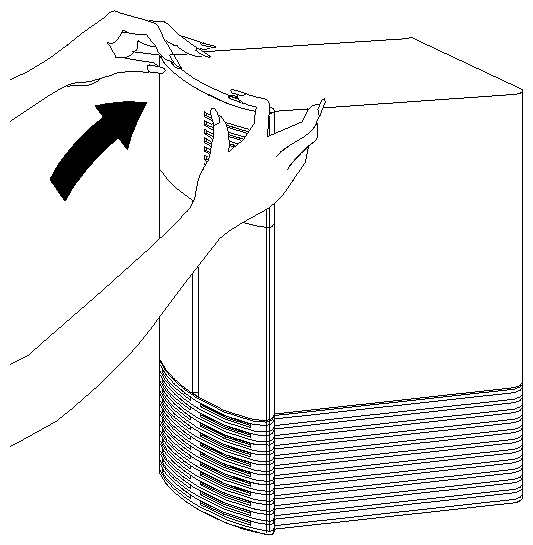
Remove the front cover.
Face the front of the Indigo chassis.
Two tabs on top of the front cover hold it in place.
Press down on the tabs and pull the cover away from the chassis, as shown in Figure 4-2.
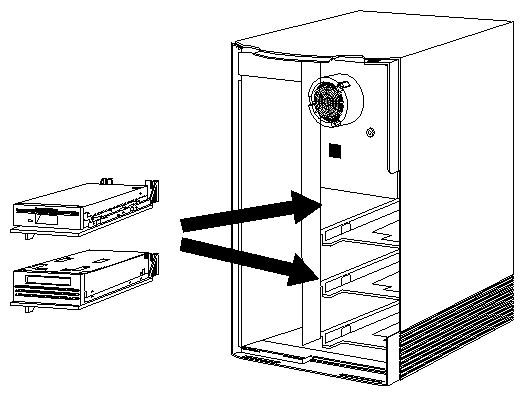
Choose a slot to install the drive in.
Caution: Install only the system disk in the bottom slot. Install a second hard disk, floppy disk drive, or a DAT drive into either the top or the middle slot, as shown in Figure 4-3.
Pick up the drive so the two plastic guide pins on the back are on the top half of the drive and facing away from you, as shown in Figure 4-4.
Slide the drive into the slot.
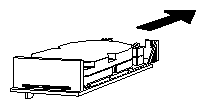
Place the drive into the slot and push firmly. The green lever underneath the drive moves to the right.
Once the drive is all the way in, push the green lever underneath the drive all the way to the right, as shown in Figure 4-5.
You should hear a click when the drive locks into place.Try pulling gently on the drive. The drive should not come out when you pull it.
If you installed a drive in the top drive slot, you need to remove the top black plastic blanking panel. If you installed a drive in the middle slot, remove the bottom black blanking panel.
Pick up the plastic front cover of the Indigo and open the door on the front of the cover.
Push the black blanking panel out from the back of the cover. The panel falls out. You may want to save the panel in case you ever remove your drive.
Replace the front cover of the chassis.
Place the bottom of the front cover in the guides on the bottom of the Indigo chassis.
Tilt the cover up to the chassis, as shown in Figure 4-6. The cover snaps in place.
Turn on the power.
Turn on the power switch on the back of the Indigo chassis.
When you see the login screen, you are ready to log in and turn on the software. Go on to the next section.
The system automatically sets up the system software for internal devices you install and places an icon on the desktop.
Once you install the drive, follow these steps to check that the system recognizes the new drive.
Log in to your account. For more information on logging in, refer to “Logging In to the Workstation”.
If the device is installed correctly, you should see an icon for it on the desktop. Double-click the icon to set up the drive.
You can also use the System Manager to check that the drive is shown correctly.
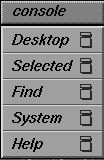
From the System toolchest, select “System Manager.” The toolchests are shown in Figure 4-7.
You see a window showing Hardware and Shared Resources.
.
Pull down the Hardware menu and select “Disks.” You see a list of installed drives.
If other users are going to access your CD-ROM drive, refer to the online Personal System Administration Guide for special instructions. Select “On-line Books” from the Help Toolchest. Then select the Personal System Administration Guide, and search for “Setting Up SCSI Peripherals.”
If you are using the drive as an IRIX device, follow these steps to format a floppy or floptical disk:
Choose “Disk Manager” from the System toolchest.
You see a photo of the drive with a labeled button underneath it.
Click the button beneath the photo of your floppy or floptical drive.
You see the “Disk Information” window.
Click the “Initialize” button.
Floppy disks take about 2 minutes to format; floptical disks take about 10 minutes.
You are finished formatting the floppy or floptical disk.
If this is the only tape drive installed on your system, the drive is ready to use. For each additional tape drive you install, you must open the shell window and type the following commands.
su
cd /dev
./MAKEDEV tape
For information on backing up data onto a tape, select “On-line Books” from the Help toolchest. Then select the Personal System Administration Guide, and search for “Backing Up and Restoring Files.”
If you use your DAT drive frequently, magnetic dust or debris can collect on the heads of the drive. This may make your DAT tapes unreadable or unwritable.
If the green LED on the front of the DAT drive flashes at about 5 second intervals, you should clean the DAT drive heads. You should clean your DAT drive after about every 30 hours of use.
 | Note: If the LED on the front of the DAT drive still flashes after you have cleaned the drive heads, you may have a worn out DAT tape. Try using a new DAT. |
Follow these steps to clean your DAT drive:
Insert a cleaning DAT tape.
Use a cleaning DAT tape authorized by the DAT drive manufacturer.
The drive loads the tape and starts cleaning the heads.
Note: Be sure to use a data cleaning tape only. An audio cleaning tape does not work. After about 10 seconds, the drive ejects the tape.
If you remove a secondary hard drive or floppy drive and do not intend to replace it, you need to inform the system that the drive is no longer there. For more information, select “On-line Books” from the Help toolchest, and search for “Removing a Disk” in the Personal System Administration Guide.
This section explains how to connect an external SCSI device to an IRIS Indigo workstation. External devices include the 1/4” tape drive, CD-ROM drive, and other external SCSI devices.
Follow the steps below to connect an external SCSI device to your IRIS Indigo workstation.
Before shutting down your system and installing an external device, you need to assign an address to the device.
If you currently do not have any extra internal devices or external devices attached to your system, you can assign any number from 1 to 7 to the new device. Skip to “Setting the SCSI Address on the External Device”.
If you have at least one or more internal or external devices attached to your system and you are adding another device, you must check which addresses are assigned to the existing external devices and then choose a number between 1 and 7 that has not already been assigned.
To check available addresses for external devices, follow these steps:
If IRIS Indigo is powered off, turn on the power switch on the back of the Indigo chassis.
Log in to your account. For more information on logging in, refer to “Logging In to the Workstation”.
When the system comes up, select “System Manager” from the System toolchest.
Pull down the Hardware menu and select “Summary.”
You see a listing of your system's hardware devices and their address numbers.
Choose a number from 1 to 7 that is not assigned to your current devices and then go to the next section,“Setting the SCSI Address on the External Device.”
Now you must manually set the address you chose in step 5 above on the external device.
This may be done in a number of ways, depending on the device. In some cases, it may mean installing jumpers on the device.
If the device has a switch or dial on the back, follow the steps below. If there is no switch or dial on the device, see the instructions included with the device.
Take the device out of its box.
Locate the address dial on the back of the device.
Caution: Do not assign number 0! This number is reserved for the SCSI controller. Click the dial buttons or turn the dial with a screwdriver to assign the drive the number you chose in step 5 above.
You can attach one or more external devices to the SCSI port on the back of your workstation. Connecting more than one device is called daisy chaining. The devices are connected together in a chain, with the first device attached to the SCSI port on the workstation.
If one or more of the devices you are attaching to your workstation is a FAST SCSI-2 device, then the maximum combined cable length of all SCSI cables should not exceed 3 meters. If you are not attaching any FAST SCSI-2 devices, then the maximum combined cable length of all SCSI cables should not exceed 6 meters.
| Note: Use the cables and active terminator that came with the device. You must use an active terminator. Using other types of cables or terminators can result in data loss. If you have a device that you want to attach to your system, but you do not have the appropriate cables, you can order them by contacting your service provider. |
Follow the steps below to connect the device to your IRIS Indigo workstation.
Power down your system.
Choose “System Shutdown” from the System menu in the Toolchest.
Turn off your system.
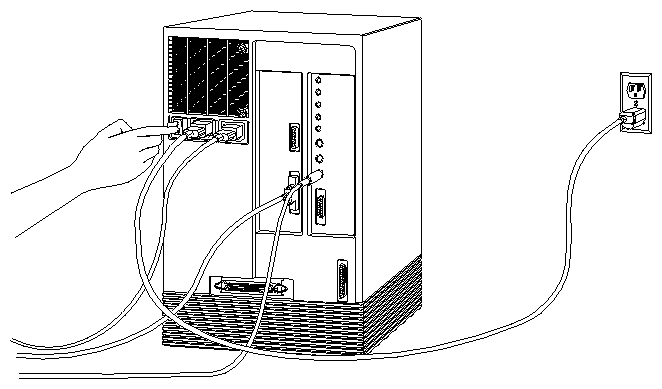
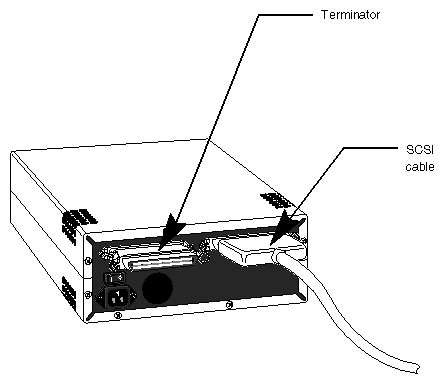
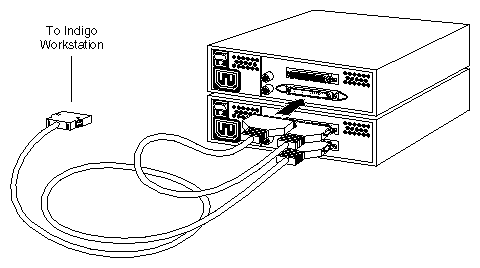
Locate the SCSI connector on the back of the Indigo chassis, as shown in Figure 4-8.
Remove the terminator from the workstation or from the last external device attached to your workstation.
If you are attaching the device to the workstation, remove the terminator from the SCSI connector on the Indigo chassis by squeezing the clips on both sides of the terminator and pulling it off, as shown in Figure 4-8.
Save the terminator. You must reattach it to the system if you remove and do not replace the external device.
If you are daisy-chaining a device to another device, remove the terminator from the connector on the device by squeezing the clips on both sides of the terminator and pulling it off.
Attach the appropriate cable. Silicon Graphics SCSI devices come with two cables; one with identical connectors at each end, and one with different connectors at each end.
If you are attaching the device to the workstation, use the cable that has a different connector on each end.
Attach the flat, smaller end of the cable to the SCSI connector on the workstation, as shown in Figure 4-8.
Connect the other end of the SCSI cable to one of the SCSI connectors on the back of the device and secure the clips on each side of the connector, as shown in Figure 4-9.
If you are daisy-chaining a device to another device, use the cable that has identical connectors at each end.
Connect one end of the cable to the open connector on the first device, as shown in Figure 4-10. Attach the other end to one of the connectors on the device you are adding.
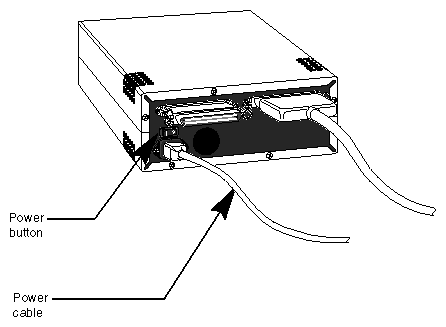
Connect one end of the power cable that came with your device to the power connector on the back of the device, as shown in Figure 4-11.
Plug the other end of the power cable into a grounded three-prong electrical outlet.
Turn the device on.
The power button is on the back of the device, as shown in Figure 4-11.

| Note: Remember to turn on the external devices first and then your system to make sure the devices are recognized. |
After you've attached the device to your system, check to make sure your system recognizes the device.
The system automatically sets up the system software for most external devices you install and places an icon on the desktop.
To check the system configuration, follow these steps:
Turn on the external device. The power switch is on the back of the device.
Note: Always turn on the external device before the system; otherwise, the system may not recognize the device. If IRIS Indigo is powered off, turn on the power switch on the back of the chassis.
After a few moments, the system starts up.
When you see the login screen, log in to your account. For more information on logging in, go to “Logging In to the Workstation”.
If the device is installed correctly, you see an icon for it on the desktop. Figure 4-12 shows the icon for a CD-ROM drive.
You can also use the System Manager to check that the drive is shown correctly. From the System toolchest, select “System Manager.”
You see a window showing Hardware and Shared Resources.
Pull down the Hardware menu and select “Disks.” You see a list of installed drives.

If the drive you installed does not appear, do the following:
You are now ready to turn on the software.
If other users are going to access your CD-ROM drive, refer to the online Personal System Administration Guide for special instructions. Select “On-line Books” from the Help Toolchest. Then select the Personal System Administration Guide, and search for “Setting Up SCSI Peripherals.”
If you are using the floppy or floptical drive as an IRIX device, see “If You Installed a Floppy or Floptical Disk Drive” for instructions on formatting the floppy disk.
If this is the only tape drive installed on your system, the drive is ready to use. For each additional tape drive you install, you must open the shell window and type the following commands.
su
cd /dev
./MAKEDEV tape
If you installed a tape drive, the drive is ready to use. For information on backing up data onto a tape, select “On-line Books” from the Help toolchest. Select the Personal System Administration Guide, and search for “Backing Up and Restoring Files.”
If you installed a printer, select “Printer Manager” from the System toolchest, and set up the printer. For more information on setting up the printer, select “On-line Books” from the Help toolchest. Select the Personal System Administration Guide, and search for “Setting Up Network, Peripheral, and Printer Connections.”
This section tells you how to install serial devices. Serial devices include:
To install a serial device, follow these steps:
Unpack the serial device and cables.
Locate the serial connector on the back of the Indigo chassis.
| Caution: Do not connect the serial devices to the connector labelled keyboard. |
Plug in the serial cable.
If you are attaching a console terminal, attach it to serial connector 1 only. If you are attaching any other device, you can attach it to either connector.
Plug one end of the serial cable into the connector on the back of the serial device.
See the instructions that came with the serial device for detailed instructions on how to connect the cable to the device.
Plug the other end of the cable to the serial connector on the back of the Indigo chassis, as shown in Figure 4-13.

You may want to connect other serial devices to your Indigo. Below you'll find information on what serial cables you can use with your IRIS Indigo workstation.
To use a serial printers and dumb terminals, use a 3-wire standard Macintosh® to Imagewriter® cable. The cable connector pinout assignments for this cable are shown in Table 4-1.
Table 4-1. Cable Connector Pinout Assignments for the Printer/Modem/Dumb Terminal Serial Cable
Signal Description | Pin Number | Pin Number |
|---|---|---|
| 1 | N/C |
| 2 | N/C |
TXD | 3 | 3 |
GND | 4 | 7 |
RXD | 5 | 2 |
| 6 | N/C |
| 7 | N/C |
GND | 8 | 7 |
| Note: For a 3-wire cable and no hardware flow control modem, you must use the /dev/ttyd* command devices in the configuration files. For more detailed information, see the serial man page. To access the man page, place the cursor in the console window and type |
man serial
Use a full-handshake (includes RTS and CTS) serial cable for a modem with RTS/CTS flow control. The cable pinout assignments for this cable are shown in Table 4-2.
You can use this cable for all serial devices (even applications that don't need RTS flow control). If you add a null modem adapter, you can use this modem cable for serial printers and dumb terminals.You can purchase this cable from Silicon Graphics.
| Note: Do not use a standard Macintosh serial cable. It does not have the correct number of connectors for full flow control. |
Table 4-2. Cable Connector Pinout Assignments for the Modem Cable
Signal Description | Pin Number | Pin Number |
|---|---|---|
DTR | 1 | 20 |
CTS | 2 | 5 |
TXD | 3 | 2 |
GND | 4 | 7 |
RXD | 5 | 3 |
RTS | 6 | 4 |
DCD | 7 | 8 |
GND | 8 | 7 |
| Note: If you are attaching a modem with modem signals and RTS/CTS flow control, you must use the /dev/ttyf* command devices in the configuration files. For more detailed information, see the serial man page. To access this man page, place the cursor in the console window and type |
man serial
To use the devices below, you'll need a serial adapter cable supplied by Silicon Graphics.
dial and button box
dials box
digitizer tablet
SpaceballTM
The cable is used to convert the serial cable that came with the device to a Silicon Graphics 9-PIN serial cable connector. This cable then connects to the serial connector on the back of the Indigo chassis. The cable connector pinout assignments are shown in Table 4-3.
Table 4-3. Cable Connector Pinout Assignments for the Adapter Cable
Signal Description | Pin Number | Pin Number |
|---|---|---|
DTR | 1 | 9 |
CTS | 2 | 5 |
TXD | 3 | 2 |
GND | 4 | 7 |
RXD | 5 | 3 |
RTS | 6 | 4 |
DCD | 7 | 8 |
GND | 8 | 7 |
| N/C | 6 |
| N/C | 1 |
To use a serial device designed for use with personal computers using a DB-9 connector, you'll need a PC adapter cable supplied by Silicon Graphics. This adapter cable is used to convert from the PC's DB-9 pinout to the Indigo2 workstation's DIN-8 pinout.
The cable connector pinout assignments for the PC adapter cable are shown in Table 4-4.
Table 4-4. Cable Connector Pinout Assignments for the PC Adapter Cable
Signal description | Pin Number | Pin Number |
|---|---|---|
DTR | 1 | 4 |
CTS | 2 | 8 |
TXD | 3 | 3 |
GND | 4 | 5 |
RXD | 5 | 2 |
RTS | 6 | 7 |
DCD | 7 | 1 |
DSR | 8 | 6 |
| N/C | 9 |