This section includes:
The 3D viewer is a 3-dimensional viewing area, where objects can be moved or rotated in any direction, including forward or backward, left or right, up or down (see “Animating Objects”).
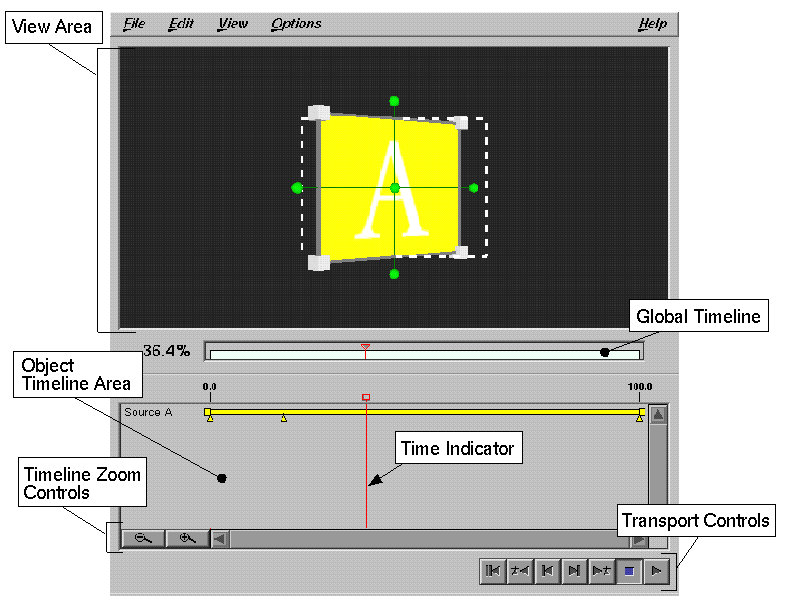
The 3D viewer initially contains clip placeholder A if you are creating a filter, or A and B, if you are creating a transition. These placeholders represent the “source,” meaning the range of frames you have selected in your movie application. The square outline in the center is called the movie viewport—the section you'll see when the movie is actually played.
In addition to the Help menu, FX Builder contains the following menus:
The File menu contains:
| New | Choose to start creating a new effect. | |
| Import... | Use to import additional objects (see “Importing Objects”). | |
| Save As Template... |
| |
| Cancel | Closes FX Builder and cancels the application of the current effect. |
The Edit menu contains:
| Undo | Reverses last command. | |
| Redo | Reverses the last Undo. | |
| Cut | Cuts currently selected object or keyframe. | |
| Copy | Copies currently selected object or keyframe. | |
| Paste | Pastes currently selected object or keyframe. | |
| Delete | Deletes currently selected object or keyframe. | |
| Insert Source A | Inserts a copy of the source A clip placeholder at the time indicator. | |
| Insert Source B | (transitions only) Inserts a copy of the source B clip placeholder at the time indicator. | |
| Apply Source A Texture |
| |
| Apply Source B Texture |
|
See also “Editing Keyframes” and “Editing and Manipulating Objects.”
The Options menu contains:
| Keyframe Animation Settings... |
| |
| Linear Interpolation |
| |
| Smooth Interpolation |
| |
| Higher Quality Scaling |
|
The global timeline represents the entire length of the effect (transition or filter). As you drag the time indicator backward or forward along the global timeline, the objects in the 3D viewer move with it, showing you what position the objects are in at any given time during the effect. For example, when the indicator is in the middle of the global timeline, the position of the objects in the 3D viewer represent the position they will be in when the effect has been played half-way through.
| Note: Time is measured from %0 to %100, so that you are observing the relative time of the occurrences within the timeline. The actual time length of the effect itself depends on what you have selected in the movie editing application you are using. |
The object timeline area is in the lower half of the window. Each object has its own timeline, which contains the keyframes (see “What Are Keyframes?”) that correspond to that object.
| Note: Time is measured from%0 to%100, so that you are observing the relative time of the occurrences within the timeline. The actual time length of the effect itself depends on what you have selected in the movie editing application you are using. |
The transport controls, located in the lower right-hand corner of the FX Builder window, enable you to preview the effect and also to jump the time indicator from one keyframe, or frame, to another. See “Previewing the Effect.”