The Disk Partition dialog allows you to display and change the disk partition table for the selected disk.
| Caution: If you change the partition table of a disk that is currently in use and accept the change, all information stored on that disk is lost. Make full backups of all disks that may be repartitioned before you begin. Disks that contain partitions and filesystems used in logical volumes are even more sensitive. If you repartition a disk that is any part of a logical volume, all information on that logical volume, even on other disks, is lost. Make full backups before you begin. |
The disk partition table you see is similar to that shown in Figure 2-6:

This dialog window has several parts: the dialog buttons, parameter fields, partition manipulation area, and the partition graphic. Each of these parts is discussed in a separate section below.
At the bottom of the Disk Partition dialog, there are several buttons, as shown in Figure 2-7:

The buttons have the following meanings:
| Accept | This button collects the partition data and repartitions the disk, then the dialog is removed. | |
| Save | This button allows you to save the information currently in the dialog as a template. The Save As Template dialog is displayed, allowing you to specify the name of the template. | |
| Cancel | This button closes the dialog. No action is taken and any changes to the dialog are discarded. | |
| Help | This button displays this help topic. |
At the top left of the Disk Partition dialog are the parameter fields, as shown in Figure 2-8:
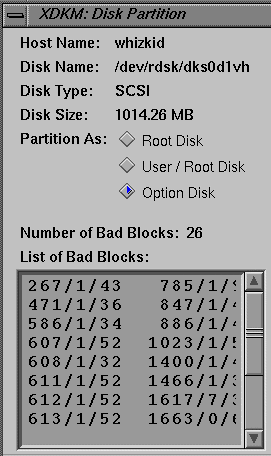
From the top, the parameter fields are:
| Host Name | The name of the host system that holds the selected disk. | |
| Disk Name | The device filename of the selected disk. | |
| Disk Type | The physical type of the selected disk (for example, SCSI, Jag, or ESDI). | |
| Disk Size | The size of the selected disk. This figure is given in the largest appropriate unit (such as megabytes, gigabytes, and so on). | |
| Partition As | There are three radio buttons that provide a short cut for setting the partition table for three “standard” partitioning schemes. When you select one of these radio buttons, the partition table and graphic are changed to reflect the predefined values:
| |
| Number of Bad Blocks |
| |
| List of Bad Blocks |
cylinder/head/sector When the dialog first appears on your screen, there is a button labeled Display Bad Blocks. Clicking on this button displays the list as shown in Figure 2-8. |
The most important portion of the Disk Partition Dialog is the partition matrix. It displays the values for each of the currently defined partitions. The columns provide parameters for the partitions, while each row represents a partition on the disk. The partition matrix you see looks similar to that shown in Figure 2-9:
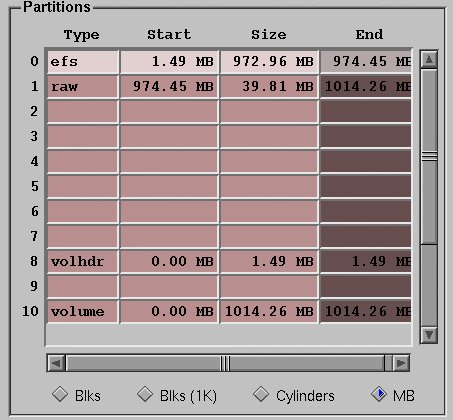
The partition matrix has four columns that define a partition:
| Type | An editable column that displays the type of partition. The acceptable values for this field are:
| |
| Start | The place on the disk at which a partition begins. | |
| Size | The size of the partition. | |
| End | The location of the end of the partition.This field is computed by xdkm based on the start location and the size of the partition. |
At the bottom of the Partition Matrix, there are four radio buttons (only one may be pressed at any time) that set the partition matrix units display. You can set, edit, and view your partition matrix in the following units of measurement:
| Blks | This button displays your partitions in 512-byte disk block units. | |
| Blks (1K) | This button displays your partitions in 1-kilobyte block units. | |
| Cylinders | This button displays your partitions in disk cylinder units. | |
| MB | This button displays your partitions in the largest appropriate units (kilobytes, megabytes, or gigabytes). |
Each editable column in the Partition Matrix (Type, Start, or Size) has a popup menu associated with it. The popup menus provide a short cut to filling in the field. To view a popup menu, select the field in the matrix by clicking on it with your left mouse button, then use the right mouse button to pull down the menu and select your option. In the following entries, a valid partition is defined as one in which the End column for that partition is not empty.
| Type | This menu has an entry for each possible type of partition. See “Partition Matrix Columns” for more information on valid partition types.There is also an option to clear the field of any entry. If you have selected a partition that may not be edited, such as partition 8, 9, or 10, the options on this menu are greyed-out and unavailable. | |
| Partition Start | This menu has the following options:
| |
| Partition Size | The items in this menu (except for Clear Size) are available only if the Start column in the same row is not empty.
|
The partition graphic, located at the bottom of the dialog, displays the relative size of each valid partition. The number of each partition is printed in the section of the graphic representing that partition. If any partition is selected in the partition matrix, that partition is highlighted in the graphic. In Figure 2-10, partition 1 is selected. The graphic is updated when a change is made to the partition matrix. The graphic is similar to that shown in Figure 2-10:

As you make your changes, the current state of the partition matrix is reflected in the partition graphic. The volume partition (10) always spans the entire disk, so it correctly appears below the other partitions, spanning the entire graphic. Partitions that overlap other partitions (such as partition 10) are always shown on their own row in the graphic. Since overlapping partitions are usually a source of serious disk trouble, your partition graphic provides an immediate visual sign of an improper matrix.
Gaps between partitions are shown in a contrasting color. In the example below, there is a substantial amount of unused (gap) disk space, and partition 1 is still selected.
