When you select the “ New” option from the Selected menu, you see the cascading menu that offers three choices. You can create a new volume, plex, or volume element (VE). Each of these options brings up a different dialog. This section describes the Create Plex dialog. This dialog window allows you to create a new stand-alone plex out of disk partitions.
The Create Plex dialog looks similar to that shown in Figure 4-11:

The Create Plex dialog buttons are shown at the bottom of Figure 4-11; they have the following meanings:
| Accept | Collects the data from the dialog and creates a new plex. The dialog is removed. | |
| Save | This button creates a template from the existing information in the dialog. | |
| Cancel | Closes the dialog. No action is taken and any changes to the dialog are discarded. | |
| Help | Brings up this help card. |
The fields of the Create Plex dialog are shown in Figure 4-12:

The following fields are shown:
| Host Name | This field is a label that displays the name of the current host. | |
| Plex Name | This is a text entry field in which you enter a unique name for the new plex. |
The plex summary is shown at the right of Figure 4-12. There are three columns of information, with a row for each possible partition. The columns have the following meanings:
| VEs | The total number of volume elements in the plex. | |
| Partitions | The total number of partitions used by the plex. | |
| Size | The total size of the plex. |
The data input matrix displays the definitions of the volume elements for the current plex. The current VE is the one selected in the summary area. The data input matrix is shown in Figure 4-13:

The matrix has one row for each volume element defined for the plex. The currently selected row is the current VE. As a visual cue, the row representing the current VE is displayed in a lighter color than the other rows.
Each row represents a single VE in the plex. The first VE has the label:
Plex: 0 Ve:0 |
The second VE is labeled:
Ve: 1 |
And so on.
You can enter data into the column labeled Num Ve. This is how you set the number of volume elements in the plex.
| Num Ve | An editable field that defines the number of volume elements in the plex. | |
| Ve Type | This field displays the type of volume element: either “S” for striped or “C” for concatenated. | |
| Stripe Units | Specifies the number of blocks to write to one disk before writing to the next disk in the stripe set. This figure is expressed in 512 byte blocks. | |
| Start | Specifies that the VE should start at the given block number within the Plex. | |
| Size | A non-editable column that displays the current size of the VE. | |
| Part Count | A non-editable column that displays the number of partitions defined for the VE. | |
| Partition List | A non-editable column that displays the list of partitions defined for the VE. |
There are two popup menus available in the Create Plex dialog, and they are similar to those described in “Create Volume Popup Menus”.
The Plex Graphic, located at the lower left of the dialog, displays the relative sizes for each non-empty VE (a VE that has at least one partition configured) in the volume. The Plex Graphic is shown in Figure 4-14:
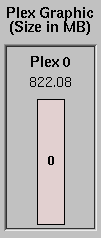
The Plex Graphic is updated when a change is made and accepted into the data input matrix.
The partition search section is similar to the sections described in “Partition Search Results Section”, and “Partitions Selected Section”.