When you select the “ New” option from the Selected menu, you will see a cascading menu that offers three choices. You can create a new volume, plex, or volume element (VE). Each of these options brings up a different dialog. This section describes the Create Volume dialog. This dialog window allows you to create a new logical volume out of disk partitions. Use “xlvm Attach Dialog” to add volume elements, plexes, or other volumes to the volume you create with this dialog.
The Create Volume dialog looks similar to that shown in Figure 4-5:
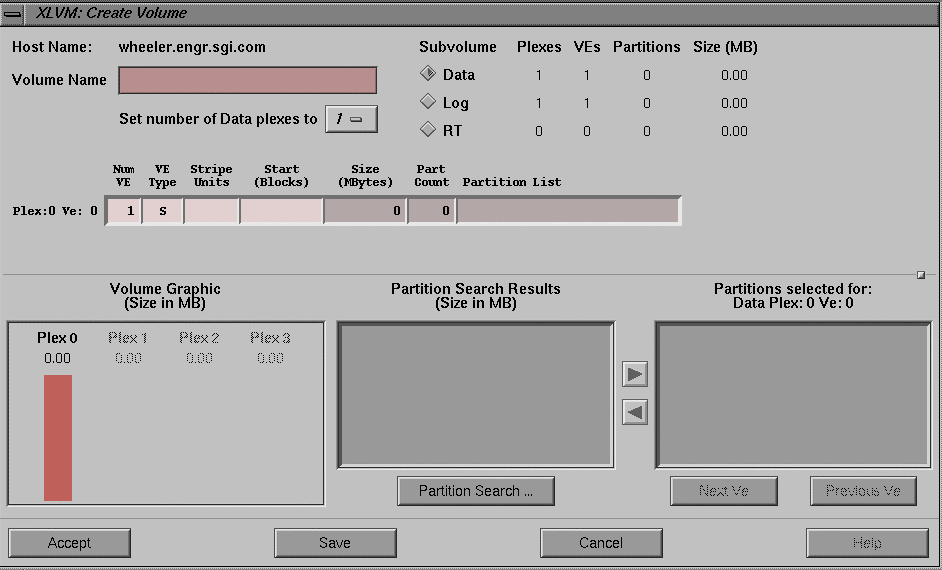
The standard Create Volume dialog buttons are shown along the bottom row of Figure 4-5 above, and have the following meanings:
| Accept | Collects the data from the dialog and creates a new volume. The dialog is removed. | |
| Save | Saves the current information as a template. | |
| Cancel | Closes the dialog. No action is taken and any changes to the dialog are discarded. | |
| Help | Brings up this help card. |
The fields of the Create Volume dialog are shown in Figure 4-6:
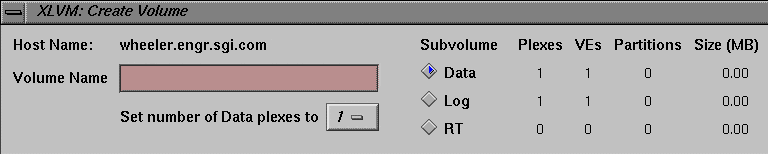
The following fields are shown:
| Host Name | This field is a label that displays the name of the current host. | |
| Volume Name | This is a text entry field in which you enter a unique name for the new volume. | |
| Number of plexes |
|
The volume summary is shown at the right of Figure 4-6, above. There are five columns of information, with a row for each possible subvolume. The possible subvolumes are Data, Log, and RT. The columns have the following meanings:
| Subvolume | There is a radio button for each possible subvolume (Data, Log, or RT). The selected radio button indicates the current subvolume. The information from the selected subvolume is visible in “Create Volume Data Input Matrix”. | |
| Plexes | The number of plexes defined for each subvolume. | |
| VEs | The total number of volume elements contained in each subvolume. | |
| Partitions | The total number of partitions used by each subvolume. | |
| Size | The total size for each subvolume. |
The data input matrix displays the definitions of the volume elements for the current subvolume. The current subvolume is the subvolume selected in the volume summary area. The data input matrix is shown in Figure 4-7:

The matrix has one row for each volume element defined for the subvolume, or plex. The currently selected row is the current VE. As a visual cue, the row representing the current VE is displayed in a lighter color than the other rows.
Each row represents a single VE in the plex. The first VE of the first plex has the label;
Plex: 0 Ve:0 |
The second VE of the first plex is labeled:
Ve: 1 |
The first VE of the second plex has the label:
Plex: 1 Ve:0 |
The second VE of the second plex is labeled:
Ve: 1 |
And so on.
The row representing the first VE of each plex is different from the other rows in that you can enter data into the column labeled Num Ve. This is how you set the number of volume elements in the plex.
| Num Ve | An editable field that defines the number of volume elements in the selected plex. | |
| Ve Type | This field displays the type of volume element; either “S” for striped or “C” for concatenated. | |
| Stripe Units | Specifies the number of blocks to write to one disk before writing to the next disk in the stripe set. This figure is expressed in 512 byte blocks. | |
| Start | Specifies that the VE should start at the given block number within the plex. | |
| Size | A non-editable column that displays the current size of the VE. | |
| Part Count | A non-editable column that displays the number of partitions defined for the VE. | |
| Partition List | A non-editable column that displays the list of partitions defined for the VE. |
There are two popup menus available in the Create Volume dialog.
This menu is displayed by pressing the right-hand mouse button while the cursor is in the data input matrix. The actions taken as a result of selecting an item in the popup menu apply only to the currently selected VE. The options are:
| Set Type to Stripe |
| |
| Set Type to Concat |
| |
| Clear Stripe Units |
| |
| Clear Start | This option clears the Start entry. | |
| Clear Partition List |
|
This menu is displayed by pressing both the <Shift> key and the right mouse button while the cursor is in the data input matrix. The actions taken as a result of selecting an item in the popup menu apply to all volume elements currently in the data input matrix. The options are:
| Set Type to Stripe |
| |
| Set Type to Concat |
| |
| Clear Stripe Units |
| |
| Clear Start | This option clears all Start entries. | |
| Clear Partition List |
|
The volume graphic, located at the lower left of the dialog, displays the relative sizes for each non-empty VE (a VE that has at least one partition configured) in the volume. The graphic is shown in Figure 4-8:
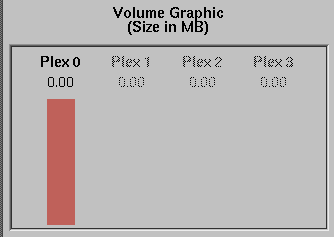
The Volume Graphic is updated when a change is made and accepted into the subvolume matrix.
The partition search results section is a scrolled list of the results from the Partition Search dialog. That dialog is described in “xlvm Partition Search Dialog”. There is a push button that displays the Partition Search dialog to allow you to generate a list of partitions. The Partition Search Results section is shown in Figure 4-9:
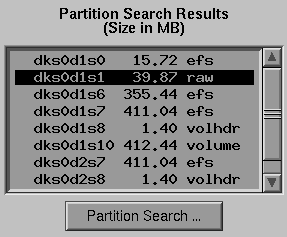
Each partition in the list is represented by four columns of information:
| Availability | This column may contain one of the following values: a blank space, a plus sign (+), or an asterisk (*).
| |
| Name | The final component in the device name path for the partition. | |
| Size | The size of the partition in Megabytes. | |
| Type | The partition type assigned when the partition was created. See “Partition Matrix Columns” for more information on disk partition types. |
The Partitions Selected section of the dialog is a scrolled list of the partitions assigned to the current VE from the Partition Search Results section. This section of the dialog is found immediately to the right of the Partition Search Results section, with a pair of arrow buttons to move partition entries from the Partition Search Results list to the selected list and back. Double-clicking an entry also moves it from one list to the other. Figure 4-10 shows both the Partition Search Results section and the Partitions Selected section together:
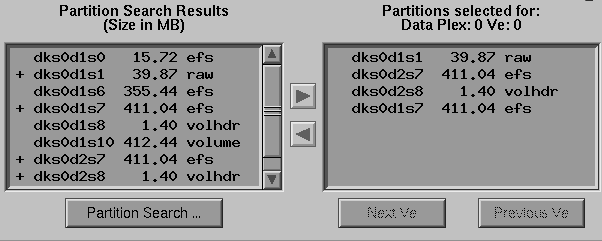
Each item in the Partitions Selected list represents a partition and is divided into three columns of information:
| Name | The final component in the device name path for the partition. | |
| Size | The size of the partition in megabytes. | |
| Type | The partition type assigned when the partition was created. See “Partition Matrix Columns” for more information on disk partition types. |
Additionally, there are two buttons beneath the Partitions Selected section that perform the following functions:
| Next Ve | This push button provides a convenient method for traversing down the list of VEs in the data input matrix, selecting partitions. | |
| Previous Ve | This push button provides a convenient method for traversing up the list of VEs in the data input matrix, selecting partitions. |