This chapter explains how to install or remove DIMMs (double in-line memory modules), PCI option boards, or the flat panel/stereo view option board. The following topics are covered:
 | Caution: Boards and DIMMs are extremely sensitive to static electricity. Handle the boards carefully, and wear the wrist strap while installing the hardware. |
Before installing memory or option boards, you must turn off the workstation, remove the power cable, and remove the system module from the chassis.
 | Note: The illustrations show an O2 R5000 workstation. Installing and removing the system module is the same for the O2 R10000 workstation. |
Turn off the workstation by pressing the power button on the front (Figure 2-1).
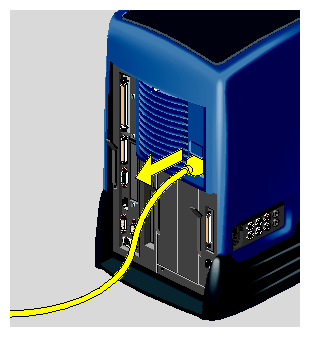
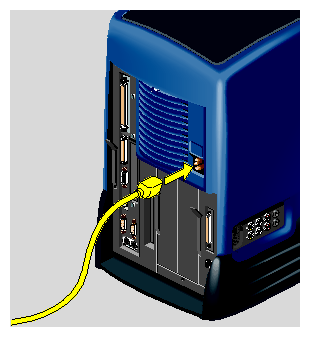
Remove the power cable from the rear. (Figure 2-2).
Caution: Always remove the power cable before removing the system module from the workstation. When you walk quickly across a room, or sit down or stand up, you build up a lot of static electricity. To perform any of the hardware tasks on the system module, it's a good idea to stand in one place until you've completed the task.
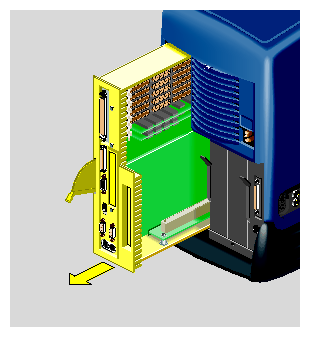
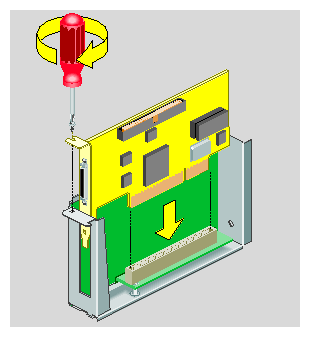
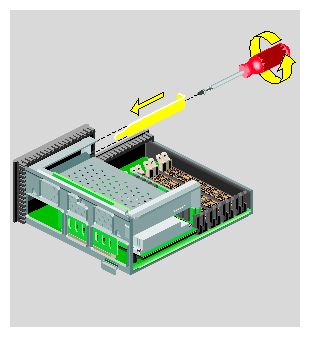
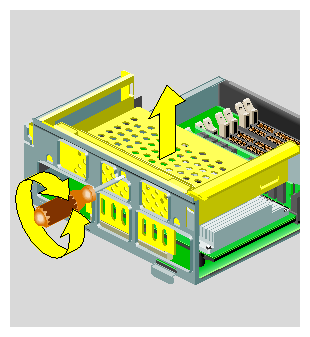
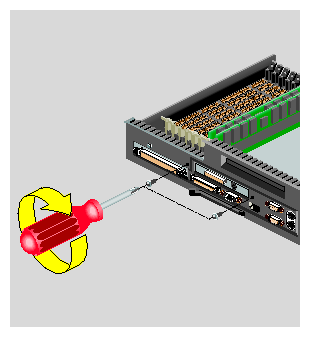
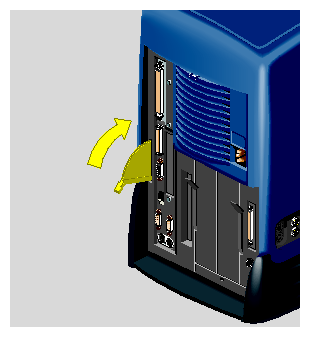
The system module is on the left as you face the rear. Pull down the lever on the left side of the module to release it (Figure 2-3).
Note: There is no need to remove the cables from the system module, as long as you are careful when handling it.
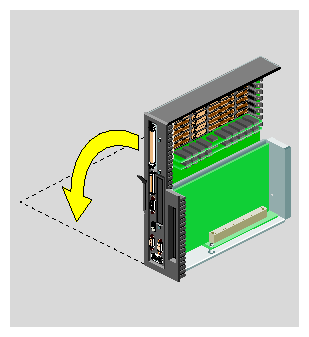
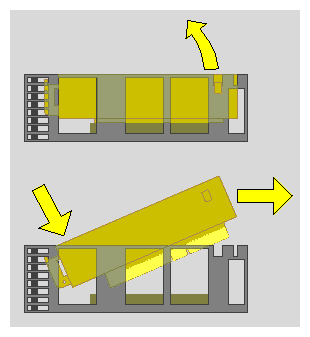
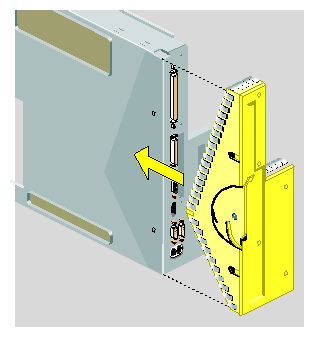
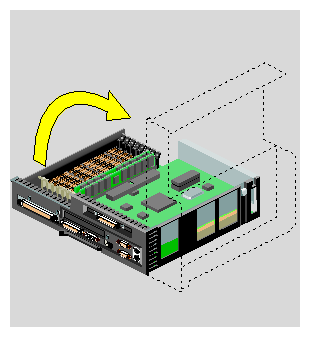
Slide the system module out of the chassis (Figure 2-4).
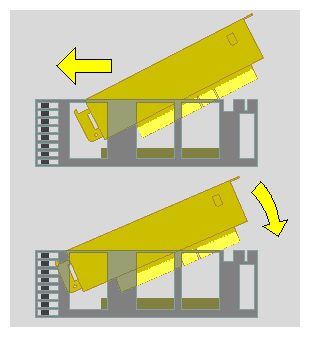
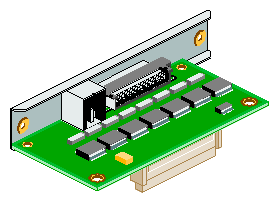
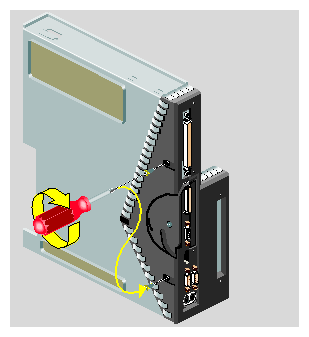
Lay the system module on a clean, flat surface, such as your desktop (Figure 2-5).


To install memory, go to “Installing Memory Modules.”
To install a PCI option board on an R5000 workstation, go to
To remove a PCI option board on an R5000 workstation, go to “Removing the PCI Tray: R5000 Workstation.”
To install a PCI option board on an R10000 workstation, go to “Installing a PCI Board: R10000 Workstation.”
To remove a PCI option board on an R10000 workstation, go to “Removing the PCI Tray: R10000 Workstation.”
To install a digital display adapter board (such as the Presenter 1280 adapter), go to “Installing a Digital Display Adapter Board.”
To remove a digital display adapter board, go to “Removing a Digital Display Adapter Board.”
To see a 3D animation of installing memory modules, click Hardware Central . When the browser window opens, click “Hardware Overview” and then “Installing Memory Modules.” (If your web browser is not loaded, it takes a few seconds to load.) If you are viewing this on a remote server, the 3D animation is not available.
| Note: The illustrations show an O2 R5000 workstation. Installing and removing memory modules is the same for the O2 R10000 workstation. |
| Caution: The O2 workstation uses DIMMs (Double Inline Memory Modules). DIMMs are extremely sensitive to static electricity. Handle the modules carefully, and wear the wrist strap while installing them. |
If you have not already done so, remove the power cable, and remove the system module from the chassis. See “Removing the System Module.”
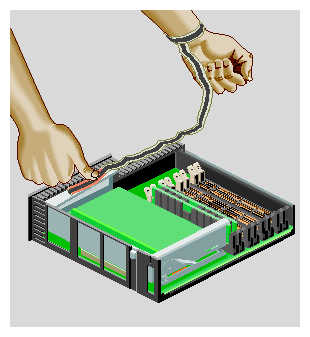
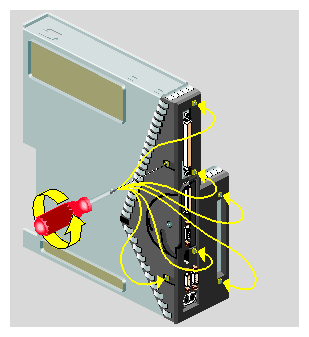
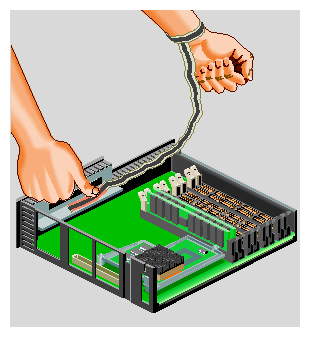
Components on the system module are extremely sensitive to static electricity. Before touching any of the components, ground yourself to a metal part of the chassis. Attach the wrist strap to your wrist and to the PCI tray (Figure 2-6).
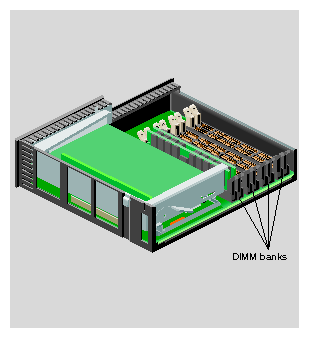
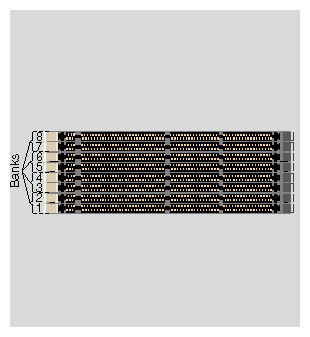
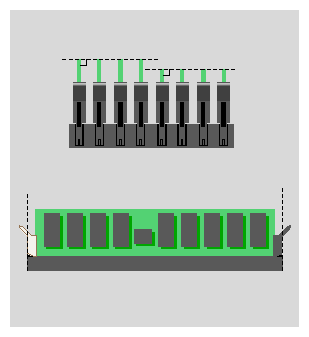
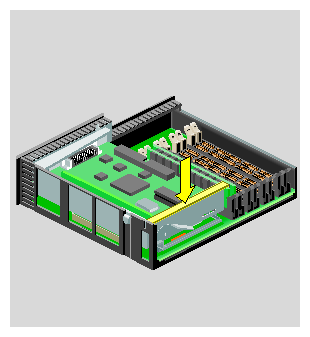
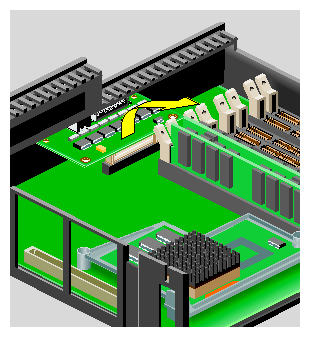
Familiarize yourself with the memory (DIMM) banks (Figure 2-7) and (Figure 2-8). There are eight sockets, numbered 1 through 8. Two sockets form a bank.
The minimum configuration has 32 MB of memory—one 16 MB module installed in slot 1 and one 16 MB module installed in slot 2.
Read the following guidelines and then go to the next step.
Sockets 1 and 2 must always be populated.
Install the DIMMs in groups of two.
A bank of two slots must have a DIMM in each slot or be empty (except for slots 1 and 2 which must always be populated).
A bank of two slots must have the same capacity DIMM installed in each slot. You cannot mix capacities in one bank.
For example, you can install a 16 MB module in slot 3, a 16 MB module in slot 4, a 32 MB module in slot 5 and a 32 MB module in slot 6.
But you cannot install a 16 MB module in slot 3 and a 32 MB module in slot 4.
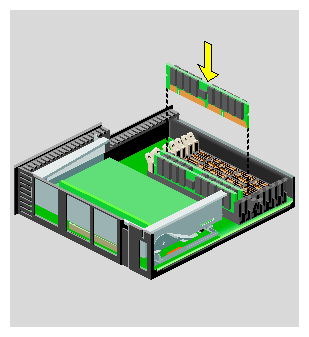
Install the DIMMs consecutively in group of two, beginning with the lowest open slot (Figure 2-9).
Check the DIMMs visually to make sure they are installed correctly (Figure 2-10).
Remove the wrist strap and go to “Reinstalling the System Module.”
If you have not already done so, remove the power cable, and remove the system module from the chassis. See “Removing the System Module.”
Before touching any of the components, ground yourself to a metal part of the chassis. Attach the wrist strap to your wrist and to the PCI tray (Figure 2-11).
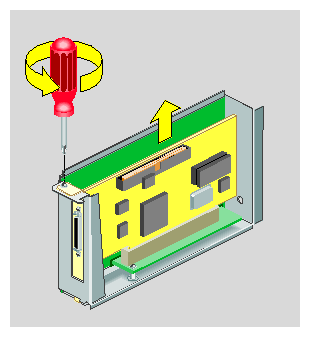
Remove the DIMM by pushing down the latches on both sides to release it. Pick up the DIMM and set it aside (Figure 2-12).
To install memory modules, see “Installing Memory Modules.”
Or, remove the wrist strap and go to “Reinstalling the System Module.”
| Note: Check the documentation that comes with the PCI board for instructions on installing the software. The software may include online software guides. |
If you have not already done so, remove the power cable, and remove the system module from the chassis. (See “Removing the System Module.”)
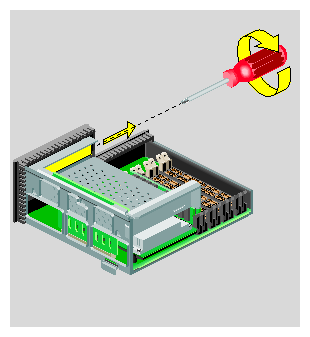
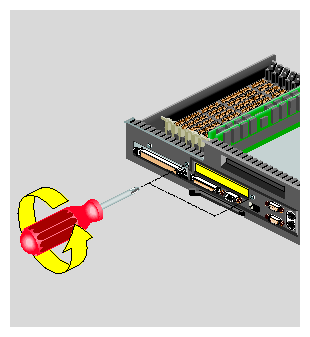
Caution: The small, printed circuit board beneath the PCI tray contains a host chip with important system information such as the serial number. Do not mix PCI trays between workstations. If you remove the PCI tray, always replace it, or the workstation will not operate correctly. Release the PCI tray by pushing up the lever on the side (Figure 2-13). The tray pops up.
Push down slightly on the rear of the PCI tray and remove it from the system module (Figure 2-14).
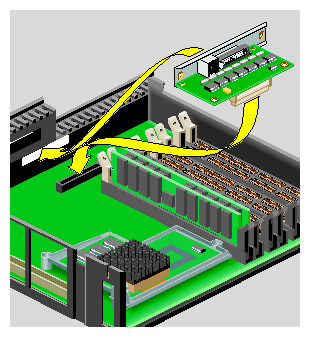
Hold the PCI tray with one hand and remove the screw and the filler panel from the tray (Figure 2-15). Keep the panel and screw. If you later remove the PCI board and do not replace it, you must reinstall the filler panel.
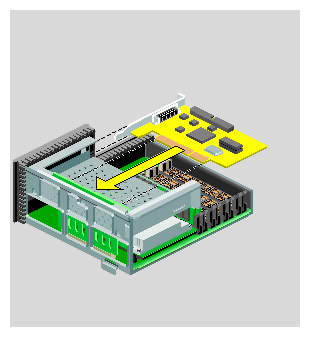
Slide the PCI board into the tray and push the PCI connector firmly into the slot (Figure 2-16). Make sure it is completely seated.
Replace the screw and tighten it (Figure 2-16).
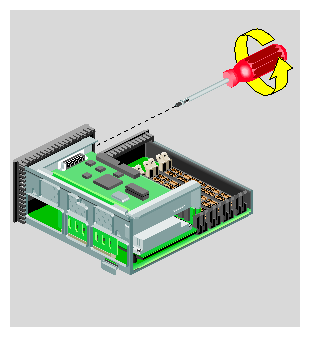
Replace the tray in the system module (Figure 2-17).
Push the tray down firmly until it is completely seated. Check that the lever returns to its starting position (Figure 2-18).
Caution: If the PCI tray is not completely seated, the system module will not slide back into the chassis.
Note: If the option board you installed comes with a cable, remember to connect the cable to the option board's external port, after reinstalling the system module.
If you have not already done so, remove the power cable and remove the system module from the chassis. (See “Removing the System Module.”)
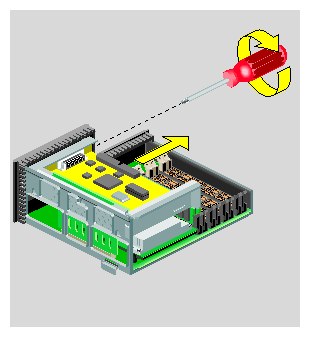
Release the PCI tray by pushing up the lever on the side (Figure 2-19). The tray pops up.
Push down slightly on the rear of the PCI tray and remove it from the system module (Figure 2-20).
Remove the screw that secures the board (Figure 2-21). Slide the PCI board out of the tray. It may be a little difficult to remove.
If you are installing another PCI board, see “Installing a PCI Board: R5000 Workstation”. Otherwise, replace the filler panel and screw (Figure 2-22). (You removed the panel and screw when you installed the board.)
| Note: Check the documentation that comes with the PCI board for instructions on installing the software. The software may include online software guides. |
If you have not already done so, remove the power cable, and remove the system module from the chassis. (See “Removing the System Module.”)
Caution: The small, printed circuit board beneath the PCI tray contains a host chip with important system information such as the serial number. Do not mix PCI trays between workstations. If you remove the PCI tray, always replace it, or the workstation will not operate correctly. Remove the screw and filler panel from the PCI tray.
Keep the panel. If you later remove the PCI board and do not replace it, you must reinstall the filler panel and screw (Figure 2-23).
Install the PCI board as follows:
Slide the PCI board into the tray and push the PCI connector firmly into the slot. Make sure it is completely seated (Figure 2-24).
You may need to use some pressure to seat it all the way.
Insert and tighten the screw that secures the PCI board (Figure 2-25).
Remove the screw that secures the PCI board (Figure 2-26).
Slide the PCI board out of the tray. It may be a little difficult to remove.
If you are installing another PCI board, see “Installing a PCI Board: R10000 Workstation.” Otherwise, replace the screw and filler panel. (You removed the screw and panel when you first installed the board.)
The figures in this section show an adapter board similar to the one that supports the Presenter 1280 monitor and stereo view (Figure 2-28).
The board you are installing may look different, but the installation steps are the same. See also any documentation that comes with the adapter board.
| Caution: Option boards are extremely sensitive to static electricity. Handle it carefully, and wear the wrist strap while installing the board. |
The slot for the display adapter is on the system module.
If you have not already done so, remove the power cable, and remove the system module from the chassis. (See “Removing the System Module.”)
To remove the PCI tray:
If you have an R5000 workstation, go to “Removing the PCI Tray: R5000 Workstation.”
If you have an R10000 workstation, go to “Removing the PCI Tray: R10000 Workstation.”
Push up the lever on the side of the PCI tray to release it (Figure 2-29). The tray pops up.
Push down slightly on the rear of the PCI tray and remove it from the system module (Figure 2-30). Do not remove the PCI board from the tray, if one is installed.
To remove the PCI tray in an R10000 workstation, you must first remove the plastic face plate on the system module.
Remove the plastic face plate of the system module as follows:
Use a Phillips screwdriver to remove five screws in the rear and two screws on the underside, in the locations shown (Figure 2-31).
Caution: On the underside, remove only two screws. Do not remove the third screw that attaches the lever to the face plate.
Lift the face plate away from the module. The filler panel covering the I/O port falls away as you remove the face plate.
Remove the PCI tray from the system module. If a PCI board is installed in the tray, do not remove it from the tray.
Insert a screwdriver in the small opening shown (Figure 2-33) and a prying or twisting motion to release the PCI tray from the system module.
Pull the PCI tray straight up to remove it and set it aside.
| Note: The illustrations show an R5000 workstation. The installation steps are the same for an R10000 workstation. |
Before touching any of the components, attach the wrist strap to your wrist and to the metal part of the chassis (Figure 2-34).
If there is a filler panel covering the I/O slot, remove it as follows:
Use a Phillips screwdriver to remove the two screws that hold it (Figure 2-35).
Push the filler panel inward.
Remove the filler panel and save it. In the event that you remove the digital display adapter board and do not replace it, you must reinstall the panel.
To install the digital display adapter board, align the connector beneath the board with the connector on the system board (Figure 2-36). Push the board firmly into the socket until the connectors are completely seated.
Insert and tighten two screws in the locations shown (Figure 2-37).
Remove the wrist strap.
Reinstall the PCI tray.
R5000 workstations, go to “Reinstalling the PCI Tray: R5000 Workstation.”
R10000 workstation, go to “Reinstalling the PCI Tray: R10000 Workstation.”
Reinstall the PCI tray in the system module (Figure 2-38).
Push the tray down firmly until it is completely seated. Check that the lever returns to its starting position (Figure 2-39).
Caution: If the PCI tray is not completely seated, the system module will not slide back into the chassis.
Replace the PCI tray in the system module as follows:
Lower the PCI tray, engaging it on the tab on the side of the system module (Figure 2-40).
Insert the PCI connector beneath the tray into the slot on the system module.
Once the connector is aligned, push down firmly until it is completely seated.
Note: If the PCI tray is not completely seated, the system module will not slide back into the chassis.
Replace the face plate on the system module as follows:
Replace the filler panel over the I/O opening on the inside of the face plate.
Align the face plate on the system module (Figure 2-41).
Use a Phillips screwdriver to insert and tighten two screws on the underside in the locations shown (Figure 2-42).
Use a Phillips screwdriver to insert and tighten five screws on the rear in the locations shown (Figure 2-43).


If you have not already done so, remove the power cable, and remove the system module from the chassis. (See “Removing the System Module.”)
To reach the digital display adapter board, you must first remove the PCI tray.
R5000 workstations, see “Removing the PCI Tray: R5000 Workstation.”
R10000 workstations, see “Removing the PCI Tray: R10000 Workstation.”
Before touching any of the components, attach the wrist strap to your wrist and to a metal part of the chassis (Figure 2-28).
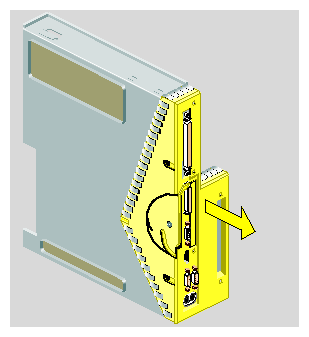
Grasp the board on either side and gently rock it out (Figure 2-45). Do not exaggerate the rocking motion, or you will bend the pins.
If you are installing another display adapter option board, see “Installing the Adapter Board.” Otherwise, replace the filler panel that you removed when you installed the first display adapter board.
Remove the wrist strap.
To reinstall the PCI tray:
R5000 workstations, see “Reinstalling the PCI Tray: R5000 Workstation.”
R10000 workstations, see “Reinstalling the PCI Tray: R10000 Workstation.”
| Note: The illustrations show an R5000 workstation. Installing the system module is the same for an R10000 workstation. |
Return the system module to its upright position (Figure 2-46).
Slide the system module into the chassis until the lever engages (Figure 2-47).
Push the lever up to lock the module in place (Figure 2-48).
Remove the wrist strap from the chassis.
Reconnect the power cable and any other cables you removed (Figure 2-49).
If you installed an option board that has a cable, connect the cable to the I/O port on the board you installed.
Turn on the workstation by pressing the power button on the front (Figure 2-50).

Once you've installed memory or option boards, you should verify that the system recognizes the new hardware.
Log in to your account.
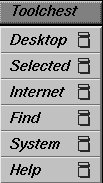
From the Toolchest, choose System > System Manager > About This System.
Look under the Hardware menu.
If you installed memory, check the amount of memory shown. It should equal the total amount that you installed.
For example, if you had 32 MB of memory when you started and you installed another 64 MB, the total shown should be 96 MB.
If the system does not show the total amount of memory you installed, turn off the workstation, remove the power cable, remove the system module, and make sure all the DIMMs are installed correctly. (See “Installing Memory Modules.”). See also Chapter 4, “Troubleshooting.”
If you installed a PCI option board, it will display. (For some option boards, the software must be installed before the board is shown.) If it is not shown, turn off the workstation, and go over the installation steps again to make sure the board is seated correctly. (See “Installing a PCI Board: R5000 Workstation,” or “Installing a PCI Board: R10000 Workstation.”)