This chapter contains the following sections:
The Silicon Graphics 320 visual workstation contains slots for two processors—a primary processor and an optional secondary processor. If you are installing a secondary processor, the stepping value must match that of the primary processor. See “Finding the Stepping Value of a Processor” for more information.
After installing a secondary processor, or installing an upgrade, you need to reinstall the Windows NT system software. It is a good idea to back up your files before performing this installation.
Shut down the system and turn off the power. For detailed instructions, see “Shutting Down the System”.
Unplug the power cord from the back of the system.
Remove the side cover. For detailed instructions, see “Removing the Side Cover”.
Touch a metal part of the chassis with your hand to discharge any static you might be carrying.
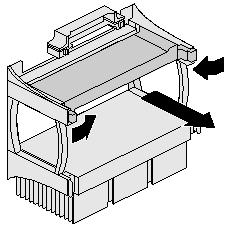
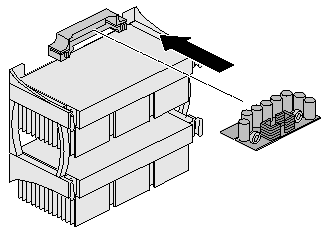
If you are installing a secondary processor, remove the processor terminator card from the secondary processor slot, as shown in Figure 6-1. Push the latches on the outside edges of the terminator inward and pull the terminator out of the slot.
Save the terminator. In the future, if you remove the processor, you will need to reinstall the terminator.
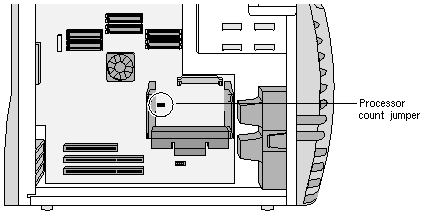
Make sure the processor count jumper is in the correct position for the number of processors in the system.
If you are only installing a primary processor and are leaving a processor terminator in the top slot, move the jumper to the two leftmost pins.
If you are installing a secondary processor, move the jumper to the two rightmost pins.
Table 6-1 shows the correct jumper position for the number of processors. Figure 6-2 shows the location of the processor count jumper in the system.
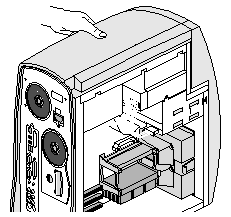
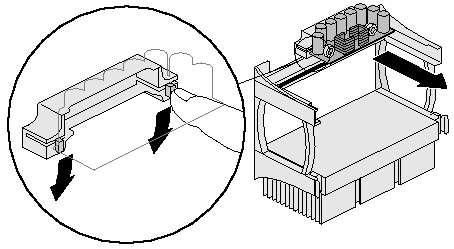
Place one hand on top of the system unit to stabilize it while you install the processor, as shown in Figure 6-3.
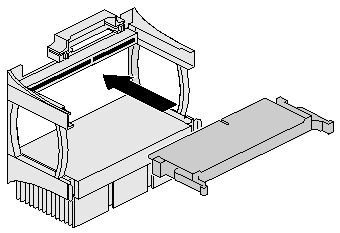
Install the processor, as shown in Figure 6-4.
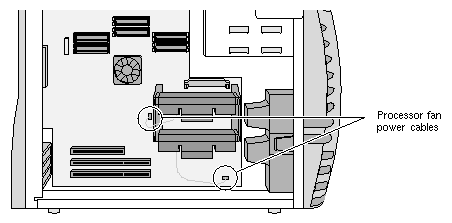
If the processor has a fan attached to it, attach the fan power supply cable to the appropriate connector on the board, as shown in Figure 6-5.
If you are installing a processor in the top slot, install the voltage regulator that ships with the processor, as shown in Figure 6-6. (If a voltage regulator is already installed, you do not need to remove it or reinstall it.)
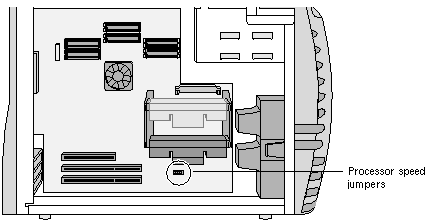
Move the processor speed jumpers to the appropriate positions for the processor or processors you are installing. Table 6-2 shows the processor speed jumper positions. Figure 6-7 shows the location of the processor speed jumpers on the system board.
Table 6-2. Processor Speed Jumper Positions
Processor Speed
Jumper Configuration
350 MHz
400 MHz
450 MHz
Replace the side cover. For detailed instructions, see “Replacing the Side Cover”.
Reattach the power cord.
If you installed a processor upgrade, you need to reinstall the system software. To do this, see the Silicon Graphics 320 and Silicon Graphics 540 Software Installation Guide found in the CD packet that shipped with your system.
If you did not install an upgrade, turn on the system. For detailed instructions, see “Turning On the System”.


If the system does not boot, the primary processor may be installed incorrectly. Shut down and reopen the system. Then:
Make sure the primary processor is securely seated in the bottom slot.
Make sure the processor speed jumpers are set correctly (see Figure 6-7).
If you installed a processor upgrade, make sure you reinstalled the system software. (See the Silicon Graphics 320 and Silicon Graphics 540 Software Installation Guide for instructions.)
Close and reboot the system. If it still does not boot, the processor may be faulty. Contact your support representative.
Use the Windows NT Diagnostics panel to verify that the system recognizes the processor. To open the panel, select Start > Programs > Administrative Tools > Windows NT Diagnostics. Click the System tab and look under the Processors list to find the processor or processors you installed.
If the system does not recognize the secondary processor, the processor may be installed incorrectly. Shut down and reopen the system. Then:
Make sure the processor is securely seated in the slot.
Make sure the processor count jumper is installed on the two rightmost pins (Figure 6-2).
Close and reboot the system. If the system still does not recognize the processor, it may be faulty. Contact your support representative.
Shut down the system and turn off the power. For detailed instructions, see “Shutting Down the System”.
Unplug the power cord from the back of the system.
Remove the side cover. For detailed instructions, see “Removing the Side Cover”.
Touch a metal part of the chassis with your hand to discharge any static you might be carrying.
If the processor has a fan attached to it, disconnect the fan power supply cable from the associated connector on the system board, as shown in Figure 6-8.
Push the latches on the sides of the processor inward and pull the processor out of the system, as shown in Figure 6-9.
If you are installing a replacement processor or upgrade, see “Installing a Processor”.
If you removed the secondary processor and installed a processor terminator card, also remove the voltage regulator, as shown in Figure 6-10.
If you removed a processor from the top slot and are not replacing it, install the processor terminator card, as shown in Figure 6-11.
If you installed a processor terminator in the top slot, make sure the processor count jumper is on the two leftmost pins. (See Table 6-1 for the correct jumper position and Figure 6-2 to see the location of the jumper on the system board.)
Replace the side cover. For detailed instructions, see “Replacing the Side Cover”.
Reattach the power cord.
Turn on the system. For detailed instructions, see “Turning On the System”.

The Silicon Graphics 320 visual workstation contains slots for two processors—a primary processor and an optional secondary processor. The chip revision—called stepping value—of the secondary processor must match that of the primary processor. When ordering a secondary processor, you will need to give the stepping value of the primary processor. To find the stepping value:
Select Start > Settings > Control Panels from the Windows NT task bar. Then double-click the System icon to open the System panel.
Click the General tab and look below the Computer label for the line that includes the stepping value. It should look similar to the following:
x86 Family 6 Model 3 Stepping 4
In this example, the stepping value for the processor is 4.