This chapter contains the following sections:
Table 8-1 lists system problems, possible causes, and recommended solutions.
Table 8-1. Troubleshooting (continued)
Symptom | Possible Cause | Solution |
|---|---|---|
AC power cable disconnected. | Check power connection from power source to workstation. | |
| Power supply cable not attached to system board. | Make sure power supply cables are attached to system board. |
|
| Check to see if internal fans are working and if LED in upper right corner of system board is lit. If fans are working and LED is lit, system board is receiving power. |
| Primary processor not recognized. | Reinstall primary processor and if a secondary processor isn't installed, make sure a terminator card is installed in the top slot. |
| Power button and LED cables not attached to system board. | Make sure internal power button and LED cables are plugged into system board (see diagram inside the side panel to locate the power button and LED cable connectors). |
| Primary processor failure. | Replace the processor. |
| Power supply failure. | Replace the power supply. |
| System board failure. | Replace the system board. |
System powers on, green LED blinks continuously, nothing appears on monitor. | Memory error. | Make sure all DIMMs
installed in slot group A are
the same capacity. |
| Voltage regulator installed with terminator in secondary processor slot. | If you have a terminator in the secondary processor slot, make sure the voltage regulator is removed. |
| Memory failure. | Replace DIMMs. |
| System board failure. | Replace system board. |
System powers on, green LED blinks a repeating pattern, nothing appears on monitor. | Memory failure. | Locate and replace the faulty DIMM by interpreting the LED blink code. For information, see “Interpreting LED Blink Codes”. |
System boots to PROM level, doesn't boot Windows NT. | Memory error or failure. | Make sure all DIMMs
installed in slot group A are
the same capacity. |
| System drive not recognized. | Make sure drive is set to
Master, installed in the
bottom slot, and IDE cable
and power cables are
attached correctly. |
| Software does not recognize new processor. | Reinstall Windows NT. See the Silicon Graphics 320 and Silicon Graphics 540 Software Installation Guide for instructions. |
Mouse or keyboard unplugged. | Plug mouse into keyboard; plug keyboard into leftmost USB connector. | |
| Mouse not recognized. | Press Reset button to reboot the system. |
| Faulty or incompatible keyboard or mouse. | Replace keyboard or mouse. |
Keyboard not plugged in or not recognized. | Plug keyboard into leftmost
USB port. | |
| Faulty or incompatible keyboard. | Replace keyboard. |
Power cable unattached or monitor not turned on. | Attach the power cable. | |
| Monitor dead. | Replace the monitor. |
Monitor powers on, no display, system LED on but does not blink continuously. | Monitor brightness controls too dark. | Increase brightness. |
| Monitor cable unattached. | Check monitor cable connection to system and monitor. |
Internal drive not recognized. | Cables connected incorrectly or disconnected. | Verify correct IDE or SCSI
cabling. |
| IDs set incorrectly. | Verify Master and Slave
settings for IDE drives. |
Card not correctly installed in slot. | Reinstall the card. | |
| Card not supported. | Remove the card. |
Processor not correctly installed in slot. | Reinstall the processor. | |
| Jumper not installed correctly. | Make sure the jumper beneath the secondary processor sits on the two rightmost pins. |
| Voltage regulator not installed or bad. | Install or replace the voltage regulator. |
The LED on the front of the system blinks randomly while the system powers up and runs power on diagnostics. If the system boot is successful, the NT login screen appears on your monitor. If the boot is unsuccessful, the LED blink codes may help you determine the error.
The LED blinks continuously if a fatal system board error occurs.
The LED blinks, then pauses, then blinks again if a memory error occurs in slot group A. The blink code communicates the number of the DIMM that failed (DIMMs in slot group A are numbered A1 through A6).
For example, if the LED blinks once, then pauses, then blinks again, the DIMM in slot A1 failed. If the LED blinks five times, then pauses, then blinks five times again, the DIMM in slot A5 failed.
The LED blinks seven or eight times, then pauses, then blinks seven or eight times again if a memory error occurs that diagnostics cannot isolate to a particular DIMM.
Shut down, power off, and unplug the workstation from an electrical outlet before performing any hardware task.
Do not block the vents by placing objects around the workstation.
Always discharge any static electricity by touching the metal chassis before beginning work on the DIMMs, processors, PCI cards, and system board. Wear a wrist strap attached to the chassis if you have one.
Do not plug in any cables to the workstation while the workstation is running except audio, IEEE 1394, and USB cables.
Keep liquids away from the keyboard and workstation.
Periodically vacuum dust from the vents to maintain optimal air flow through the system.
If you do not know your password, you can disable it by moving a jumper on the system board.
Shut down the system and turn off the power. For detailed instructions, see “Shutting Down the System”.
Unplug the power cord from the back of the system.
Remove the side cover. For detailed instructions, see “Removing the Side Cover”.
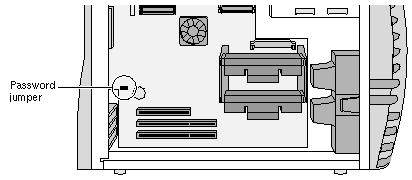
Locate the password jumper just above the PCI card slots on the system board, as shown in Figure 8-1.
To disable the password, move the jumper to the two rightmost pins, as shown in Figure 8-2.
Reattach the power cord.
Turn on the system. For detailed instructions, see “Turning On the System”.
Enter a new password when prompted to do so.
Shut down the system and remove the power cord from the back of the system.
Move the jumper to the two leftmost pins, as shown in Figure 8-3. Then reattach the power cord, replace the side cover, and power up the system.
Your new password is now enabled.