This appendix lists and describes the status and error messages generated by the L1 and L2 controllers. It also explains how to resolve the errors, if action is necessary.
The L1 controller front panel display shown in Figure C-1 consists of a 2-line, 12-character liquid crystal display (LCD) that provides the following:
Brick identification
System status
Warning of required service or failure
Identification of failed components

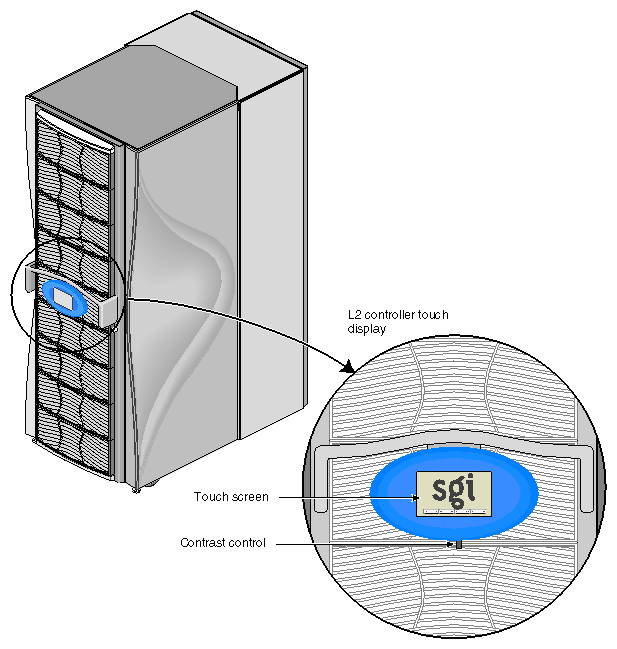
Note: Besides the L1 control display, if you have an L2 controller, you can see the L1 controller messages on the L2 controller touch display located on the front door of the rack where the L2 controller resides. If you have a system console, you can also see the L1 controller messages on your system console.
Besides the display, the L1 controller front panel also includes the following items:
On/Off switch with LED (brick reset button with LED). Pressing this button turns on the brick's internal components. The LED on the button lights green when the brick's internal components are on and turns off when the internal components are off.
Service required LED. Lights orange to indicate that some item is broken or not operating properly (for example, a fan is off), but the brick is still operating.
Failure LED. Lights red to indicate that a system failure has occurred and the brick system is down.
The following items are available on the C–brick only:
Reset switch. Use this switch to reset the C–brick internal processors and ASICs. The reset will cause a memory loss. (See the non-maskable interrupt information that follows to perform a reset without losing memory.)
Non-maskable interrupt (NMI) switch. Use this switch to reset the C–brick internal processors and ASICs without losing memory.
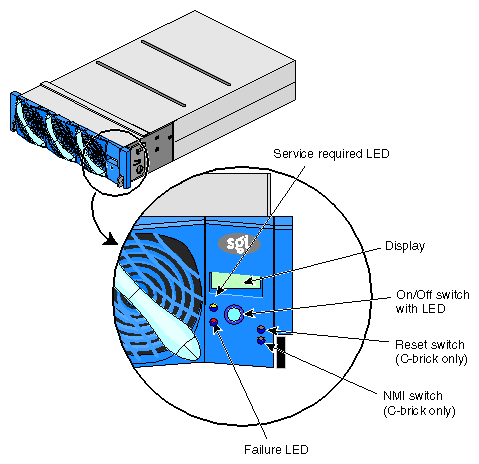
Table C-1 lists the L1 controller messages.
| Note: Note that in Table C-1, a voltage warning occurs when a supplied level of voltage is below or above the nominal (normal) voltage by 10 percent. A voltage fault occurs when a supplied level is below or above the nominal by 20 percent. |
Table C-1. L1 Controller Messages
L1 System Controller Message | Message Meaning and Action Needed |
|---|---|
Internal voltage messages: |
|
ATTN: x.xV high fault limit reached @ x.xxV | 30-second power off sequence for the brick (or system, if no backup is available). |
ATTN: x.xV low fault limit reached @ x.xxV | 30-second power off sequence for the brick (or system, if no backup is available). |
ATTN: x.xV high warning limit reached @ x.xxV | A higher than nominal voltage condition is detected. |
ATTN: x.xV low warning limit reached @ x.xxV | A lower than nominal voltage condition is detected. |
ATTN: x.xV level stabilized @ x.xV | A monitored voltage level has returned to within acceptable limits. |
Fan messages: |
|
ATTN: FAN # x fault limit reached @ xx RPM | A fan has reached its maximum RPM level. The ambient temperature may be too high. Check to see if a fan has failed. |
ATTN: FAN # x warning limit reached @ xx RPM | A fan has increased its RPM level. Check the ambient temperature. Check to see if the fan stabilizes. |
ATTN: FAN # x stabilized @ xx RPM | An increased fan RPM level has returned to normal. |
Temperature messages: low alt. |
|
ATTN: TEMP # advisory temperature reached @ xxC xxF | The ambient temperature at the brick's air inlet has exceeded 30 degrees centigrade. |
ATTN: TEMP # critical temperature reached @ xxC xxF | The ambient temperature at the brick's air inlet has exceeded 35 degrees centigrade. |
ATTN: TEMP # fault temperature reached @ xxC xxF | The ambient temperature at the brick's air inlet has exceeded 40 degrees centigrade. |
Temperature messages: high alt. |
|
ATTN: TEMP # advisory temperature reached @ xxC xxF | The ambient temperature at the brick's air inlet has exceeded 27 degrees centigrade. |
ATTN: TEMP # critical temperature reached @ xxC xxF | The ambient temperature at the brick's air inlet has exceeded 31 degrees centigrade. |
ATTN: TEMP # fault temperature reached @ xxC xxF | The ambient temperature at the brick's air inlet has exceeded 35 degrees centigrade. |
Temperature stable message: |
|
ATTN: TEMP # stabilized @ xxC/xxF | The ambient temperature at the brick's air inlet has returned to an acceptable level. |
Power off messages: |
|
Auto power down in xx seconds | The L1 controller has registered a fault and is shutting down. The message displays every 5 seconds until shutdown. |
Brick appears to have been powered down | The L1 controller has registered a fault and has shut down. |
The L2 controller performs the following functions:
Controls resource sharing.
Controls L1 controllers.
Resets the system.
Issues non-maskable interrupts (NMI).
Displays voltage margin information.
Routes data between upstream devices and downstream devices.
Upstream devices (for example, rack display, console, and modem) provide control for the system, initiate commands for the downstream devices, and act on the messages that they receive from downstream devices.
Downstream devices (for example, C-bricks, the USB hub of the R-brick, and L1 controllers of the bricks) perform the actions that are specified by the L2 controller commands, send responses to the L2 controller that indicate the status of the commands, and send error messages to the L2 controller.
Allows remote maintenance.
The L2 controller touch display is used to do the following:
Powering the system on and off
Monitoring voltage margins
Resetting the system
Entering a non-maskable interrupt (NMI)
The L2 controller also monitors and generates status and error messages related to the rack chassis items, such as the power bay and other rack items. The L2 controller also displays status and error messages generated by each individual brick's L1 controller.
(See “L1 Controller Messages” for L1 controller message descriptions.)
The L2 controller information is displayed on the L2 controller touch display located in the front door of your server system, as shown in Figure C-2. (The actual L2 controller is located on the top of your rack enclosure.)
| Note: Besides on the L2 controller touch display, if you have a system console, you can see the L2 controller messages on the system console. |
The L2 controller contains a software component that transfers data from a send client to the appropriate receive client. The clients with which the L2 controller communicates are local to the L2 controller.
The software allows the router clients to:
Register with the router (identifies the client with a unique ID).
Register to receive messages from other clients (local or remote).
Receive commands and send corresponding responses.
Send commands and receive corresponding responses.
Receive messages that they are registered to receive.
The L2 controller logs the following information in separate files:
Messages and command responses from the L1 controllers (includes the I/O bricks).
Messages and output from the system console.
Debugging messages that the L2 controller produces.
Commands and responses from the L2 controller touch display.
Messages and output that are sent to the console (attached to the L2 controller).
Messages and output that are sent to the modem port (attached to the L2 controller).