This chapter describes the function and physical components of the CR-brick in the following sections:
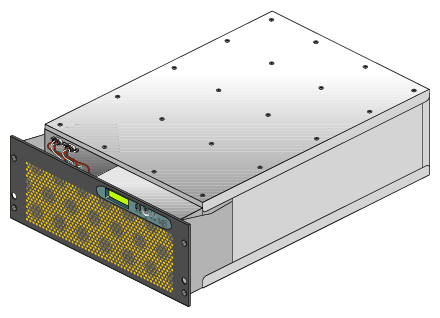
The CR-brick is a 4U-high enclosure that contains the compute and memory functionality for the SGI Altix 3700 Bx2 system. Figure 5-1 shows a front and side view of the CR-brick.
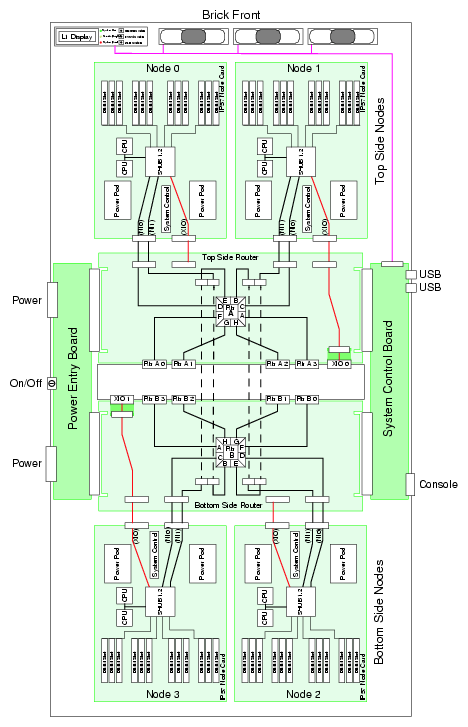
The CR-brick is divided into separate nodes that are connected internally by high-speed NUMAlink channels. Each node has two 64-bit processors and 12 memory DIMM slots connected to a custom-designed application-specific integrated circuit (ASIC). This ASIC is the heart of the CR-brick, and it provides an intelligent interface between the processors, memory, network fabric, and peripheral I/O.
The CR-brick has the following features:
Up to eight 64-bit RISC processors (two processors per node)
Large secondary caches (on each processor)
Up to 48 memory DIMM slots (12 slots per node)
Up to eight internal NUMAlink channels (two per node)
Up to eight external NUMAlink channels (two per node)
Two 1.2-GB/s (each direction) Xtown2 I/O channels
One USB port for system controller support
One serial console port
One L1 controller and LCD display
Three hot-pluggable fans
Figure 5-2 shows a block diagram of the CR-brick.
This section describes the external components located on the front and rear panels of the CR-brick.
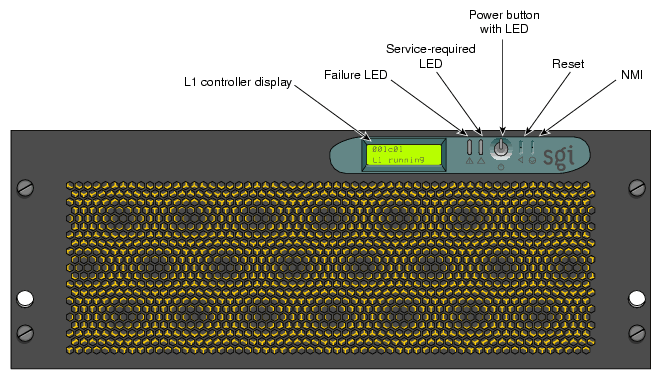
The CR-brick contains the following front panel items (see Figure 5-3):
Three hot-pluggable fans.
L1 controller display. The display is a 55.7 mm X 32mm backlit liquid crystal display (LCD) that displays system messages. It will display two lines with a maximum of 12 characters on each line.
On/Off switch with LED. Press this switch to turn on the CR-brick internal components. You can also turn these on at a system console.
L1 controller switches and LEDs:
On/Off LED. This LED illuminates green when the CR-brick internal components are on and turns off when they are off.
Service required LED. This LED illuminates orange to indicate that an item is broken or not operating properly (for example, a fan is off), but the CR-brick is still operating.
Failure LED. This LED illuminates red to indicate that a system failure has occurred and the CR-brick system is down.
Reset switch. Press this switch to reset the internal processors of the CR-brick. All register values will be reset to their default states and the operating system will be rebooted. (See the non-maskable interrupt [NMI] to perform a reset without losing the register data.)
Non-maskable interrupt [NMI] switch. Press this switch to force the CR-brick into power-on diagnostics (POD) mode. The PROM saves the register state for each CPU. On the next reboot, the operating system retrieves the information from PROM and logs it in the system log. SGI service personnel can also perform an error dump or other maintenance action before rebooting the partition. The NMI command is necessary to troubleshoot a system.
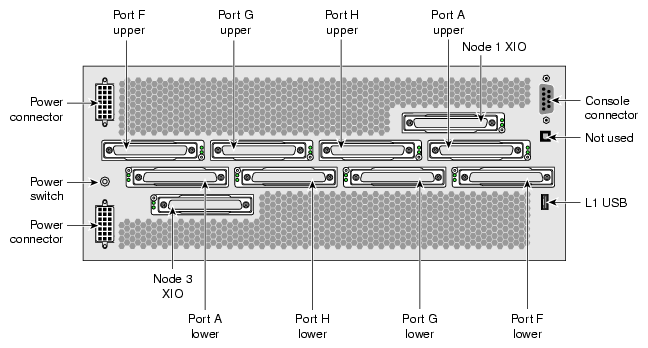
The CR-brick has the following rear panel items (see Figure 5-4):
Power switch. Move the power switch to the I position to power on the L1 controller within the CR-brick, and to the 0 position to power off the L1 controller. Powering on the L1 controller illuminates the 12-VDC LED green.
Two PWR (power) connectors. These connect the CR-brick to the power bay, to provide 12-VDC and 48-VDC power to the CR-brick.
48-VDC and 12-VDC LEDs. The power switch must be in the ON (I) position for these LEDs to be on. The 12-VDC LED illuminates green when the L1 controller is powered on and operating, and the 48-VDC LED illuminates green when the rest of the CR-brick internal components are powered on and operating. You can power on the internal components by pressing the On/Off switch (brick reset button) on the L1 controller panel.
NUMAlink connectors A, F, G, H (or Network Interface (NI) connectors). These upper and lower connectors attach the CR-brick to an R-brick or to other CR-bricks. These are connected with a NUMAlink cable at 3.2 GB/s in each direction.
Heartbeat LEDs. The four heartbeat LEDs turn on and off at a preset rate when the Linux operating system is running. The heartbeat LEDs indicate that the processor is functioning and can process an interrupt from the operating system. The LEDs for each node are arranged in pairs. The lower LED represents the processor 0 heartbeat, and the upper LED represents the processor 1 heartbeat.
Node 1 and Node 3 XIO (II - I/O Interface) connectors. These Xtown2 connectors connect a CR-brick to an IX-brick or PX-brick. These are connected with a NUMAlink cable at 1.2 GB/s in each direction.
Console connector. This is an RS-232 serial port (console and diagnostic port) that connects the L1 controller within a CR-brick to a system console. The CR-brick L1 controller communicates with a system console through the console connector, which provides a serial bus that uses the standard RS-232 protocol.
L1 host port connector. This universal serial bus (USB) connector connects to the L1 controller.
Processor status LEDs. The 32 processor status LEDs (8 for each processor) are used by SGI service engineers for diagnostic purposes.
Link and XIO connector LEDs. Each connector has an LED that illuminates yellow and an LED that illuminates green. One LED illuminates yellow to indicate that both the CR-brick and the brick to which it is connected are powered on. The other LED illuminates green when the link between the CR-brick and the other brick is established.
The node electronics are connected internally to two NL4 router ASICs. Each of the two router ASICs connects to four Dnet connectors on the rear panel of the CR-brick (8 total Dnet connectors). Two XIO ports from the node boards (node 1 and node 3 are brought out to the rear of the brick. Each node board contains two processors and 4, 8, or 12 memory DIMMs. The processors, memory, I/O, and network connections on each node board are interconnected via a SHub ASIC. This ASIC acts a a crossbar between the processor interface, local memory interface, network interface, and I/O interfaces.
| Note: The internal components of the CR-brick can be serviced only by trained SGI technicians. |
Eight 64-bit Intel Itanium 2 processors with secondary cache are mounted on half panel printed circuit boards (referred to as node boards). To reduce memory latency, each processor can access three levels of on-chip cache memory. L3 cache sizes and types vary with processor speed.
See “I/O Port Specifications” in Appendix A for pinout specifications for the non-proprietary connectors on the CR-brick.
See Table 5-1 for configurable items in the CR-brick.
Table 5-1. Configurable Items of CR-brick
Configurable Item | Options |
|---|---|
Memory size | 4, 8, or 12 DIMMs per node |
Processors | 0 or 8 per CR-brick |
| Note: A CR-brick with 0 processors on the internal node boards is generally referred to as a “memory only” brick or M-brick. |
The CR-brick has the following restrictions:
All processors within the CR-brick must be the same frequency; however, CR-bricks within a partition or system can have different processor speeds.
All processor revisions must be the same within a processor node.
The processor revisions of CPUs between processor nodes can be no greater than n+1.
All memory DIMMs within a memory bank (group) must be the same speed, capacity, and use the same chip technology.
Different logical banks within a CR-brick can have different DIMM capacities and chip technologies.
Memory DIMMs must be added in groups of four DIMMs per node board.
Table 5-2 lists the technical specifications of the CR-brick.
Table 5-2. CR-brick Technical Specifications
Characteristic | Specification |
|---|---|
Height | 6.67 in. (16.9 cm) |
Width | 19 in. (49.26 cm) |
Depth | 29 in. (73.66 cm) |
Weight | 68 lb (30.9 kg) maximum |
Input power | 48 VDC (~1300 W) |