The PX-brick is a PCI-X based I/O expansion subsystem that connects I/O devices to your server. The PX-brick supports both PCI and PCI-X protocol. PCI-X protocol enables I/O devices to operate at clock speeds of up to 133 MHz, or 1 GB/s. This protocol also enables I/O devices to operate more efficiently, thereby providing a higher sustained bandwidth at any clock frequency.
This chapter describes the function and physical components of the PX–brick, and it provides guidelines for configuring PCI cards in the brick. Specifically, it includes the following information:
-

Note: Throughout this chapter, the term “PCI card” refers to cards with PCI or PCI-X capabilities. When necessary, distinctions between the cards are noted. Note: For information about installing or replacing a PCI card, see “Installing or Replacing PCI or PCI–X Card” in Chapter 14.
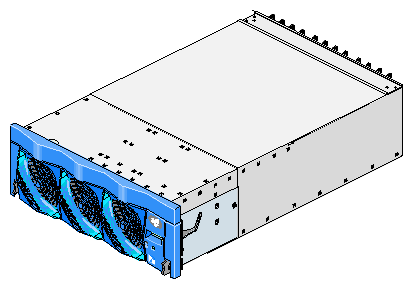
The 4U-high PX–brick shown in Figure 5-1 provides 12 card slots to support up to 12 PCI or PCI–X cards. The 12 slots are configured as six 2–slot buses.
Compared to the P–brick, the PX–brick offers the following enhancements:
The PX–brick supports both PCI cards and PCI–X cards.
The PX–brick can connect an InfiniteReality graphics pipe to a Cx-brick.
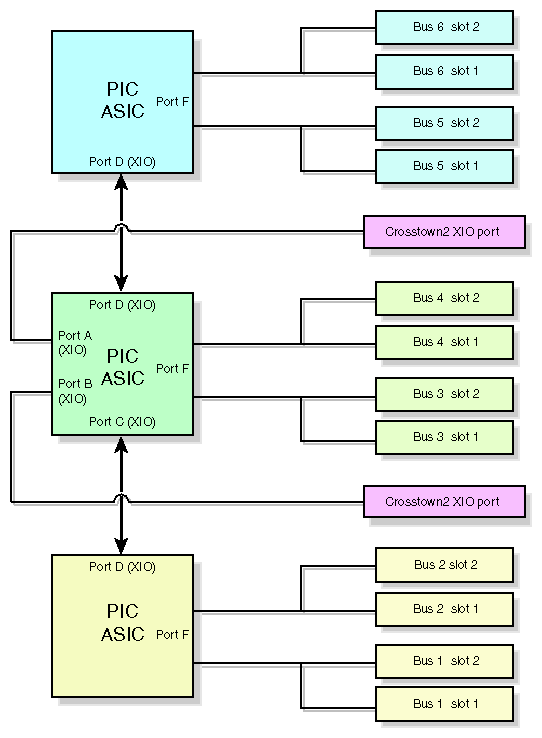
Three PIC (PCI interface chip) ASICs are key components of the PX–brick architecture. The PIC ASICs support the following (see Figure 5-2):
Two 1200- or 800-MB/s Xtown2 XIO ports. (You can select the MB/s setting with the L1 controller command XIO. For more information, see the SGI L1 and L2 Controller Software User's Guide.)
Six PCI/PCI–X buses. Each bus has two card slots in which you can install PCI or PCI–X cards.
This section describes the external components located on the front and rear panels of the PX–brick.
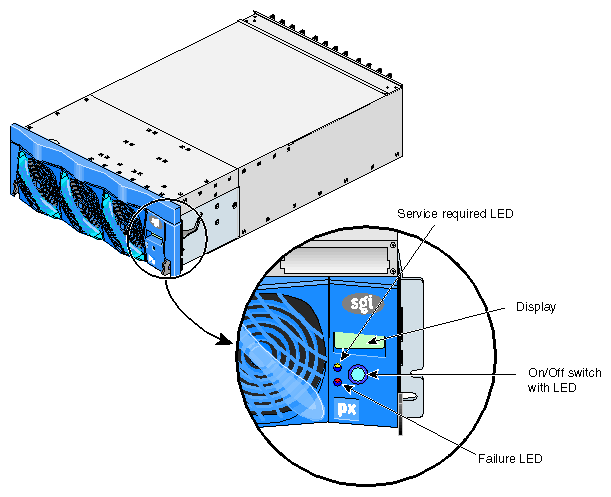
The following are the front-panel components of the PX–brick (see Figure 5-3):
L1 controller display. This liquid crystal display (LCD) displays status and error messages that the L1 controller generates.
Note: For more information about the L1 controller, see the SGI L1 and L2 Controller Software User's Guide. On/Off switch with LED. Press this button to turn on the internal components of the PX-brick. Alternatively, you can turn on the internal components at an L2 controller touch display or at a system console.
LEDs:
On/Off switch LED. This green LED illuminates when 48-VDC power is applied to the internal components of the PX–brick.
Service required LED. This LED illuminates yellow to indicate that a component is broken or is not operating properly (for example, if a fan is off), but the PX–brick is still operating.
Failure LED. This LED illuminates red to indicate that a system failure has occurred and the PX–brick is not operating.
Fans. Three hot–swappable fans provide the required cooling for your PX–brick.

Warning: To prevent personal injury, or damage to the PX–brick, the hot-swappable fans can be installed only by a trained SGI system support engineer (SSE).
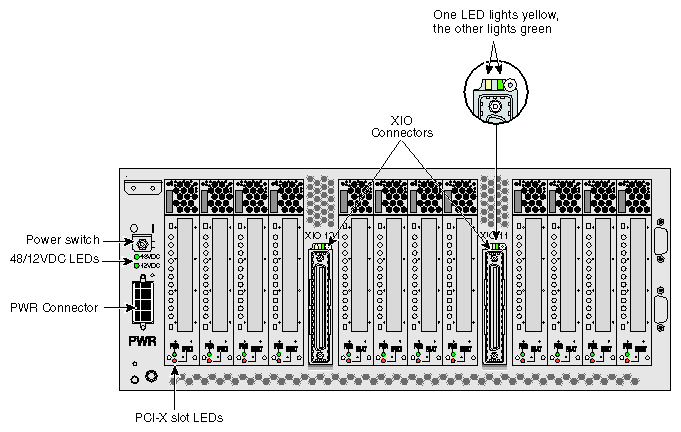
The PX-brick has the following rear-panel components (see Figure 5-4):
Power switch. Moving the power switch to the 1 position powers on the L1 controller of the PX-brick, and moving it to the 0 position powers off the L1 controller.
12-VDC LED. The 12-VDC LED illuminates green when the L1 controller is powered on.
48-VDC LED. The power switch must be in the ON (1) position for this LED to illuminate. The 48-VDC LED illuminates green when the rest of the PX-brick internal components are powered on.
PWR (power) connector. This connector connects to a power bay, which provides power to the PX-brick.
PCI/PCI–X slots. These slots support PCI or PCI–X cards. The card slots are numbered bus 1 through bus 6. Each bus has two slots, labeled 1 and 2, as shown in Figure 5-5.
PCI-X Slot LEDs. Each slot has the following LEDs:
PWR (power) LED. This LED illuminates green when the PCI card carrier is installed securely and is receiving power.
Fault LED. This LED illuminates yellow when a fault occurs with the PCI card.
XIO 10 and XIO 11 connectors. Each connector can connect the PX–brick to one IP53 node board. As an option, the second connector can connect to another IP53 node board to create a dual-ported PX–brick, which provides greater bandwidth.
XIO 10 and XIO 11 connector LEDs. Each connector has two LEDs, as follows:
The yellow LED illuminates to indicate that both the PX–brick and the IP53 node board to which it is connected are powered on.
The green LED illuminates when a link has been established between the PX-brick and the IP53 node board to which it connects.
Figure 5-4 shows the location of the rear-panel components of the PX–brick.
The PCI and PCI–X card slots are numbered bus 1 through bus 6. Each bus has two slots, labeled 1 and 2, as shown in Figure 5-5. Separate buses enable the PX–brick to run cards of different frequencies at the same time. As a result, the same PX–brick can run 133–MHz, 100–MHz, 66-MHz, and 33–MHz cards at the same time.
Each PCI/PCI–X bus supports 32-bit and 64-bit PCI or PCI–X cards at the same time.
For maximum bandwidth, PCI/PCI–X cards are distributed across all six buses when they are integrated at the factory.
This section contains the following information:

To maximize the operating efficiency of the PCI cards, consider the following configuration guidelines before you install the cards:
You can place one or two PCI cards on one bus, or one or two PCI-X cards on one bus.
You should avoid mixing cards that operate at different frequencies or in different modes. If you have two cards of different speeds on the same bus, both cards operate at the lower speed. If a PCI card and a PCI–X card are on the same bus, both cards operate in PCI mode. Note the following examples:
When one 133–MHz PCI–X card resides on a bus, the card operates at 133 MHz in PCI-X mode.
When two 133–MHz PCI–X cards reside on a bus, the cards operate at 100 MHz in PCI-X mode.
When two 66–MHz PCI–X cards reside on a bus, the cards operate at 66 MHz in PCI-X mode.
When two 66–MHz PCI cards reside on a bus, the cards operate at 66 MHz in PCI mode.
When one 66–MHz PCI card and one 66 MHz PCI-X card reside on a bus; the cards operate at 66 MHz in PCI mode.
When two 33–MHz PCI cards reside on a bus, the cards operate at 33 MHz in PCI mode.
When one 66–MHz PCI card and one 33–MHz PCI card reside on the same bus, the cards operate at 33 MHz in PCI mode.
Note: When installing a PCI card, you need to shut down the operating system and power off the PX-brick before installing the card.
SGI supports various PCI and PCI–X cards. These cards can be purchased from SGI or another manufacturer. Ask your SGI sales representative for a current listing of PCI and PCI–X cards supported by SGI.
Each PCI card is mounted on a carrier so that you can slide the cards into and out of the brick. This carrier supports most PCI cards; it can be adjusted to accommodate cards of different sizes. (To learn how to adjust a carrier, see “Installing or Replacing PCI or PCI–X Card” in Chapter 14.)
When the PX-brick is shipped, any card that was ordered is installed with a carrier, and any unoccupied slot is populated with an empty carrier. A carrier must be present in an unpopulated slot to maintain an even airflow through the brick and to protect against electromagnetic interference (EMI).
Table 5-1 lists the physical specifications of the PX-brick.
Table 5-1. Physical Specifications of PX–brick
Characteristic | Specification |
|---|---|
Height | 6.64 in. (168.65 mm) |
Width | 17.5 in. (444.5 mm) |
Depth | 27.74 in. (704.59 mm) |
Weight | 60 lb (27.2 kg) |
Input power | +48 VDC (225 watts) |
Table 5-2 shows the port specifications of the PX-brick.
Table 5-2. Port Specifications of the PX-brick
Port | Quantity | Connector Type |
|---|---|---|
Power entry | One | 21-pin Foxcon |
XIO | Two | Proprietary 100-pin dual row |