This chapter tells you how to:
use system tests to diagnose hardware problems
recover from a system crash
disable the workstation password
To order and replace parts, see Chapter 8, “Ordering, Removing, and Installing Replacement Parts.”
There are four ways to diagnose hardware problems:
Power-on tests—tests your major hardware parts as the system is booting up. If a part is faulty, the system notifies you with the LED and error messages.
Diagnostic tests—more comprehensive tests of your system's hardware. The system informs you if it finds a faulty part.
Confidence tests—used if you think you have a problem with your keyboard, mouse, monitor, or a peripheral. The confidence tests verify which parts are working correctly.
Table 7-1 briefly lists symptoms and probable causes during power-on diagnostics.
Table 7-1. Troubleshooting Symptoms and Probable Causes
Symptom | System State | Cause |
|---|---|---|
No LED | No power to unit | Power supply failure— check rear of unit for fan operation. Check system disk (green LED should flash during power-on). Possible CPU failure.Backplane not seated. |
Solid amber LED |
| CPU board or graphics board failure. |
Flashing amber LED | No memory found | SIMM failure. Check error messages for faulty SIMM. |
No boot tune | No audio | Faulty speaker. Faulty CPU board. Volume set too low or zero. |
Solid green LED | System menu displayed on booting up | Diagnostics successful. |
No LED on system | No system boot | Drive not all the way into slot—check drive. Drive failure—see your site administrator. |
Diagnostic error
messages, no login | Diagnostic failure | CPU failure. Graphics board failure. Monitor failure. |
When you turn on the power switch, your system should go through these steps:
The LED on the front of the machine blinks green, then turns amber, and then the system initiates power-on diagnostics.
The system runs power-on diagnostics for about five seconds; then the disks spin up. This takes about 15 seconds for each hard disk.
When the system passes all power-on tests, the LED turns green.
The system boots IRIX or brings up a menu, if you configured your system to do so.
If the LED comes on, but there is no image on your monitor, try connecting an ASCII terminal (at 9600 baud) to serial port 1 on the back of your system. On the ASCII terminal you may see error messages that will help you diagnose the problem.
If your system does not operate as described above, you may have a problem. Below is a list of possible symptoms, error messages, and cures to fix your system or locate the faulty part.
During power-on, if the system LED doesn't light up and no error message appears on the screen, follow these steps:
Disconnect the power cable from the back of the system.
Remove the top cover from the system and make sure the EISA backplane is firmly seated by pressing down on top of it.
The backplane is the gold-colored metal wall that extends from the fan in the front of the system, along the back of the expansion board slots, to the back of the chassis. It's okay to press quite firmly on the top of the backplane wall.
Check to make sure the internal power connectors are attached correctly to the system board.
Replace the top cover and reattach the power cable to the back of the system.
Check all cables.
Make sure the cables are securely connected and the power cable is plugged into an outlet that works.
Adjust the brightness control knob on the monitor to test for adequate light on the screen.
Make sure you've pressed the power switch to turn on the system.
If all of the cables are connected and the symptoms remain, you may have a faulty power supply.
To see if you have a faulty power supply, follow these steps:
Check to see if the fans are running. Feel if there is airflow from the vents and listen for the sound of the fans running.
One fan is in the front of the system on the left. The other fan is in the back of the system inside the power supply.
If the fans are not running, the power supply is faulty or overloaded. Early power supplies may not be adequate for newer configurations.
Go to “Replacing the Power Supply” to remove the power supply.
Follow the instructions in “Ordering Replacement Parts” to order a new power supply.
Contact your service provider for further instructions.
If the LED keeps blinking and no error message appears on the screen, one or more memory SIMMs may be faulty. Go to “Replacing Internal Parts” to check that all SIMMs are seated all the way into the sockets. Then power on the system again.service
If the LED still blinks and the screen is blank, replace all four SIMMs. Follow the instructions in “Ordering Replacement Parts” to order new SIMMS and “Replacing Internal Parts” to remove the faulty SIMMs. Then contact your service provider for further instructions.
If the LED stays blinking and a message appears on the screen, one or more pieces of hardware may be faulty. Below is a list of messages and where to go from there:
If you see this message:
No usable memory found. Make sure you have a full bank (4 SIMMs)
Go to “Replacing Internal Parts” to check that all of your SIMMs are seated all the way into the sockets.
Power the system on again.
If you get the same message, the SIMMs are faulty.
Remove the faulty SIMMs.
Go to “Ordering Replacement Parts” to order replacement SIMMs.
Contact your service provider for further instructions.
If you see this message:
Check or replace: SIMM#
Follow the instructions in “Replacing Internal Parts” to make sure the indicated SIMM is seated all the way into its socket.
# represents the SIMM number that failed the test (for example, SIMM 1, SIMM 2).
Power on the system again. If you get the same message, the SIMM is faulty.
Remove the faulty SIMM.
Go to “Ordering Replacement Parts” to order a replacement SIMM.
Contact your service provider for further instructions.
If you see this message:
Memory is not usable. Check or replace all SIMMs.
Follow the instructions in “Replacing Internal Parts” to check that all of your SIMMs are seated all the way into the sockets and that they are installed in the correct slots.
Power on the system again.
If you get the error message, then all SIMMs are faulty.
Remove the faulty SIMMs.
Follow the instructions in “Ordering Replacement Parts” to order new SIMMs.
Contact your service provider for further instructions.
If the amber LED stays on without blinking or turning green, the memory is working but some other part is faulty.
If you hear a dissonant piano chord sound from the speaker, the graphics board has failed the test. Check to make sure the graphics board is installed properly.
Follow the instructions in “Replacing Internal Parts” to remove the graphics board and then reinstall it.
Power on the system.
If no message is displayed on the monitor, the graphics board is faulty.
Remove the board.
Follow the instructions in “Ordering Replacement Parts” to order a replacement board.
Contact your service provider for further instructions.
If you do not hear a dissonant piano chord sound from the speaker:
Make sure the monitor is plugged in and turned on and the brightness control knob on the monitor is turned to provide adequate light to the screen.
Check to make sure that the system disk is seated all the way in its slot.
Try powering on again.
If an error message is still not displayed, the graphics board is faulty.
Remove the board.
Follow the instructions in “Ordering Replacement Parts” to order a replacement board.
Contact your service provider for further instructions.
If the LED stays amber and a message appears on the screen, one of your parts is faulty.
If you see this message:
Check or replace: Graphics board.
The graphics board has failed. First, make sure the board is seated properly.
Follow the instructions in “Replacing Internal Parts” to remove the graphics board and reinstall it.
Power on the system.
If you get the same error message, the graphics board is faulty.
Remove the board.
Follow the instructions in “Ordering Replacement Parts” to order a replacement board.
Contact your service provider for further instructions.
If you see this message:
Check or replace: CPU module
The CPU module has failed. First, make sure the module is seated properly.
Follow the instructions in “Replacing Internal Parts” to remove the CPU module and reinstall it.
Power on the system.
If you get the same error message, you have a faulty CPU module.
Remove the module.
Follow the instructions in “Ordering Replacement Parts” to order a replacement module.
Contact your service provider for further instructions.
If you see this message:
Check or replace: CPU baseboardThe CPU baseboard has failed.
Follow the instructions in “Replacing Internal Parts” to remove the CPU baseboard and reinstall it.
Power on the system.
If you get the same error message, you have a faulty CPU baseboard.
Remove the board.service
Follow the instructions in “Ordering Replacement Parts” to order a replacement board.
Contact your service provider for further instructions.
-
Make sure all of the cables are firmly connected and that the brightness control knob on the monitor is turned to provide adequate light to the screen.
If the screen has lines through it, measles, or looks unusual, the graphics board is faulty.
Remove the board.
Follow the instructions in “Ordering Replacement Parts” to order a replacement board.
Contact your service provider for further instructions.
If the keys on the keyboard don't work, the keyboard is failing.
Shut down your system and make sure that the keyboard cable is firmly connected to the keyboard (not the mouse) connector.
Power on the system again.
If the keyboard still doesn't work, the keyboard is faulty.
Remove the keyboard.
Follow the instructions in “Ordering Replacement Parts” to order a replacement keyboard.
Contact your service provider for further instructions.
If the mouse doesn't work, the mouse is failing.
Shut down your system and make sure the cable is firmly connected to the mouse (not the keyboard) connector.
Power on the system again.
If the mouse still doesn't work, you have a faulty mouse.
Follow the instructions in “Ordering Replacement Parts” to order a replacement part.
Contact your service provider for further instructions.
When you power on the system, power-on tests check the system's essential hardware components. Diagnostic tests give you a greater depth of testing capabilities. Diagnostic tests take about 30 minutes to run. (It takes 15-30 minutes longer for each additional hard disk.)
You can stop the tests at any time by pressing the <Esc> key.
The system stops the testing if it finds any errors and reports any failures on the screen.To run the diagnostic tests, follow these steps:
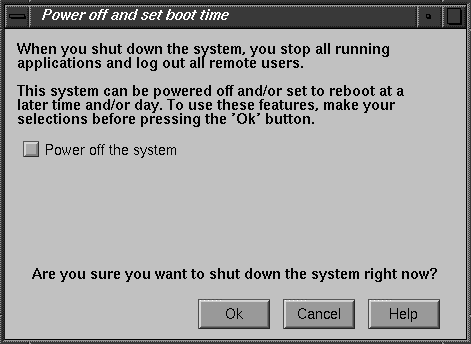
Shut down the system.
After a few seconds you see the notifier shown in Figure 7-1.
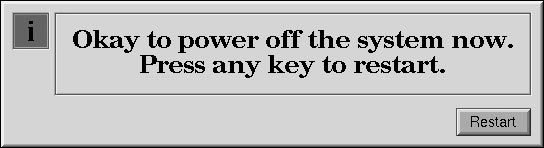
Click OK. The screen clears and you see the notifier shown in Figure 7-2.
After a few seconds, the screen clears and when you see the notifier shown in Figure 7-3, click on the Restart button.

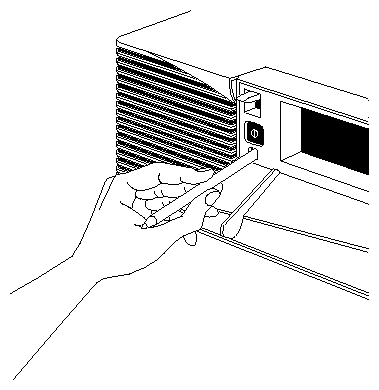
 | Note: If the system is malfunctioning and you cannot communicate with it using the mouse, keyboard, or over the network, then press the Reset button located behind the front door on the front of the Indigo2 chassis, as shown in Figure 7-4. |
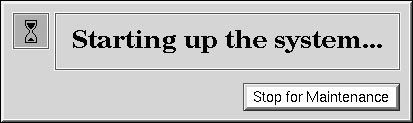
When you see the notifier shown in Figure 7-5, click Stop for Maintenance, or press <Esc>.
If you cannot reach this menu, your system is faulty. Contact your service organization.
The System Maintenance menu appears.
Start diagnostics by clicking the Diagnostics icon or by typing:
3
You see a message similar to this:
SGI Version 5.3 IP22 IDE field
October 22 1994
+
Note: If you do not see this message, you cannot run the diagnostics. You may have a faulty disk. Contact your service organization. The character on the last line (next to the cursor) shows a spinning combination of slashes and dashes while the tests are running. Also, the LED on the front of the main unit blinks slowly throughout the testing process.
Included in the diagnostics is a series of graphics tests. During these tests, the screen goes blank and displays various images.
Watch for messages.
If the system's hardware is completely healthy, after 10 to 30 minutes (could be more if you have more than one hard disk) you'll see this message:
Diagnostic tests completed with no failures detected.
Press <Enter> to continue.
Press <Enter> to return to the System Maintenance menu, where you can restart the system by selecting 1. If problems persist, or if you still cannot restart the system, you may have a software problem. See “Recovering from a System Crash”.
If the diagnostics find a problem, you see a message like this:
ERROR: Failure detected on the CPU module
or a message indicating a failure with the CPU baseboard, audio board, or graphics board.
You may also see other messages that report faulty peripherals or subsystems. If an error message is displayed, follow the instructions in “Ordering Replacement Parts” to order a replacement part. Then follow the instructions to remove the faulty part and contact your service provider for further instructions.
If your keyboard, mouse, monitor, audio subsystem, or one of the SCSI peripherals (excluding hard disks) isn't working properly, use the confidence tests to verify that each device is working. Your system must be booted and running the IRIX operating system to run these tests.
To run the confidence tests, choose “Run Confidence Tests” from the System toolchest. You see the Confidence Tests form shown in Figure 7-6, with icons for each device for which a confidence test exists. Instructions on how to run each test are contained in the sections below.

If you run the confidence tests and you find that one of the devices is faulty, follow the instructions in “Ordering Replacement Parts” to order a replacement part. Then contact your service provider for further instructions.
If you are running an audio application and you do not hear the audio output, first make sure all cables are connected properly. Then use the confidence test to make sure the audio is functioning properly.
To test audio, follow these steps:
From the System toolchest, choose “Run Confidence Tests.” You see the Confidence Tests form, as shown in Figure 7-6.
Select the Audio icon and click Open or double-click the icon.
Click on the Start Test button.
You see the form shown in Figure 7-7. The Audio Control Panel is also displayed.
Follow the instructions on the form.
If your audio is still not responding, you may have a bad audio system. If this is the case, you must replace the CPU board. Follow the instructions in “Ordering Replacement Parts” to order a replacement part.
Contact your service provider for further instructions.

You'll find instructions on how to run the confidence test for the dial and button box, digitizer tablet, Spaceball, and Genlock options in the installation booklet that comes with each option.
Before you run a confidence test on a CD-ROM drive, make sure it is correctly installed in your system. “Installing External SCSI Devices” tells you how to install a CD-ROM drive. If you suspect that there is a problem with the drive, remove it and then reinstall it. If you still have problems, run the CD-ROM drive confidence test.
To run a CD-ROM drive confidence test, follow these steps:
From the System toolchest, choose “Run Confidence Tests.” You see the Confidence Tests form, as shown in Figure 7-6.
Select the CD-ROM icon and click Open or double-click the icon.
You see the CD-ROM drive confidence test form.
Start the CD-ROM drive test.
When you test the CD-ROM drive, load a CD into the drive.
Double-click the CD-ROM icon to start the test. You see CD-ROM drive test in progress.
When the test is complete, you see the CD-ROM drive test completion notifier.
Click Continue to dismiss the notifier.
If the drive doesn't pass the test, follow the instructions in “Ordering Replacement Parts” to order a replacement part. Then contact your service provider for further instructions.
Before you run a confidence test on a floppy drive, make sure it is correctly installed in your system. “Installing an Internal Drive” tells you how to install a floppy drive. If you suspect that there is a problem with the floppy drive, first remove it and then reinstall it. If you still have problems, run the floppy drive confidence test.
To run a floppy drive confidence test, follow these steps:
From the System toolchest, choose “Run Confidence Tests.” You see the Confidence Tests form, shown in Figure 7-6.
Select the Floppy icon and click Open or double-click the icon.
Select the icon that represents your floppy drive and click Open or double-click the icon.
Select the density of the floppy you are using.
 | Caution: When you test the floppy drive, use a floppy that is blank or doesn't have information that you need to keep. The floppy drive destroys any information on the floppy in the process of testing the hardware. |
Insert the floppy into the floppy drive and click “Test.”
When the test is complete, you see the floppy drive test completion notifier.
Click Continue to dismiss the notifier.
If the drive doesn't pass the test, follow the instructions in “Ordering Replacement Parts” to order a replacement part. Then contact your service provider for further instructions.
The keyboard confidence test is useful if the keyboard is not responding to input. Before you run the confidence test on the keyboard, make sure that the cable that connects the keyboard to the system is firmly connected. Once you're sure the connection is good, use the confidence test to make sure that the keyboard is working correctly.
To test the keyboard, follow these steps:
From the System toolchest, choose “Run Confidence Tests.” You see the Confidence Tests form, as shown in Figure 7-6.
Select the Keyboard icon and click Open or double-click the icon.
You see the form shown in Figure 7-8.
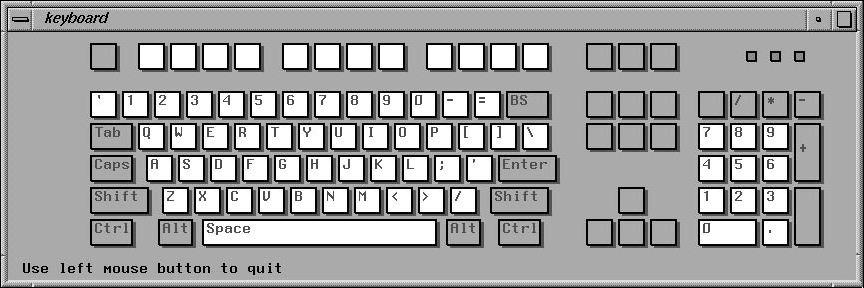
To use the test, press the different keys on the keyboard. The picture on the screen should highlight the key that you press.
If the graphic doesn't reflect the key that you press, you may have a problem with the keyboard or with the cable that connects the keyboard to the system.
If you're using a keyboard other than the one supplied by Silicon Graphics, the key layout may be different.
Close the keyboard test by clicking the button in the upper left-hand corner of the keyboard graphic and selecting “Quit.” The screen goes back to the way it was before you launched the confidence test.
If your keyboard does not work, follow the instructions in “Ordering Replacement Parts” to order a replacement part. Then contact your service provider for further instructions.
If the monitor isn't working properly or the display is distorted, first check the cable that connects the monitor to the system. Also check to make sure that the brightness knob is providing sufficient light to the screen, that the monitor video cable is firmly connected to both the monitor and the Indigo2 chassis, and that the thumbscrews are screwed in all the way.
If you still have problems, use the confidence test to check that the monitor is working properly. Follow these steps to test the monitor:
From the System toolchest, choose “Run Confidence Tests.” You see the Confidence Tests form, as shown in Figure 7-6.
Select the monitor icon and click Open, or double-click the icon.
The monitor test takes over the entire screen.
To run one of the tests from the menu, click the mouse over the menu choice and see how the monitor responds.
Click Quit when you are finished.
When you click Quit, the screen goes back to the way it was before you launched the confidence test.
If the monitor tests indicate a failure, follow the instructions in “Ordering Replacement Parts” to order a replacement part. Then contact your service provider for further instructions.
If the buttons on your mouse do not work, make sure that the mouse cable is firmly connected to the back of the system. If the buttons still don't work, you have a faulty mouse. Follow the instructions in “Ordering Replacement Parts” to order a replacement mouse. Then contact your service provider for further instructions.
If the mouse is behaving strangely or only one of the mouse buttons works, make sure that the mouse cable is firmly connected to the system. If the buttons still don't work, try running the mouse confidence test.
Follow these steps:
From the System toolchest, choose “Run Confidence Tests.” You see the Confidence Tests form, as shown in Figure 7-6.
Select the mouse icon and click Open, or double-click the icon. When you start the mouse test, you see only a mouse on the screen.
Test the mouse by moving it around and pressing each button.
As you press each of the mouse buttons and move the mouse around, the movement is reflected on the screen.
If the screen doesn't respond as you move the mouse or press the mouse buttons, the mouse may be faulty. If the mouse does not respond correctly, follow the instructions in “Ordering Replacement Parts” to order a replacement mouse.
Press the <Esc> to quit the mouse test.
The screen goes back to the way it was when you launched the confidence test. Contact your service provider for further instructions.
Before you run a confidence test on a tape drive, make sure it is correctly installed on your system. If you suspect that there is a problem with the tape drive, first remove it and install it again. If you still have problems, run the appropriate tape drive confidence test.
To run a tape drive confidence test, follow these steps:
From the System toolchest, choose “Run Confidence Tests.” You see the Confidence Tests form, as shown in Figure 7-6.
Select the tape icon and click Open or double-click on the icon.
Click on the icon for the tape drive you have.
Insert a blank tape, or one that has information you don't need, into the drive.
Caution: The tape drive destroys any information on the tape in the process of testing the hardware. Start the tape drive test by double-clicking the tape icon to start the test.
When the test is complete, you see the tape drive test completion notifier.
Click Continue to dismiss the notifier.
If the drive doesn't pass the test, follow the instructions in “Ordering Replacement Parts” to order a replacement drive. Then contact your service provider for further instructions.
If your system crashes because of a software malfunction, you first need to find a CD with the IRIX operating system release that matches the IRIX release you are running on your system. Then you can recover your data from your most recent full backup tape. The backup tape must be one that has been made using the System Manager backup tool, or with the /usr/sbin/Backup script. You can restore other types of backups, but must do so manually from a shell prompt. (Type sh at any question prompt to get a shell prompt.)
To recover from a system crash, follow these steps:
If the system is malfunctioning and you cannot communicate with it using the mouse, or keyboard, or over the network, press the Reset button located behind the front door, as shown in Figure 7-9.
When the system startup notifier appears, as shown in Figure 7-10, click Stop for Maintenance or press <Esc> to bring up the System Maintenance menu.
Click the Recover System icon in the System Maintenance menu, or type:
4
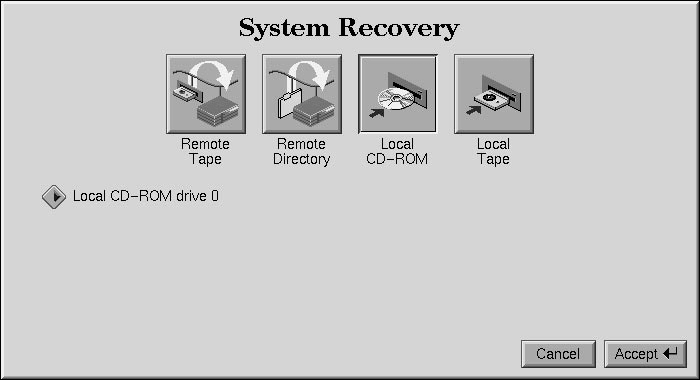
Note: If you are using an ASCII terminal, type 4 at the System Maintenance menu. The System Recovery menu appears, as shown in Figure 7-11.
Click the appropriate drive icon from which you want to recover the software.
For example, if you have a CD-ROM drive connected to your system, click the Local CD-ROM icon. Then click Accept to start.
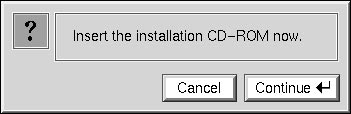
You then see the notifier shown in Figure 7-12, prompting you to insert the media into the drive.
If you don't have a CD-ROM drive, you can use a drive that is connected to another system on the network. At the System Recovery menu, click the Remote Directory icon. When a notifier appears asking you for the remote hostname, type the system's name, a colon (:), and the full pathname of the CD-ROM drive, followed by /dist. For example, to access a CD-ROM drive on the system mars, you would type:
mars:/CDROM/dist
Insert the IRIX CD that came with your system, then click Continue.
The CD-ROM drive begins reading information from the CD. The system takes approximately 5 minutes to copy the information from the CD that it needs.
After everything is copied from the CD to the system disk, you can restore your data from a recent full backup tape. The backup must be one that has been made using the System Manager backup tool, or with the /usr/sbin/Backup script.
Note: If you need to check something on your system or do anything special, you can get a shell prompt by typing sh at most question prompts. You see the following messages.
**********************************************
SYSTEM RECOVERY
**********************************************
If you have a local tape device, you see this message:
Restore will be from <tapename> OK? ([Y]es, [N]o): [Y]
<tapename> is the name of the local tape device.
If you have a remote (network) tape device, when no tape device is found, or when you answered “No” to the question in the previous bullet, you see this message:
Remote or local restore ([r]emote, [l]ocal):
If you answer “remote,” you have chosen to restore from the network, and you are then asked to enter the following information:
– the hostname of the remote system
– the name of the tape device on the remote system
– the IP address of the remote system
– the IP address of your system
The IP address must consist of two to four numbers, separated by periods, such as 192.0.2.1
If you answer “local,” you have chosen a tape device that is connected to your system, and you are then asked to enter the name of the tape device.
When you see the following message, remove the CD-ROM, insert your most recent full backup tape, then press <Enter>.
Insert the first backup tape in the drive, then press <Enter>, [q]uit (from recovery), [r]estart:
There is a pause while the program retrieves several files from the tape describing the system state at the time the backup was made. Then you see this message:
Erase /x filesystem and make new one (y,n)? [n]
where x is the file system. It prompts you for every file system that was known at the time of the backup.
Answer by typing either y or n.
If you answer no to this question, the system tries to salvage as many files as possible, then it uses your backup tape to replace the files it could not salvage. Usually you should answer n for no, especially if your backup tape is not very recent. If the file systems were badly damaged, or the backup was from a different level operating system, you may need to answer yes.
If you answer y for yes, the system erases the file system and copies everything from your backup tape to the disk. The system loses any information on that filesystem that you created between now and when you made your backup tape.
You see this message:
Starting recovery from tape.
After two or three minutes, the names of the files that the system is copying to the disk start scrolling. When the recovery is complete, you see this message:
Recovery complete, restarting system.
Then the system restarts.
When you see the login screen, the system is ready to go.
| Note: If your backup tapes were old, or you were changing your operating system level, you should reinstall the operating system from the IRIX CD that came with your system after system recovery is complete. When you see the “Starting up the system” notifier, press <Esc>, or click on Stop for Maintenance. Then click the Install System Software icon. For more information on installing the operating system, go to Chapter 6, “Installing Software.” |
If you are in the System Maintenance menu, and you choose the Install System Software, Run Diagnostics, Recover System, or Enter Command Monitor icon, you may be prompted for a password, as shown in Figure 7-13.
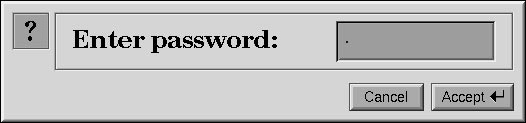
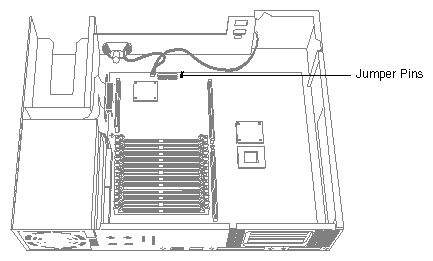
If you do not know the password, you can disable it by removing a jumper from the inside of the workstation.
| Note: If you are able to boot your system and are running IRIX, you can log in as root, and disable the password by typing /etc/nvram passwd_key "" at the shell prompt. |
To remove the jumper and disable the password, follow these steps:
Shut down the system.
Press and release the power switch to shut down the software and power off the system.
Press and release the power switch on your monitor to turn off the monitor.
Disconnect the power cable from the back of the system.
Remove the cover.
Remove the 5-1/4" drive tray.
The jumper is located on the front and center edge of the CPU baseboard, as shown in Figure 7-14.
Remove the jumper and save it. You must reinstall it if you choose to reset the password.
Replace the 5-1/4" drive tray.
Replace the cover.
Reconnect the power cable to the back of the system.
When you return to the System Maintenance menu and choose one of the four icons mentioned before, you see the notifier shown in Figure 7-15.

If you want to reenable the password, you can do so by entering the command monitor and giving the command resetpw to clear the password. Then power the system down, remove the top cover, and replace the jumper. Replace the top cover and power up the system.
When you purchased your system you may have purchased a support program from either Silicon Graphics, or a vendor who supplies software. Whenever you encounter any problems that you cannot solve using the methods in this chapter, contact the organization from which you purchased the support program.
If you would like support for your Silicon Graphics products, contact your service provider.