This chapter tells you how to install GIO (Graphics Input/Output) option boards. GIO option boards are video, network, fast SCSI controller boards, and other I/O boards that are connected to the expansion slots on the graphics board to add functionality to your system.
If a GIO option board is already installed, and you wish to replace it, go to “Replacing a GIO Option Board”.
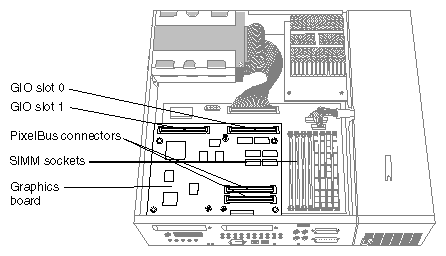
GIO option boards are installed on top of the graphics board. A GIO option board can be either single-width, covering half of the graphics board, or double-width, extending over the entire graphics board.
 | Note: Refer to the manual included with your GIO option board for special installation instructions. |
Follow these steps to turn off the system, remove the cover, install the GIO option board, and replace the cover.
If the system is powered on, press and release the power button on the front panel to power off the system.
The system powers off automatically after about a minute.
Disconnect the power cable from the back of the Indy workstation.
Remove the top cover by releasing the latch on the rear of the cover and sliding it forward. For more details, see “Removing the Top Cover”.
Ground yourself to a metal part of the Indy chassis.
Unwrap the first two folds of the wrist strap and wrap the exposed adhesive side firmly around your wrist.
Unroll the rest of the band and peel the liner from the copper foil at the opposite end.
Attach the copper foil to a metal part of the Indy chassis.

Caution: The GIO option board is extremely sensitive to static electricity; you must wear the wrist strap while installing it. The wrist strap prevents the discharge of static electricity, which could damage
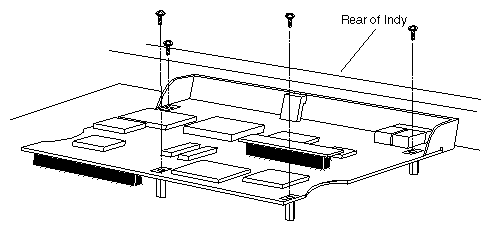
the board.Move the system or position yourself so that you are facing the rear of the system as shown in Figure 4-1. You'll be connecting the GIO option board to the graphics board.
If the single-width board you're installing is a video board with more than one connector for the graphics board, you must install it on the side close to the SIMM sockets.
If the single-width GIO option board you're installing has only one connector for the graphics board, you may install it on either side.
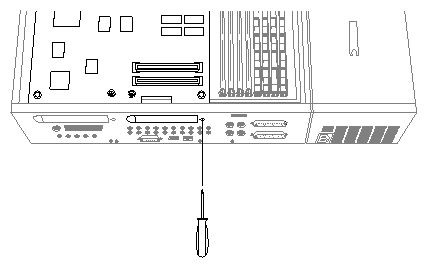
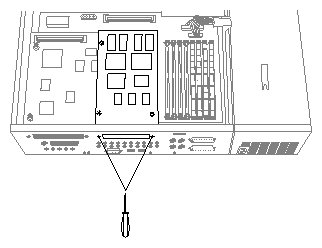
If you are installing a single-width board, use a phillips screwdriver to remove the screw from the face plate covering the GIO option port on side where you are installing the board. (See Figure 4-2.)
If you are installing a double-width board, remove the screw from both faceplates. Save the face plates in the event you remove and do not replace the board in the future.
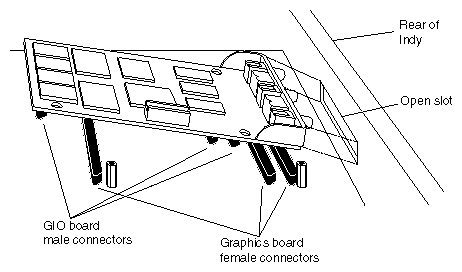
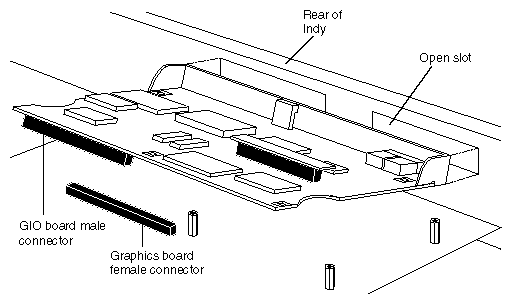
Lower the GIO option board over the graphics board, inserting the GIO board's I/O connector through the open slot on the rear of the workstation. Figure 4-3 shows a single-width board. Figure 4-4 shows a double-width board.
Connect the GIO option board to the graphics board. Figure 4-5 shows a single-width board. Figure 4-6 shows a double-width board.
Align the screw holes on the GIO option board over the vacant standoffs (tall, hexagonal posts) on the graphics board.
Seat the connectors located under the GIO option board over the sockets on the graphics board and press down firmly on all four corners of the board until the connectors are securely seated on the graphics board.
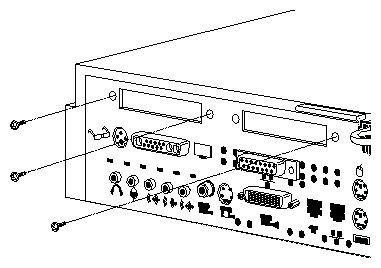
Using a phillips screwdriver, insert and tighten the screws (provided with the board) in the locations shown in Figure 4-5 (single-width board) and Figure 4-6 (double-width board). As you tighten the screws, alternate among them so that the board is connected evenly.
Insert and tighten the screws that come with the GIO board through the rear of the workstation. Figure 4-7 shows the screw locations for a a single-width board; Figure 4-8 shows the screw locations for a double-width board.
If the screw holes do not line up, the board may not be seated all the way, or one of the screws on the board may be screwed down too tightly.
Look under the board to make sure the connector or connectors are seated evenly and are inserted all the way into the sockets.
Press the four corners of the board to make sure the connectors are inserted all the way into the sockets on the graphics board.
If you have no more options to install, replace the top cover by inserting the tab through the hole in the rear of the chassis and sliding the cover back until it snaps into place. For more information, see “Replacing the Top Cover”.
If the GIO option board has one or more external cables, connect them to the board's I/O connector.
Reconnect the power cable to the connector on the back of the Indy workstation.

You are now ready to power up the system and check that the system recognizes the new board.
Follow these steps to check if the system recognizes the new board:
Press and release the power button to turn on the power.
After the power-on diagnostics run, the system boots up and brings you to the login screen.
Log in to your account. For more information on logging in, refer to “Turning On the Workstation”.
Check that the board you installed is shown correctly.
Choose “System Manager” from the System toolchest.
You see a window showing Hardware and Shared Resources.
Look under “Hardware” for a line showing the GIO board you installed.
The System Manager recognizes most boards. If the board you installed is not shown, however, you can also use the hinv command from a shell window. To use the hinv command, follow these steps:
From the Desktop toolchest, select “Unix Shell.”
At the prompt, type:
hinv
Then press <Enter>.
If the board you installed is still not shown, the board may not be seated correctly. Go to “Installing a GIO Option Board” and re-install the board. Then try the above steps again.