This chapter tells you how to install and remove EISA (Extended Industry Standard Architecture) and GIO (Graphics Input/Output) boards. EISA and GIO boards add functionality to your system through a standard bus.
 | Note: PC software device drivers are not compatible with the Indigo2 IMPACT workstation. |
To remove or replace the Indigo2 High IMPACT Texture Memory Option Board, see Chapter 5, “Identifying, Installing, and Removing Graphics Boards and Attached Option Boards.”
To install an EISA or GIO option board, you must shut down the system, remove the cover, attach the wrist strap, install the option board, replace the cover, and start up the system.
To shut down and power off the system, follow these steps:
Open the front cover.
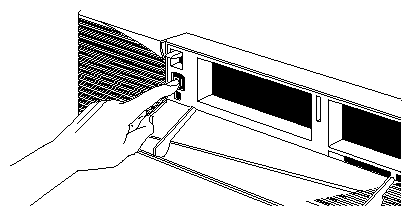
Press and release the power switch on the front of the workstation to shut down the software and power off the system.
The system powers off automatically.
Disconnect the power cable from the back of the workstation.
Disconnect the monitor cable from the back of the workstation.

To remove the cover, follow these steps:
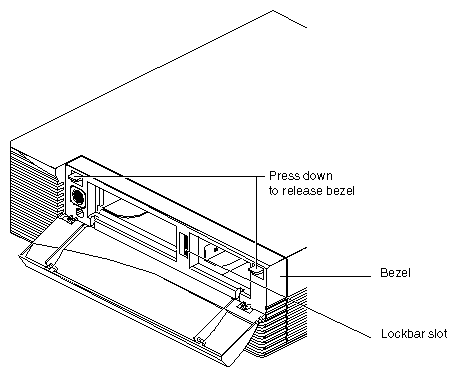
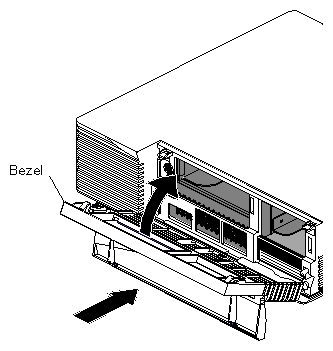
Remove the bezel.
Press down on the tabs on each side of the bezel, as shown in Figure 4-3.
Remove the lockbar, if one is installed.
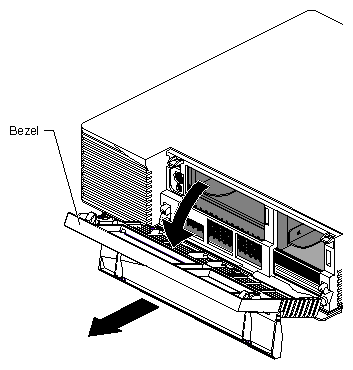
Remove the top cover.
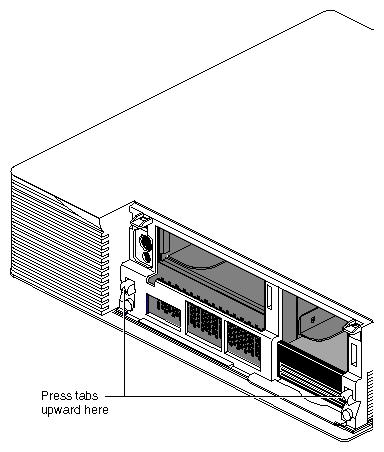
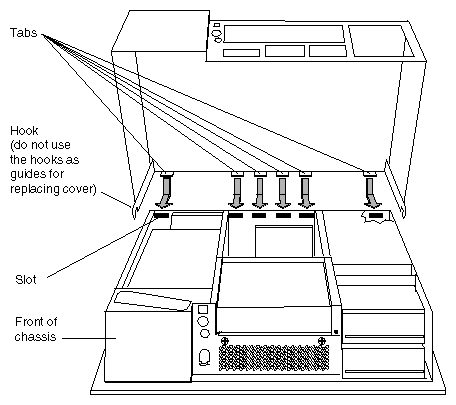
Press up on the tabs on each side of the drive openings and pull up on the cover, as shown in Figure 4-5.
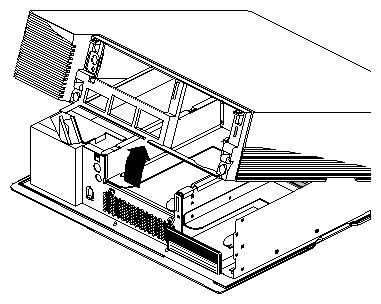
Rotate the cover back and away from the chassis, as shown in Figure 4-6.
 | Tip: If the cover is difficult to raise, check the locking levers of your drives to be sure they are fully locked. The levers should be pushed all the way to the right. |
To install an EISA or GIO option board, follow these steps:
Ground yourself to a metal part of the Indigo2 IMPACT chassis.
Unwrap the first two folds of the band and wrap the exposed adhesive side firmly around your wrist.
Unroll the rest of the band and peel the liner from the copper foil at the opposite end.
Attach the copper foil to a convenient and exposed electrical ground, such as a metal part of the Indigo2 IMPACT workstation.
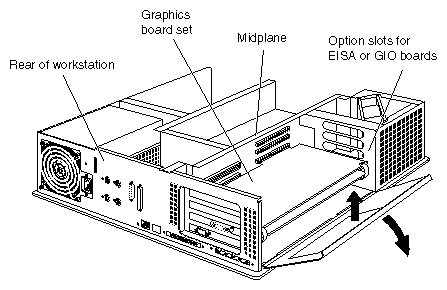
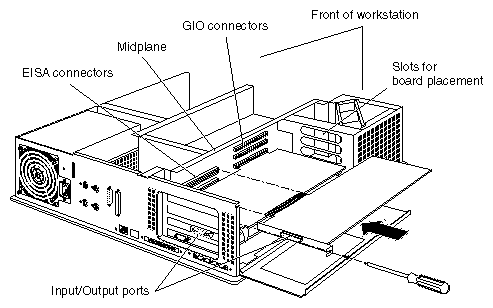
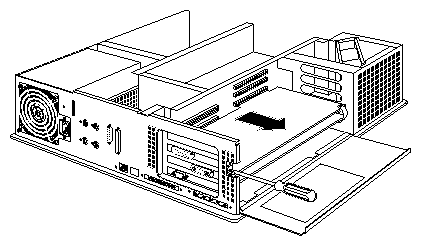
Move the workstation or position yourself so that you are facing the option slots.The option slots are located at the side and rear of the workstation, as shown in Figure 4-7.
Open the metal panel located in front of the option slots by pulling up on the panel and lowering it.
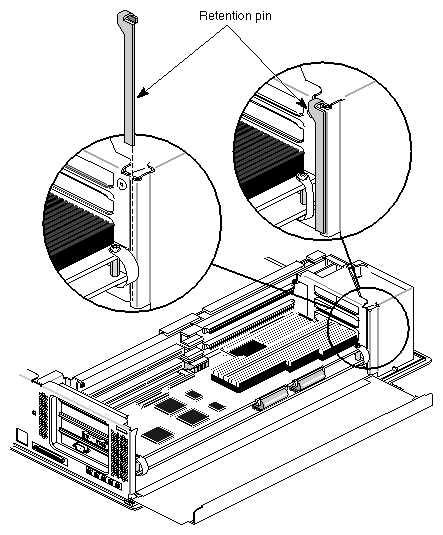
Remove the retention pin on the right side of the boards, as shown in Figure 4-8.
Note: Check the placement of the retention pin. It hangs in front of the board, not beside it.
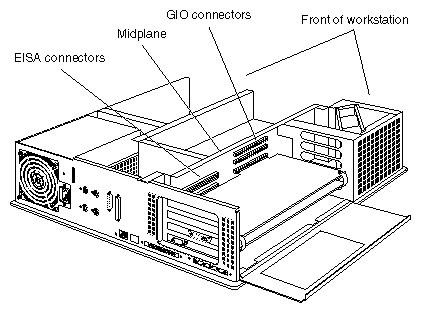
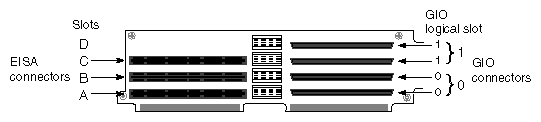
Locate the EISA or GIO connector for the board or boards you are installing. Your Indigo2 IMPACT workstation has two sets of option connectors, as shown in Figure 4-9.
| Note: For proper placement of your option board in relation to the board set you purchased with your Indigo2 IMPACT workstation, refer to Table 4-1, Table 4-2, Table 4-3, and Figure 4-10. |
Table 4-1. Placement of Solid IMPACT Board and Option Boards
If you have this combination of Indigo2 | Use these slots: |
|---|---|
Solid IMPACT board plus 1 GIO option board | Place Solid IMPACT board in Slot B and GIO board in Slot C |
Solid IMPACT board plus 1 GIO and 1 EISA option board | Place Solid IMPACT board in Slot B, GIO board in Slot C, and EISA board in Slot A |
Solid IMPACT board plus 1 EISA board | Place Solid IMPACT board in Slot B and EISA board in Slot A or Slot C |
Solid IMPACT board plus 2 EISA boards | Place Solid IMPACT board in Slot B and EISA boards in Slot A and Slot C |
Solid IMPACT board plus 3 EISA boards | Place Solid IMPACT board in Slot D and EISA boards in Slots A, B, and C |
| Note: Although there are four GIO connectors, only one of each pair of GIO connectors, 0–0 or 1–1, may be used. You may connect only one GIO board or board set to one “0” connector in the pair 0–0, or to one “1” connector in the pair 1–1. See Figure 4-10. |
Install the board set in the same slots as before. If you need help locating the correct slots for your board set, see Table 4-2
Table 4-2. Placement of Indigo2 High IMPACT Board Set and Option Boards
If you have this combination of Indigo2 High IMPACT and option boards: | Use these slots: |
|---|---|
Indigo2 High IMPACT (2 board set) plus 1 GIO option board | Place Indigo2 High IMPACT board set in Slots A and B, and GIO option board in Slot C |
Indigo2 High IMPACT board set plus | Place EISA option board in Slot A, and Indigo2 High IMPACT board set in Slots B and C |
Indigo2 High IMPACT board set plus | Place EISA boards in Slots A and B and the Indigo2 High IMPACT board set in Slots C and D |
Indigo2 High IMPACT board set plus 1 GIO option board and 1 EISA option board | Place EISA option board in Slot A, Indigo2 High IMPACT board set in Slots B and C, and GIO option board in Slot D |
Install the board set in the same slots as before. If you need help locating the correct slots for your board set, see Table 4-3
Table 4-3. Placement of Maximum IMPACT Board Set and Option Boards
If you have this combination of Indigo2 Maximum Board Set and option boards: | Use these slots: |
|---|---|
Maximum IMPACT Board set plus 1 GIO option board | Place Maximum IMPACT board set in Slots A, B, and C and GIO option board in Slot D |
Maximum IMPACT board set plus
| Place EISA option board in Slot A and
Maximum IMPACT board set in |
Look at the left end of your board and find the port. Determine where the port will exit the chassis when the board or board set is inserted into the option slot.
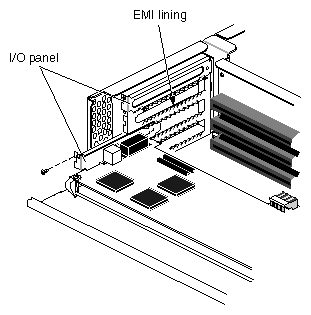
Remove the corresponding I/O panel over the slot. This makes the port accessible.
Remove the screw that attaches the I/O panel to the chassis. The screw opening is located on the metal bracket on the upper left side of the board.
Save the screw to secure the option board after it is installed.
If your site has multiple Indigo2 IMPACT workstations, it's a good idea to save at least one set of I/O panels to reinstall in the workstation should you need to remove an option board.
Install the board.
Align the right side of the board with the metal grooves on the right.
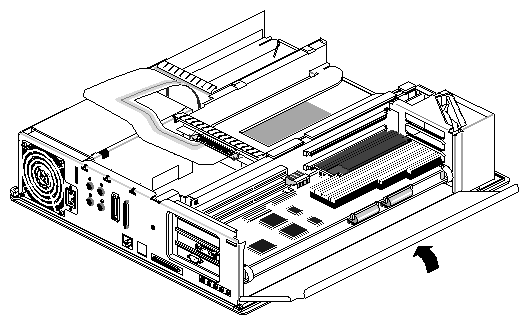
Align the Input/Output port with the port opening that allows access to the exterior of the chassis. Push the board into the slot until the connector on the back of the board is securely connected to the connector on the midplane, as shown in Figure 4-13.
Insert and tighten the screw that holds the board to the chassis.
The screw opening is located on the metal bracket on the upper left side of the board. See Figure 4-13.
Hang the retention pin so that it sits in front of the board set. The retention pin prevents the board set from moving away from the connectors. See Figure 4-14.
Tip: Use the retention pin as a plumb line to determine if the board set is properly seated. If the pin is tilted, push on the board set until it is properly connected. Tip the metal panel up until it snaps into place, as shown in Figure 4-15.
To replace the cover, follow these steps:
Locate the tabs on the inside and back of the top cover and the slots on the back of the workstation. See Figure 4-16.
Face the front of the workstation.
Replace the bezel.
Place the tabs on the bottom of the bezel in the grooves in the front of the chassis, as shown in Figure 4-17.
Tilt the bezel up until it snaps into place.
Reinstall the lockbar, if you removed it.
Reconnect the power cable and monitor cable to the connector on the back of the workstation.
You are finished installing the option board and are ready to turn on the workstation.
To turn on the workstation, follow these steps:
Turn on the monitor.
The monitor's power switch is on the front of the monitor in the lower right corner. The LED next to the switch lights up when you turn on the monitor.
Turn on the system power.
Open the front cover by snapping it away from the top edge of the chassis and tipping it down.
Press the power switch to turn on the system, as shown in Figure 4-18.
To remove a GIO or EISA option board, follow these steps:
For instructions on how to shut down and power off the system, see “Shutting Down and Powering Off the System”.
For instructions on how to remove the cover, see “Removing the Cover”.
Ground yourself to a metal part of the Indigo2 IMPACT workstation.
Unwrap the first two folds of the band and wrap the exposed adhesive side firmly around your wrist.
Unroll the rest of the band and peel the liner from the copper foil at the opposite end.
Attach the copper foil to a convenient and exposed electrical ground, such as a metal part of the Indigo2 IMPACT workstation.
Move the workstation or position yourself so that you are facing the option slots.The option slots are located on the side toward the rear of the workstation. See Figure 4-19.
Open the metal panel located in front of the option slots by pulling up on the panel and lowering it down, as shown in Figure 4-19.
Note: Look at the placement of the retention pin before you remove it. It hangs between the edge of the board set and the metal panel you just opened. Remove the retention pin, as shown in Figure 4-20.
Remove the screw attaching the option board to the workstation slot, as shown in Figure 4-21. The screw is located on the metal bracket on the upper left side of the board.
Pull the board out of the workstation.
Grasp the board with both hands, and pull it out of the slot.
Set the board down on a flat, antistatic surface so that the side with the chips on it faces up.
If you are replacing the board, see “Installing an EISA or GIO Option Board”.
If you are not immediately replacing the board, install the metal I/O panel. You need a Phillips screwdriver to do so.

Caution: The I/O panel is required to keep your graphics boards at the appropriate temperature and to prevent interference with other electrical equipment. Hang the retention pin so that it sits in front of the board set. The retention pin prevents the board set from moving away from the connectors. See Figure 4-23.
Replace the cover. For instructions, see “Replacing the Cover”.
You are finished removing the option board.
To turn on the workstation, see “Turning On the Workstation”.