The Silicon Graphics 750 system uses proprietary BIOS code stored on the 82802AC FWH (firmware hub). The BIOS may be upgraded using a diskette-based firmware flash utility. This chapter describes the system BIOS and explains how to configure the system by changing the settings of the BIOS parameters. This chapter consists of the following sections:
Table 3-1 provides an overview of the features supported by the BIOS.
Feature | Description |
|---|---|
BIOS upgrades | Flash memory upgrades using SuperDisk (floppy) drive |
Enhanced IDE | PIO Mode 4 |
ATAPI | LS-120/LS-240 SuperDisk (floppy) drive support |
System management | System and chassis information is loaded into SMBIOS tables from IDROMs |
ACPI | Power management support |
Video support | Supports 1X, 2X, or 4X AGP graphics, AGP Pro 110, and 32- or 64-bit PCI graphics cards |
Available languages | English (U.S.) |
Boot options | Hard drive (IDE or SCSI) |
USB | Legacy USB keyboard and mouse support |
BIOS security features | User and Administrative passwords |
BIOS recovery | Recovery BIOS included in flash |
SMBIOS | Compliant with SMBIOS 2.3 |
The Configuration Manager is accessed at the Intel Itanium processor splash screen (see Figure 3-1) by tabbing to the Enter Setup option and pressing Enter. The Configuration Manager is organized into a set of tabbed panels. Table 3-2 summarizes the uses for each tab.
Table 3-2. Summary of Configuration Manager Screens
Tab Legend | Function(s) |
|---|---|
Help | Explains how to use the Configuration Manager |
System Processors | Displays processor information |
System Memory | Displays the amount of memory |
System Event Log | Configure system event log |
Integrated IDE | Enable controller |
System BIOS | Displays the BIOS version |
Power Events | Enable or disable the S5 wake-up events |
Time/Date | Displays and sets the time or date |
General | Set the amount of time the introductory screen remains visible |
Security | Set or clear the user and administrator passwords |
Save/Exit | Save or discard the changes |
The following sections describe entering, navigating, and exiting Configuration Manager.
The BIOS displays a screen with the manufacturer's logo (see Figure 3-1) shortly after the start of the boot sequence. You have two choices before proceeding:
Click Enter Setup to use the Configuration Manager.
Click Boot OS to dismiss the introductory screen and continue booting the operating system.
The label for the currently selected button is white and enclosed by right (-->) and left (<--) arrows. To move the current selection between the two buttons, click the desired button with the mouse, or press the Tab key or the left and right arrow keys. The text box between the two buttons shows the number of seconds remaining before the BIOS automatically continues with the selected option.
| Note: For reference purposes, before you begin record the current settings in Appendix A, “Configuration Manager Settings ”. When you make changes to the settings, update this record. |
The letters in Figure 3-1 indicate the following:
A | Boot OS (operating system) |
B | Time remaining before executing selected option |
C | Enter the Configuration Manager (Setup) |
You can use your keyboard and mouse together to navigate in the Configuration Manager. However, the mouse is the preferred method. Table 3-3 explains the functions of the mouse and keyboard keys.
Table 3-3. Using the Keyboard and Mouse in the Configuration Manager
Element | Function |
|---|---|
Mouse | Click the left mouse button to select tabs or buttons. Click the right mouse button to display the online help for the selected tab. If you have swapped the left and right mouse buttons in your operating system, that setting is not in effect while you are using the Configuration Manager. |
Backspace | Press the Backspace key when entering text to erase the previous character. |
Tab | Press the Tab key to move to the next control. |
Shift+Tab | Press the Shift+Tab key to move back one control. |
Esc | Press the Esc key to move to the Save/Exit tab. |
F1 | Press the F1 key to display help text for the selected tab. |
Right arrow | Press the Right Arrow key to move to the next tab panel to the right. |
Left arrow | Press the Left Arrow key to move to the next tab panel to the left. |
Space bar | If the focus is on a checkbox, press the space bar to toggle the checkbox on or off. |
Enter | If the focus is on a button, press the Enter key to activate the button. |
Up/down arrows | If the focus is on a combo box (a text box with a drop-down list), press the up and down arrow keys to select the previous or next option. If the focus is on a spin box, press the up and down arrow keys to select the previous or next value. |
Figure 3-2 is an example of Configuration Manager tabs.
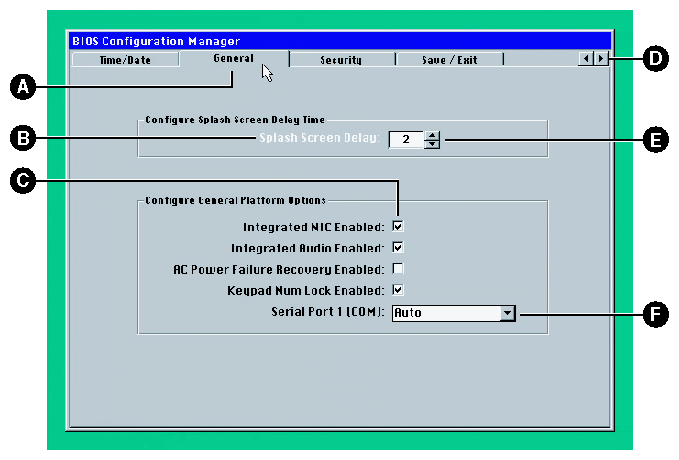
The letters in Figure 3-2 indicate the following:
A | Active tab panel |
B | Label turns white to indicate focus |
C | Checkbox |
D | Previous tab and next tab buttons |
E | Spin button |
F | Drop-down list |
To exit the Configuration Manager, follow these steps:
Select the Save/Exit tab. (See “Save/Exit ”.)
If you have changed the Configuration Manager settings, click Save New Settings or Discard Changes.
Click Exit.
Figure 3-3 shows the Help tab screen.
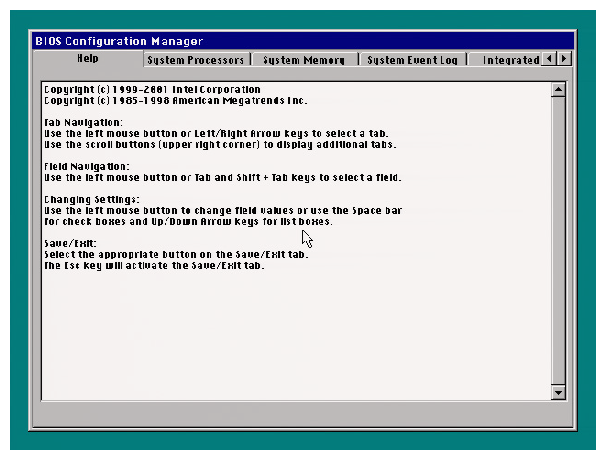
The Help tab lists the keyboard navigation shortcuts used in the Configuration Manager. For help on any tab, press F1, or click the right mouse button.
Figure 3-4 shows the System Processors tab screen.
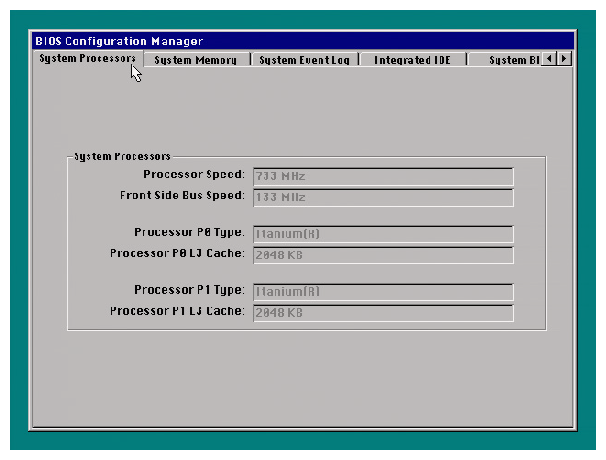
Table 3-4 describes the System Processors tab features.
Table 3-4. Description of the System Processors Tab
Figure 3-5 shows the System Memory tab screen.
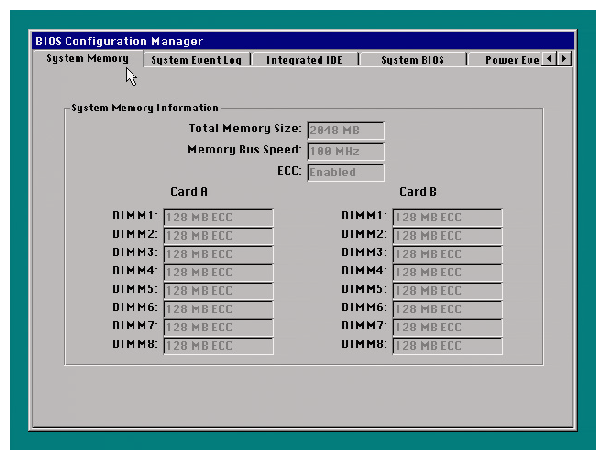
Table 3-5 describes the System Memory tab features.
Table 3-5. Description of the System Memory Tab
| Note: An asterisk (*) on the screen indicates that the memory bank is invalid. |
Figure 3-6 shows the System Event Log tab screen.
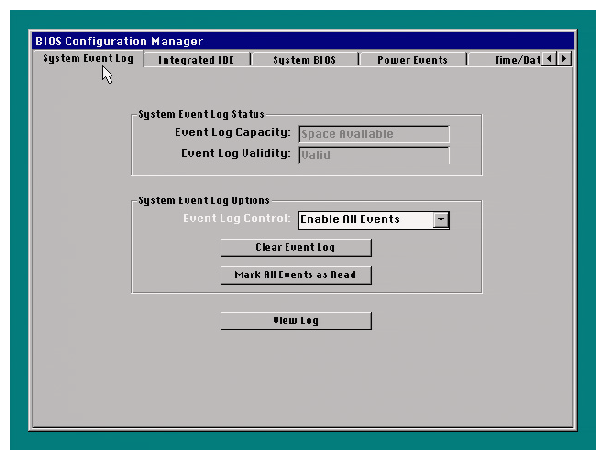
Table 3-6 describes the System Event Log tab features.
Table 3-6. Description of the System Event Log Tab
Feature | Options | Description |
|---|---|---|
Event Log Capacity | Display only | Shows space availability for the event log. |
Event Log Validity | Display only | Shows the information in the System Event Log as valid or invalid. If the log is marked as invalid, clear the log and reboot. |
Clear Event Log | Enabled | Enable this option to clear the System Event Log each time the system is rebooted. |
Event Log Control | Enable All Events (default) | Enable or disable event logging. Disable ECC Events will enable logging all events except ECC events. |
Mark All Events as Read | Button | Mark all events in the log as read. |
View Log | Button | Displays the system events in the System Event Log (see Figure 3-7 ). Read events are marked with an asterisk. |
Figure 3-7 shows the System Event Log screen.
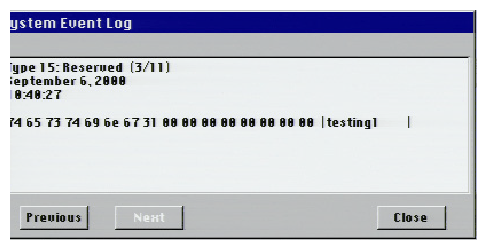
Figure 3-8 shows the Integrated IDE tab screen.
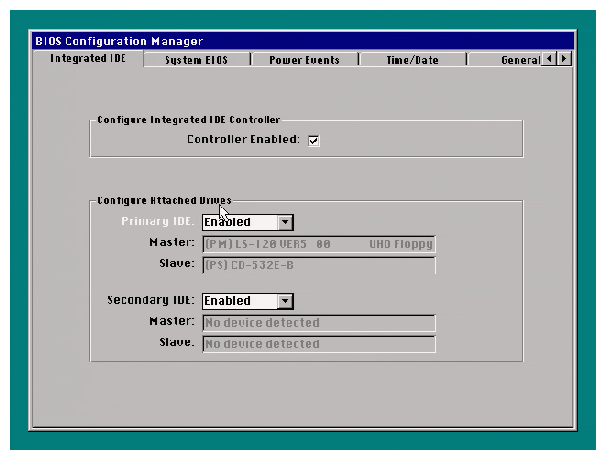
Table 3-7 describes the Integrated IDE tab screen.
Table 3-7. Description of the Integrated IDE Tab
Figure 3-9 shows the System BIOS tab screen.
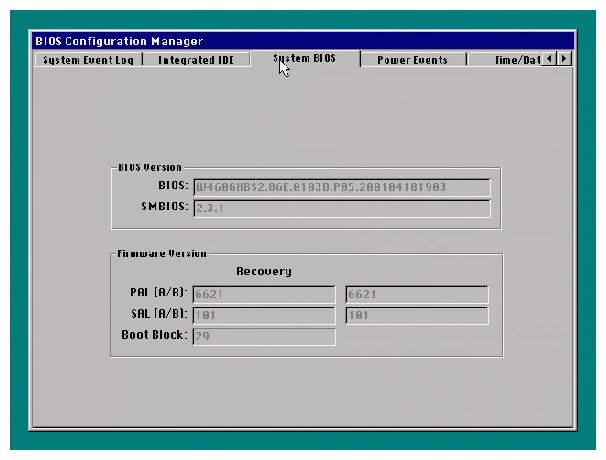
Table 3-8 describes the System BIOS tab screen.
Table 3-8. Description of the System BIOS Tab
Feature | Options | Description |
|---|---|---|
BIOS Version: |
|
|
BIOS Version | No options | Displays the BIOS version. |
SMBIOS Version | No options | Displays the System Management BIOS (SMBIOS) version. |
Firmware Versions: |
|
|
PAL A/B | No options | Displays the Platform Abstraction Layer (PAL) version. |
SAL A/B | No options | Displays the Software Abstraction Layer (SAL) version. |
Boot Block | No options | Displays the Boot Block version. |
Figure 3-10 shows the Power Events tab screen.
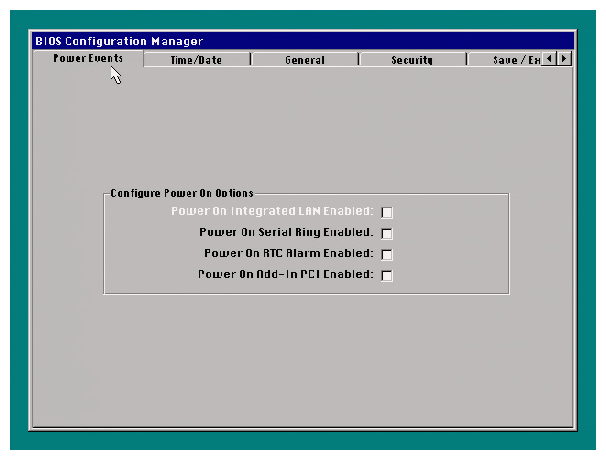
Table 3-9 describes the Power Events tab screen.
Table 3-9. Description of the Power Events Tab
Figure 3-11 shows the Time/Date tab screen.
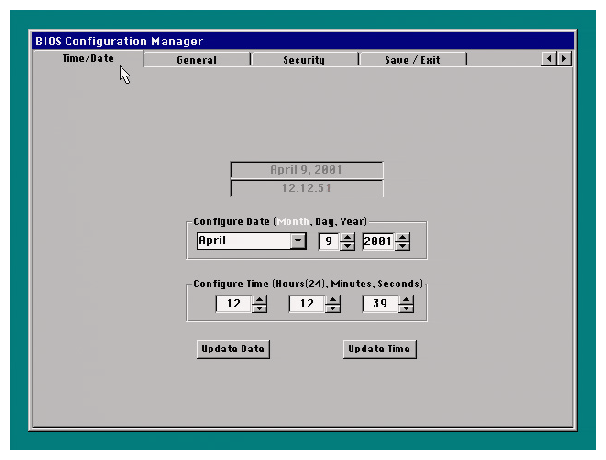
Table 3-10 describes the Time/Date tab screen.
Table 3-10. Description of the Time/Date Tab
Feature | Options | Description |
|---|---|---|
Date | No options | |
Time | No options | Displays the current time (using 24-hour clock). |
Month Day Year | January - December 1–31 1980–2099 | Specifies the current date. |
Hours Minutes Seconds | 0–23 0–59 0–59 | |
Update Date Update Time | Buttons | Sets the date or time. |
Figure 3-12 shows the General tab screen.
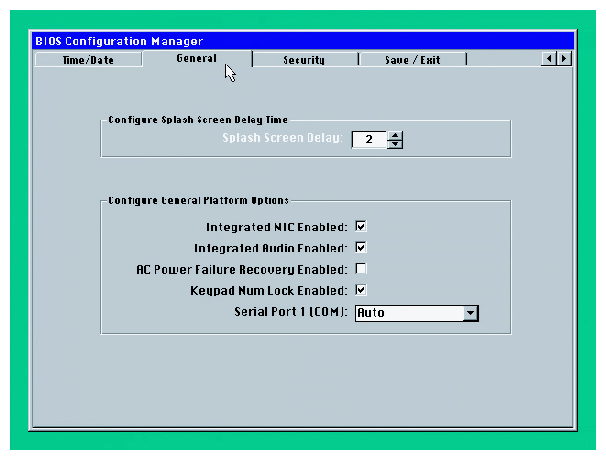
Table 3-11 describes the General tab screen
Table 3-11. Description of the General Tab
Figure 3-13 shows the Security tab screen.

Table 3-12 describes the Security tab screen.
Table 3-12. Description of the Security Tab
Feature | Options | Description |
|---|---|---|
User Password Set | No options | Reports if the user password is set. |
Administrator Password Set | No options | Reports if the administrator password is set. |
Clear User Password | Button | Clears the user password. |
Set User Password | Button | Specifies the user password. The user password can be as many as 15 characters long. |
Clear Administrator Password | Button | Clears the administrator password. |
Set Administrator Password | Button | Specifies the administrator password. The administrator password can be as many as 15 characters long. |
Figure 3-14 shows the Save/Exit tab screen.
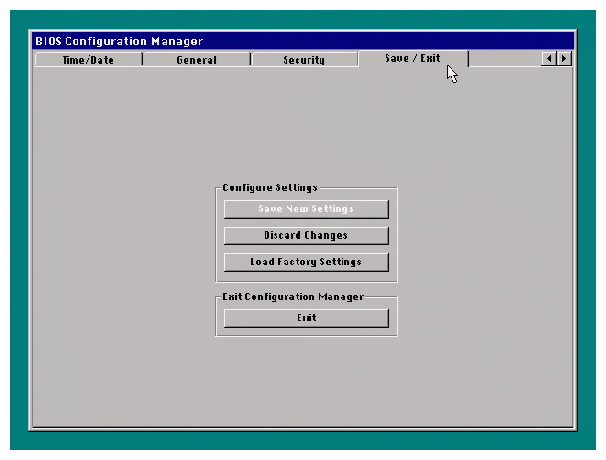
Table 3-13 describes the Save/Exit tab screen.
Table 3-13. Description of the Save/Exit Tab
Feature | Options | Description |
|---|---|---|
Save New Settings | Button | Saves the changes in flash memory. |
Discard Changes | Button | Discards any changes made in the Configuration Manager. |
Load Factory Settings | Button | Loads the factory default values for all the Configuration Manager options. |
Exit | Button |
Follow these steps to use the extensible firmware interface ( EFI) shell or the boot option maintenance menu:
Turn the power on, or restart the system.
Click Boot OS from the splash screen or wait without making a choice. The BIOS will boot the EFI shell if you do not choose Enter Setup.
If only the user password is set, you must enter the user password. If both the user and administrator passwords are set, you can enter either password.
The system boot manager will display a screen similar to that shown in Figure 3-15.
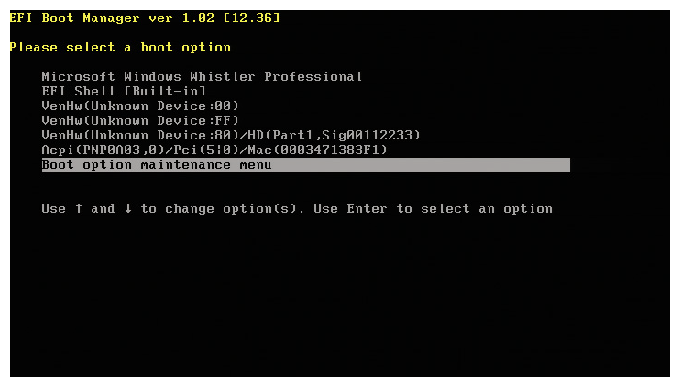
To enter EFI shell command mode, select EFI Shell [Built-in]. See “EFI Shell Command Mode” for usage information.
To enter the boot maintenance manager, select Boot option maintenance menu. See “EFI Boot Maintenance Manager” for usage information.
Follow the directions in “EFI Boot Manager” to enter the EFI shell command mode. Figure 3-16 shows a typical EFI shell screen.
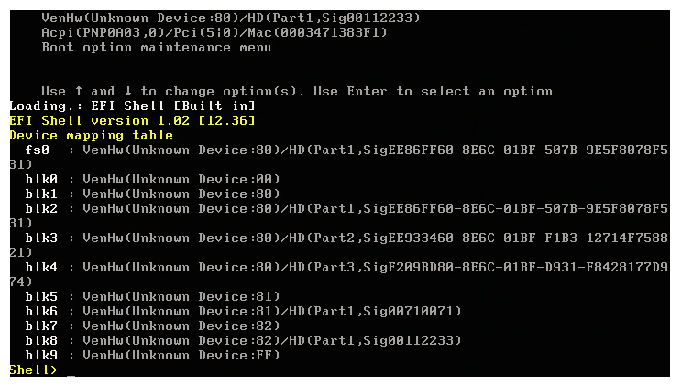
| Note: Devices displayed in Figure 3-16 will change based on the system configuration. See Table 3-14 for device ID descriptions. |
Table 3-14. Device ID Descriptions
Device ID | Description |
|---|---|
Device:00 | Indicates an LS-120/LS-240 (SuperDisk) drive |
Device:8x | Indicates a hard drive |
Device:FF | Indicates a CD-ROM drive |
Follow the directions in “EFI Boot Manager” to enter the boot maintenance manager. Using the boot maintenance manager you can select how your system boots.
| Note: For reference purposes, you should record the current boot option settings in Table A-1. When you change the settings, update this record. |
Figure 3-17 shows the EFI Boot Maintenance Manager main menu screen.
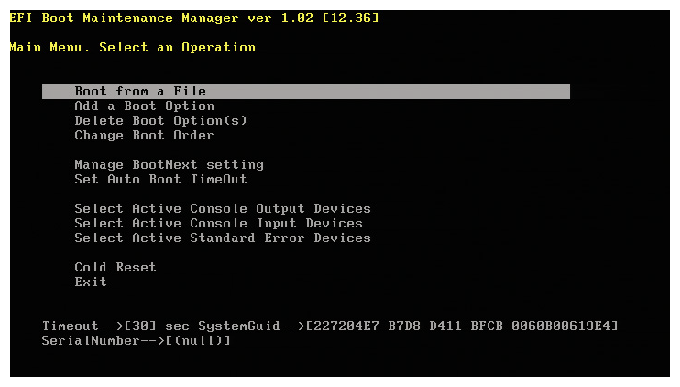
The EFI boot maintenance manager is organized into a set of menu options allowing you to select how your system boots. Table 3-15 summarizes the EFI boot maintenance manager options shown in Figure 3-17.
Option | Function |
|---|---|
Boot from a File | Allows browsing for a boot file. |
Add a Boot Option | Adds new boot option file to Select Boot Option menu. |
Delete Boot Option(s) | Removes boot option file from Select Boot Option menu. |
Change Boot Order | Changes order of option in Select Boot Option menu. |
Manage BootNext Setting | Sets or resets the option to which the system will automatically boot on the next reboot. |
Set Auto Boot TimeOut | Sets time delay before the system auto boots to the item selected in the BootNext option. |
Select Active Console Output Devices | Allows output to be directed to selected options. |
Select Active Console Input Devices | Allows input to be directed from selected options. |
Select Active Standard Error Devices | Selects devices where errors are reported. |
Cold Reset | Performs a cold reboot of system. |
Exit | Returns to EFI Select Boot Option menu mode. |
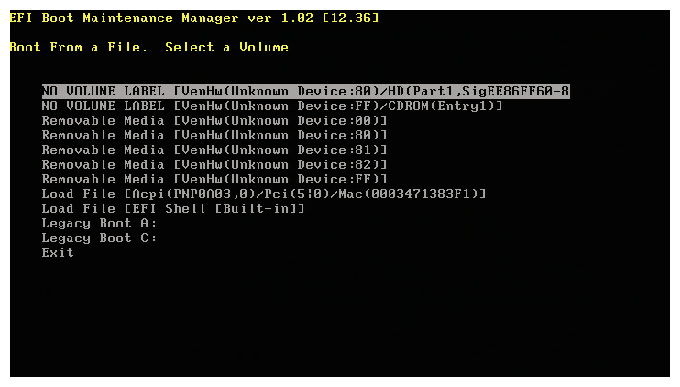
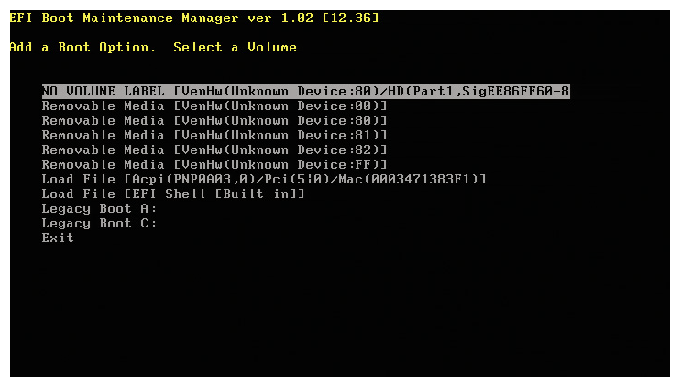
If you select Boot from a File in the EFI boot maintenance manager main menu (as described in “EFI Boot Maintenance Manager”), you can browse for a boot file. Figure 3-18 shows a typical Boot from a File screen.
If you select Add a Boot Option in the EFI boot maintenance manager main menu (as described in “EFI Boot Maintenance Manager”), you can add new boot option information to the EFI shell. Figure 3-19 shows a typical Add a Boot Option screen.
To add a boot option, follow these steps:
Select the device where the boot file is located (see Figure 3-19).
Select the file within the device.
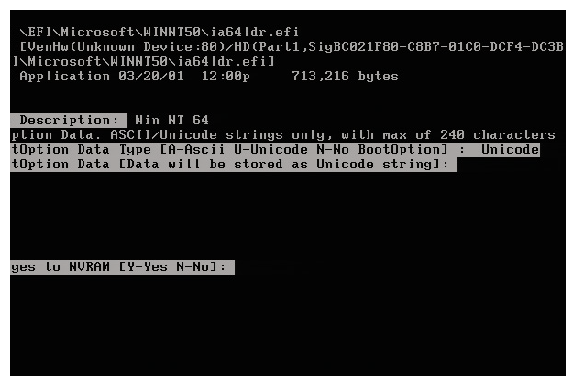
Enter the file description at the prompt (see Figure 3-20).
Type u or U to select Unicode and press Enter.
To save your changes, select Save changes to NVRAM and press Y.
To boot from a network, following these steps:
From the EFI Boot Maintenance Manager main menu select Add a Boot Option.
Select the following option:
Removable Media [Acpi(PNPA03,0)/Pci(4\xad 0)/Mac(00XXXXXXXXXX)]

Note: The MAC address will vary with each board. Enter a file description at the prompt (for example, LAN or Network) and press Enter.
To save your changes, select Save changes to NVRAM and press Y.
Exit both the Add a Boot Option screen and the EFI Boot Maintenance Manager main menu screen.
The EFI Boot Manager screen reflects your network boot option. Select this option and press Enter to boot from the network.
If you select Delete Boot Option(s) in the EFI boot maintenance manager main menu (as described in “EFI Boot Maintenance Manager”), you can delete a boot option from the EFI shell. Figure 3-21 shows a typical Delete Boot Option(s) screen.
To delete a boot option, follow these steps:
Highlight that option using the arrow keys and press Enter. You may also highlight an option and press d or D on your keyboard.
To confirm your delete command, press Y or N at the prompt. To delete all the boot options, select Delete All Boot Options from the menu.
To save your changes before exiting, select Save Settings to NVRAM.

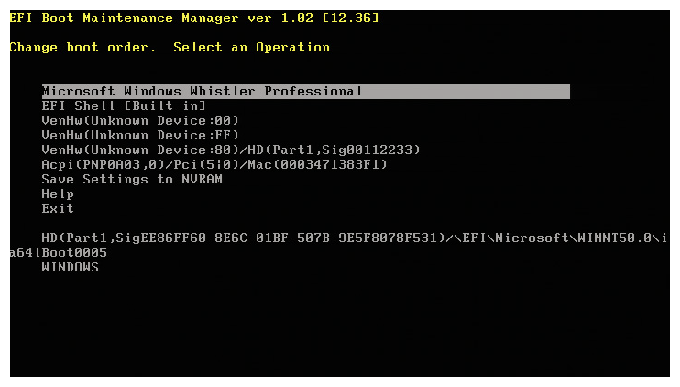
If you select Change Boot Order in the EFI boot maintenance manager main menu (as described in “EFI Boot Maintenance Manager”), you can set the boot order. Figure 3-22 shows a typical Change Boot Order screen.
To change the boot order, follow these steps:
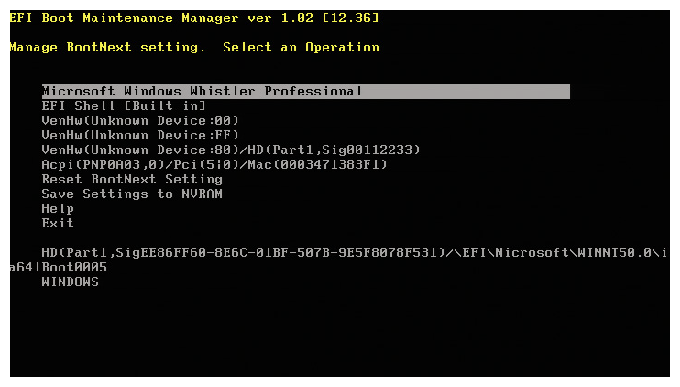
If you select Manage BootNext Setting in the EFI boot maintenance manager main menu (as described in “EFI Boot Maintenance Manager”), you can control the automatic actions of the system on the next boot. Figure 3-23 shows a typical Manage BootNext Setting screen.
To change the BootNext setting, follow these steps:
Select a boot option using your arrow keys.
Press Enter, b, or B to designate this option as BootNext.
To remove a BootNext setting, select Reset BootNext Setting, or press r or R when the option is selected.
To save your changes before exiting, select Save Settings to NVRAM.
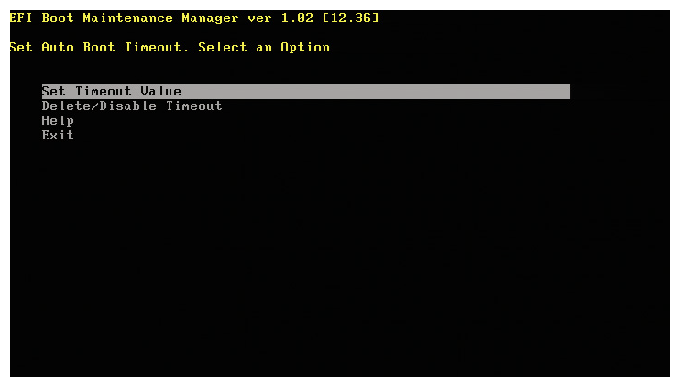
If you select Set Auto Boot Timeout in the EFI boot maintenance manager main menu (as described in “EFI Boot Maintenance Manager”), you can set the timeout value before the operating system (OS) automatically boots. Figure 3-24 shows a typical Set Auto Boot Timeout screen.
The auto boot timeout value can be set in the following ways:
Select Set Timeout Value to set the time, in seconds, to boot the default OS. If a value of zero is specified, there is no wait to boot the default OS.
The following three choices are available to disable the timeout variable:
Select Delete/Disable Timeout menu option to delete the timeout variable.
Set the timeout value to be 65535 <0xFFFF>.
Press a key when the EFI is booting and the timeout count down is disabled.
Select Set Timeout Value to save the timeout value.
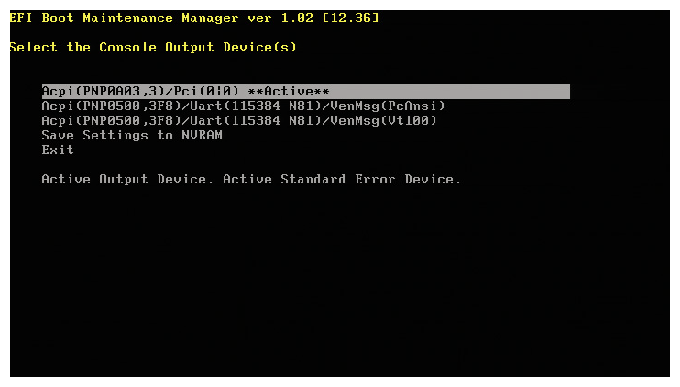
If you select Select Active Console Output Devices in the EFI boot maintenance manager main menu (as described in “EFI Boot Maintenance Manager”), you can direct console output to selected devices. Figure 3-25 shows a typical Select the Console Output Device(s) screen.
To change the console output device setting, follow these steps:
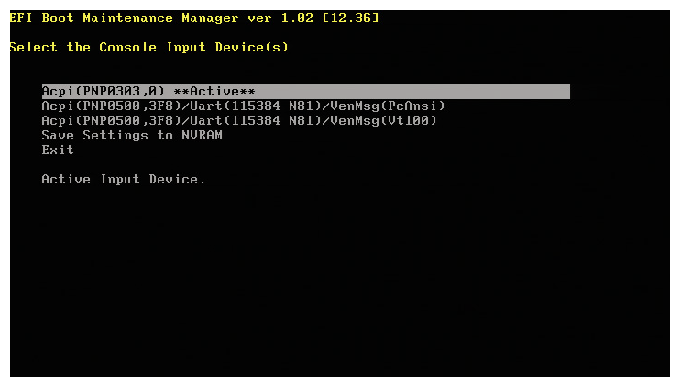
If you select Select Active Console Input Devices in the EFI boot maintenance manager main menu (as described in “EFI Boot Maintenance Manager”), you can allow input to be accepted from selected devices. Figure 3-26 shows a typical Select the Console Input Device(s) screen.
To change the console input device setting, follow these steps:
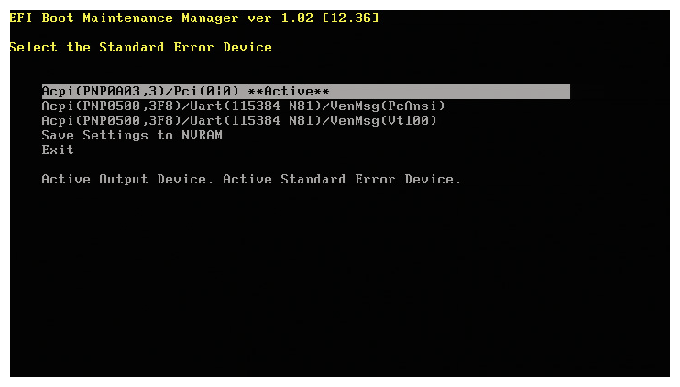
If you select Select Standard Error Devices in the EFI boot maintenance manager main menu (as described in “EFI Boot Maintenance Manager”), you can choose the device where errors are reported. Figure 3-27 shows a typical Select the Standard Error Device screen.
To change the standard error device setting, follow these steps:
The firmware hub (FWH) includes an 8-Mbit (1024-KB) symmetrical flash memory device. Four FWH devices are located on the I/O board for a total of 4 MB of flash memory. Internally, each device is grouped into eight 64-KB blocks that are individually erasable, lockable, and unlockable with additional hardware protection for the top block.
The IFlash64 utility is an EFI application program used for updating the BIOS for this system. Firmware releases will be shipped as two images for updating in the field:
fw.bin (4 MB) - Complete firmware image including recovery block.
wpgbios.bin (3.75 MB) - Complete firmware image minus recovery block.
Note: Only the English language is supported.
You will most likely upgrade the BIOS using the 4-MB fw.bin file and the SuperDisk (floppy) drive.
Before you upgrade the BIOS, prepare by:
Obtaining the appropriate BIOS and PAL version for the processor upgrade file.
Recording the current BIOS settings.
Creating the BIOS upgrade disk.
You can upgrade to a new version of the BIOS by using the latest image and the current flash utility. The images and utilities are contained in a compressed, self-extracting archive that contains all the files you need to upgrade the BIOS.
| Note: Review the instructions distributed with the BIOS files for new information before attempting a BIOS upgrade. |
To record the current BIOS settings, boot the computer, click Enter Setup, and use Table A-1 to record the current BIOS settings in the Configuration Manager.
| Note: Do not fail to record the current settings in Appendix A, “Configuration Manager Settings ”. You will need these settings to configure your computer at the end of the upgrade procedure. |
Use the BIOS Flash Upgrade Utility to upgrade your system BIOS by following the steps outlined below:
Unzip and copy the contents of the zip file (example: 077pal214.zip) containing the BIOS and PAL code onto a SuperDisk (i.e., LS-120) floppy diskette.
Insert the SuperDisk diskette into its appropriate drive on the system.
Boot to the EFI shell, change the directory to the SuperDisk floppy drive (for example, if the SuperDisk drive is device fs0, type fs0:), and press Enter.
Enter the following command:
UNLOCK /L=2
Reboot the system.
Again, boot to the EFI shell and change the directory to the SuperDisk floppy drive (for example, if the SuperDisk drive is device fs0, type fs0:), and press Enter.
Enter the following command:
Iflash64 <filename>
Follow the instructions on the screen. Additional information can be obtained via the utility help command Iflash64 /h.
Reboot the system after the upgrade is completed.
Click Enter Setup and change the BIOS settings to match those recorded in “Recording the Current BIOS Settings”.
To save the settings and exit Configuration Manager, refer to “Save/Exit ”.