This Chapter describes assembling the various bricks that make up your Onyx4 UltimateVision system to form one unified system. You should follow the steps in this Chapter if you ordered a complete Onyx4 system from SGI without a rack, or if you are expanding an existing Onyx4 system to include more graphics output pipes.
If your SGI Onyx4 system came from SGI already mounted in a rack, you should proceed directly to Chapter 3, “Setting Up Your Onyx4 System”.
The first section in this chapter discusses safety precautions that must be taken when working with the system:
The second section in this chapter describes choosing where in the rack to mount the various bricks that form the system:
The third section describes making the NUMA and XIO connections:
The fourth section of this chapter details the installation of PCI cards in the host system:
The fifth section addresses connecting cables to the optional ImageSync card:
The sixth section addresses providing power to the system:
Before you install an SGI Onyx Next Generation Scalable Graphics system, you should familiarize yourself with the safety precautions discussed in the following subsections:
During the installation of the computer system, be alert for hazard advisory statements with icons, which signify the following:
Caution Indicates a potentially hazardous situation that, if not avoided, can result in minor or moderate injury. A caution statement also alerts you to unsafe practices that can result in equipment damage and/or data corruption. A caution message is accompanied by an icon as shown in the following example:

Caution: Warning indicates a potentially hazardous situation that, if not avoided, could result in death or serious injury. A warning message is accompanied by icon as shown in the following example:

Warning:
Observe electrostatic discharge ( ESD) precautions during the entire installation process to eliminate possible ESD damage to the equipment. Wear an SGI-approved wrist strap when you handle an ESD-sensitive device. Connect the wrist strap cord directly to earth ground.
| Caution: Observe all ESD precautions. Failure to do so can result in damage to the equipment. |
The internal configuration of the system is partially determined by the locations of the various bricks within the rack. This includes such things as which brick the system boots from and the ordering of the graphics pipes.
Cable lengths and routings also play a part in determining rack configurations.
If your system was preconfigured from SGI but purchased without a rack, you should reassemble the system in the order in which it was originally configured. This is described in “Determining Rack Locations for Preconfigured Systems”.
If your system was not preconfigured, you will need to determine the best rack locations. This is described in “Selecting Rack Locations for Non-Preconfigured Systems”.
If you have changed the rack locations from those preconfigured in the factory, or if you have selected your own rack locations, you will need to program the L1 controllers with the new locations. This is described in “Programming L1 Rack and Slot Numbers”.
Once you determine the desired rack locations for all the bricks in your system, refer to Appendix C, “Installing G2-bricks and G2N-bricks in a Rack” for instructions to mount the bricks in a rack, then proceed to “NUMA and XIO Cabling”.
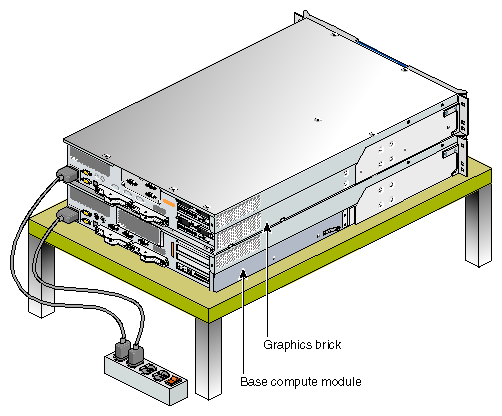
Rack mounting Onyx4 systems is recommended. However, if your Onyx4 system consists of only two or three bricks, they may be placed on a flat surface, as shown in Figure 2-1.
| Caution: The Onyx4 bricks are heavy. Ensure that the bricks are positioned in such a way that they can not slide and fall, causing damage or injury. |
If your system was preconfigured from SGI but purchased without a rack, you should reassemble the system in the order in which it was originally configured. This section describes how to determine that order.
Supply power to each brick in turn, as described in “Providing Power to G2-bricks and G2N-bricks”. There is no need to power up the bricks at this time.
While each brick is receiving power, make a note of the information on the L1 display on the front of that brick.
Each L1 will display a location in the form “XXXyZZ” (for example, “001c07”) where:
“XXX” is the rack number (001 in this example),
“y” is the brick type (c in this example), and
“ZZ” is the slot number (07 in this example).
Once you determine the desired rack locations for all the bricks in your system, refer to Appendix C, “Installing G2-bricks and G2N-bricks in a Rack” for instructions to mount the bricks in a rack.
If your system was not preconfigured by SGI, you will need to decide on suitable rack locations for each of the bricks in the system.
Because the SGI Onyx4 is a highly-configurable system, it is not practical to list every possible configuration. For configurations not shown here, consult your SGI sales or support representative.
The following figures show the most common configurations of the SGI Onyx4 system. To assist in system configuration, the typical location of pipe 0 is called out in these figures.
Once you determine the desired rack locations for the bricks in your system, Appendix C, “Installing G2-bricks and G2N-bricks in a Rack” describes how to mount them in a rack.
Figure 2-2 shows a configuration containing one host brick and one G2-brick.
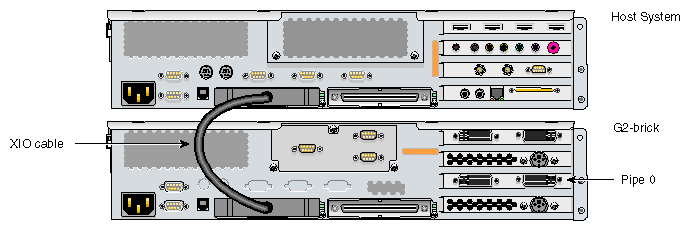
Figure 2-3 shows a configuration containing one host brick and one G2N-brick.

Figure 2-4 shows a configuration containing one host brick, one G2-brick, and one G2N-brick.
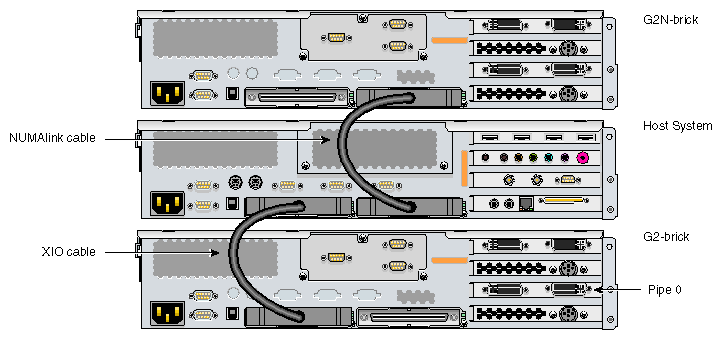
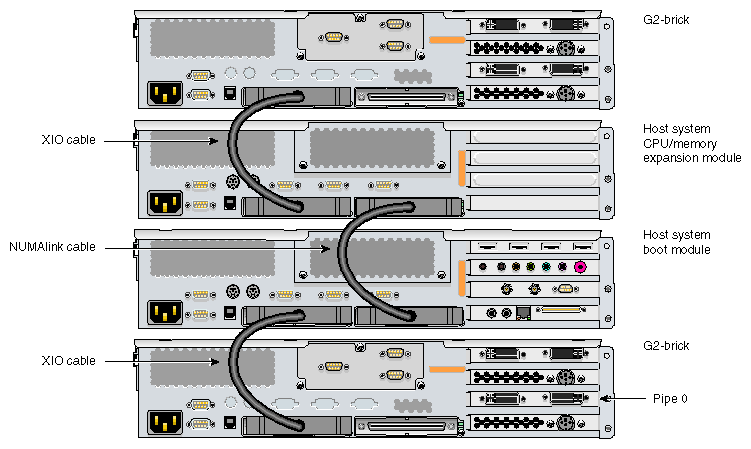
Figure 2-5 shows a configuration containing two host bricks and one G2-brick.
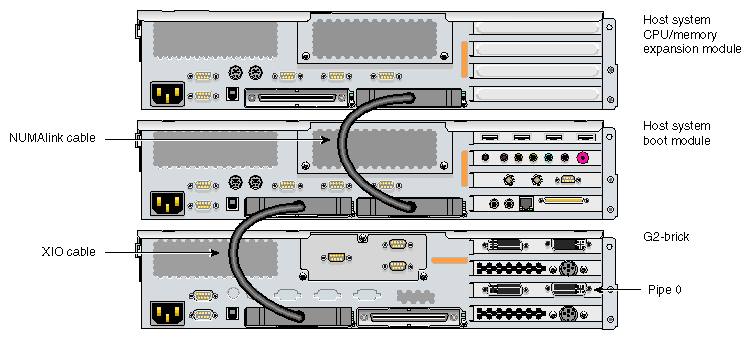
Figure 2-6 shows a configuration containing two host bricks and two G2-bricks.
Each brick in an Onyx4 system contains a Level 1 controller (L1). This controller should be programmed with the location of the brick in which it is installed. Programming the L1 with the correct rack and slot numbers allows for easier system maintenance and diagnostics, and is necessary for predictable operation of the system.
When a brick is connected to AC power, the L1 display will indicate its position as follows:
There will be a string of the form XXXyZZ (for example, “001c12”).
Decode this string as follows:
“XXX” is the rack number (in this example, rack 001)
“y” is the module type (in this case, c indicates a compute module)
“ZZ” is the “U” number within that rack, counting from the bottom (in this case, slot 12).
If the position indicated on an L1 display is not correct, you should correct it as follows:
Connect a serial terminal to the console port on the brick in question.
Display the current location setting in the L1:
001c12-L1> brick
rack: 001 slot: 12 partition: 0 type: C source: EEPROM
001c12-L1> brick rack 1
brick rack set to 001
-
001c12-L1> brick slot 7
brick slot set to 07
Verify the newly entered information:
001c12-L1> brick
rack: 001 slot: 07 partition: 0 type: C source: EEPROM
If other bricks need to be changed, repeat steps 1 through 4 for each additional brick.
Once the bricks that make up your Onyx4 system are mounted in rack, you will need to connect the bricks together with NUMA and XIO cables.
Using the figure you selected for your system configuration in the previous section as a guide, connect the bricks in your system together with NUMA and XIO cables.
| Caution: The connectors on the NUMAlink cables (used for both NUMAlink and XIO connections) are delicate, and must be handled carefully. Use care when removing and replacing these cables. |
The SGI Onyx Next Generation Scalable Graphics Platform uses either of two different graphics bricks: a G2-brick (graphics-only) and a G2N-brick (graphics, CPUs, and memory).
Note that the two different styles of graphics bricks (G2 and G2N) attach to their host bricks in different manners.
The Onyx4 G2N-brick uses NUMAlink to attach to a host system.
The Onyx4 G2-brick uses XIO to attach to a host system.
Each host system brick has only one NUMA port and one XIO port.
Once the NUMA and XIO connection have been made, proceed to “PCI Card Locations”.
Various configurations of the Onyx4 systems may ship with one or more PCI cards. These cards include:
BaseI/O (IO9) PCI card
ImageSync PCI card
Four-port USB PCI card
Basic or professional PCI sound card
In most cases, these cards will have been installed in the factory. There may be situations, however, where they may be installed or where their positions may be changed in the field.
This section describes the requirements for each of these cards, then shows the preferred location of these PCI cards in the host system.
Some of the PCI cards used with Onyx4 systems have specific requirements that may constrain their placement. Care must be taken that these requirements are met when installing these cards.
| Note: The PCI cards described in this section are not installed in the G2-bricks or the G2N-bricks, but are instead installed in PCI slots in the host system. |
The BaseI/O (IO9) PCI card is factory-installed in the certain host systems. It is not a customer-installable option. Though the IO9 card will run at either 33 MHz or 66 MHz, 66 MHz operation is strongly preferred. This means any cards that share a bus with an IO9 card should also be capable of running at 66 MHz.
The SGI ImageSync PCI card will run at either 33 MHz or 66 MHz. However 66 MHz operation is strongly preferred. This means any cards that share a bus with an ImageSync card should also be capable of running at 66 MHz.
The four-port USB PCI card only runs at 33 MHz. This means any cards that share a bus with this card will also run at only 33 MHz.
The basic or professional PCI sound cards will run at either 33 MHz or 66 MHz. This means these sound cards can share a bus with at least one card that runs only at 33 MHz (in which case all cards in that bus will run at 33 MHz) or the sound cards can share a bus populated only with cards capable of running at 66 MHz (in which case all cards in that bus will run at 66 MHz).
The preferred location for the SGI ImageSync PCI card in your host system is bus 1, slot 2 (i.e., the second PCI slot from the bottom).
The preferred location for the basic or professional sound card in your host system is bus 2, slot 1 (i.e., the third PCI slot from the bottom).
The preferred location for the USB card in your host system is bus 2, slot 2 (i.e., the fourth PCI slot from the bottom).
When present, the BaseI/O (IO9) card in your host system will be in bus 1, slot 1 (i.e., the bottom PCI slot).
| Note: A BaseIO (IO9) card will always be present in the host system boot module, but may or may not be present in other host system compute modules, depending on configuration. |
Figure 2-7 shows the rear panel of a host system with an ImageSync card, a sound card, a USB card, and a BaseI/O card installed in the preferred locations.
Detailed instructions for installing PCI cards may be found in the user's guide that came with your host system.

If your Onyx4 system came with an ImageSync card, you will need to connect appropriate cables to each G2-brick or G2N-brick you wish to control.
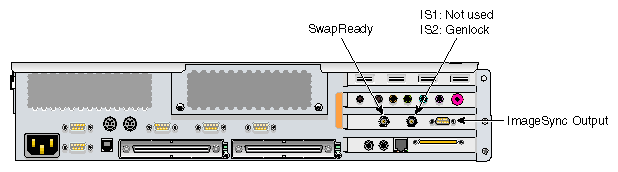
Figure 2-8 shows the connector locations on an ImageSync card.
ImageSync cabling is described in the following section. Swap ready cabling is described in “Attaching SwapReady Cabling” in Chapter 3. Genlock cabling is described in “Attaching Genlock or Framelock Cabling” in Chapter 3.
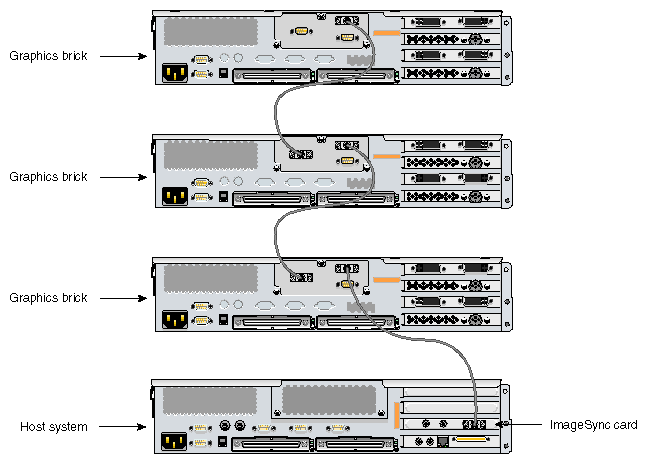
The image sync signal runs from the ImageSync card (installed in the host system) to one of the G2-bricks or G2N-bricks, then from that brick to another G2-brick or G2N-brick, and so on, to each additional graphics brick in the system.
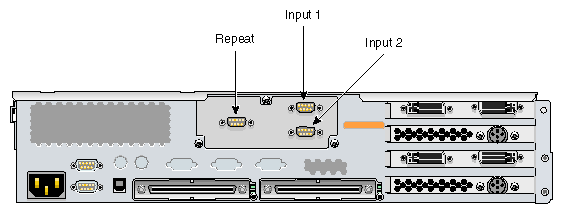
Figure 2-9 shows the ImageSync connector locations on a G2-brick or G2N-brick.
Follow these steps to connect your ImageSync cables:
Locate a DB9-to-DB9 image-sync cable (part number 018-1126-001).
Connect one end of the image-sync cable to the DB9 connector on the ImageSync card in your host system.
Connect the other end of the image-sync cable to the upper right (Input 1) image sync DB9 connector on one of the graphics bricks.
If you have only one graphics brick, you are done connecting image sync cables.
If you have additional graphics bricks, connect another image-sync cable between the left (Repeat) image sync DB9 connector on the last-connected system and the upper right (Input 1) image sync DB9 connector on the next graphics brick.

Note: There is no required order for the image sync cabling. Repeat step 5 until all graphics bricks are connected via image sync cables.
Figure 2-10 shows an ImageSync card installed in a host system with ImageSync cables connected to three G2-bricks.
| Note: Figure 2-10 does not show a complete system, and should not be used as a guide for brick placement. It is intended only to show how the ImageSync cables connect. |
| Caution: Although the image sync subsystem uses DB9 connectors, these connectors, whether on the ImageSync card or on the G2 and G2N bricks, are not serial ports. Connecting a serial device to these connectors may cause damage to both the ImageSync devices and the serial devices. |
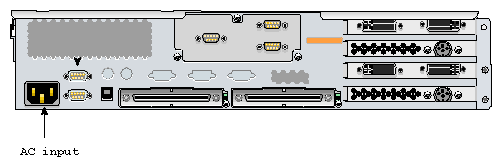
G2-bricks and G2N-bricks require AC power (see “Technical Specifications for G2-bricks and G2N-bricks” in Appendix B for details). G2-bricks and G2N-bricks will therefore generally plug into a PDU ( power distribution unit) at the rear of the rack.
Figure 2-11 shows the AC input location for the SGI Onyx4 G2-brick and the G2N-brick.
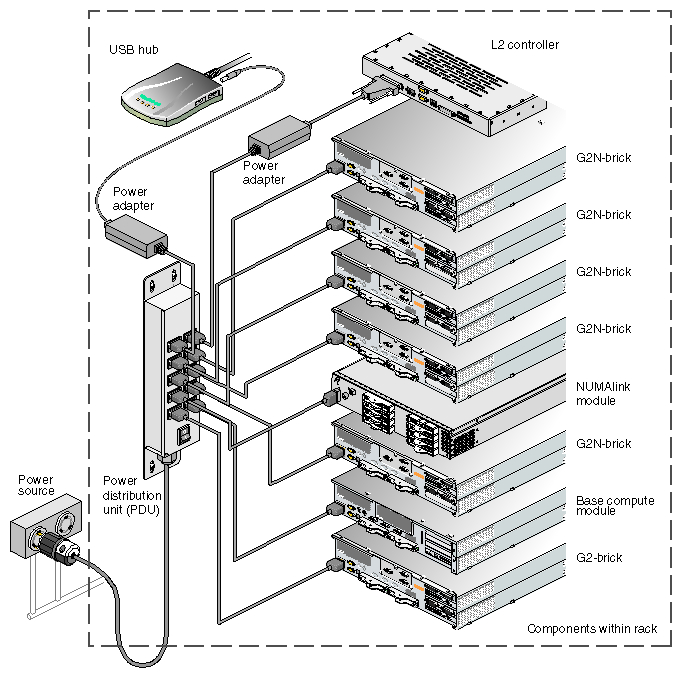
If your Onyx4 system is not installed in a rack, provide power as shown in Figure 2-1.
If your Onyx4 system is installed in a rack, provide power as shown in Figure 2-12.
| Note: Figure 2-12 is intended only to present an example of power-cable routing, and should not be used as a guide to rack positioning of chassis. For information about rack positioning, see “Selecting Rack Locations”. |
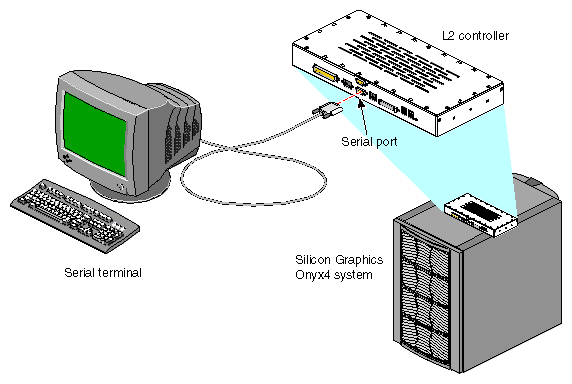
If your Onyx4 system was shipped in a rack with a Level 2 controller, you should connect a serial terminal to that Level 2 controller, which is located in the top of the rack as shown in Figure 2-13 (this view shows the back of the rack).
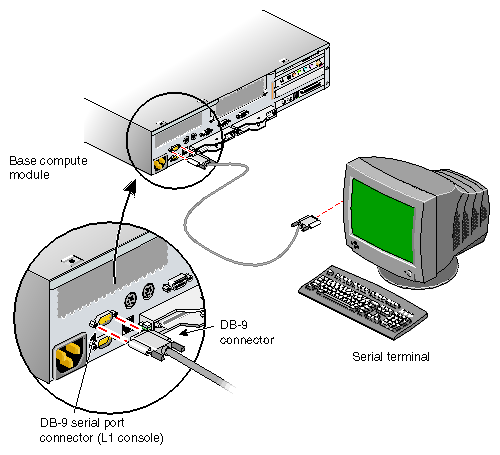
If your Onyx4 system was shipped in a rack without a Level 2 controller, or was shipped as individual chassis, you should connect a serial terminal to the Level 1 controller contained in the host system master CPU brick as shown in Figure 2-14.
The power up procedure varies, depending on whether your serial terminal is connected to an L1 system controller or an L2 system controller. Refer to the appropriate section below.
Power up your Onyx4 system from a serial terminal connected to the L1 system controller on the master CPU as follows:
At the system controller prompt, type:
003c01-L1> * pwr u
To see the IRIX OS console output, type Control-D:
003c01-L1> <ctrl>-D
If these commands result in an error message, reset the system:
003c01-L1> reset
Once the system is powered up, it will automatically boot to the IRIX OS and a login screen will appear on the attached graphics monitor(s).
Power up your Onyx4 system from the serial terminal connected to an L2 system controller as follows:
At the system controller prompt, type:
001-10.17.168.102-L2> pwr u
To see the IRIX OS console output, type Control-D:
001-10.17.168.102-L2> <ctrl>-D
Once the system is powered up, it will automatically boot to the IRIX OS and a login screen will appear on the attached graphics monitor(s).
Once your system is installed in a rack (or otherwise situated), is cabled together via NUMAlink and/or XIO, and is powered on, you should verify that all G2-bricks and G2N-bricks are being seen by IRIX.
To do this, follow these steps:
From an IRIX prompt, run the hinv command:
[1%]
hinv
Count the number of lines in the hinv output similar to the following:
Graphics board: SG2
For each G2-brick or G2N-brick there should be two such lines. If you do not see the correct number of lines, refer to the Appendix A, “Troubleshooting and Replacing Parts”.