This chapter describes how to set up your SGI Onyx4 system. Before following the instructions in this chapter, your system should be assembled and bootable, all G2-bricks and G2N-bricks should be properly mounted (typically in a rack) and connected to the host system, and hinv should show all graphics pipes.
This will be the case if you purchased your system preconfigured from SGI. Otherwise you should assemble your system by following the instructions in Chapter 2, “Assembling an Onyx4 System”.
This section guides you through the process of determining if the version of the IRIX operating system installed on your host system is suitable for use with the SGI Onyx4 system.
To determine your IRIX version, type the following at an IRIX prompt:
[1%] uname -R 6.5 6.5.24m |
Depending on the output of this command, go to the appropriate section below.
If your system is running IRIX version 6.5.21 or earlier, you should upgrade your operating system to at least IRIX version 6.5.22 with patch 5448, IRIX version 6.5.23 with patch 5448, or IRIX version 6.5.24.
If your system is running IRIX version 6.5.22 or IRIX version 6.5.23, you should also be running patch 5448.
To determine if you have patch 5448 installed, type the following at an IRIX command prompt:
[3%] versions patchSG0005448 |
If the output of this command is simply the headings “Name,” “Date,” and “Description,” you do not have patch 5448 installed. This patch should be installed (or you should upgrade your system to IRIX version 6.5.24 or later) in order to get the best performance from your Onyx4 system.
If the output of this command includes items below the Name-Date-Description heading, you do have patch 5448 installed, and your system is suitable for use with Onyx4 graphics.
You may use this method to determine if you have other patches installed. Simply substitute the other patch number for 5448.
Many details of the graphics system in an Onyx4 are controlled by the /etc/X11/ XF86Config-4 file.
After adding or removing a G2-brick or G2N-brick, it may be necessary to regenerate your XF86Config-4 file. Depending on the settings of two variables, this might be done automatically or may need to be done manually. Both methods are described in this section.
Two chkconfig variables control the automatic regeneration of the XF86Config-4. These are xf86config-autoconfig and xf86config-autoreplace. The settings of these variables on a particular system may be displayed by running the chkconfig command as follows:
[1%] /etc/ chkconfig |
The default value for xf86config-autoconfig is on. The default value for xf86config-autoreplace is off.
When the system boots (or the init level is changed in any other manner) the setting of the xf86config-autoconfig variable is consulted. If this variable is set to on, the /etc/X11/gen-XF86Config script is run.
If the gen-XF86Config script detects no hardware changes, it does nothing.
If any graphics hardware not listed in the existing XF86Config-4 file is detected, a new file named XF86Config-4.N is created, containing the new hardware. The existing XF86Config-4 file is left unchanged. The graphics system will still start this way (though some graphics pipes will not be active). The user can then choose to manually replace the old XF86Config-4 file with the new XF86Config-4.N file and reboot.
If some graphics hardware listed in the existing XF86Config-4 file is no longer detected, the existing XF86Config-4 is renamed XF86Config-4.O, and a new XF86Config-4 file is written in its place. This allows the graphics system to start, which it would not do if the XF86Config-4 file listed graphics hardware no longer present in the system.
After the gen-XF86Config script is completed, the setting of the xf86config-autoreplace variable is consulted. If this variable is set to on, the system looks for a XF86Config-4.N file. If this file is found, the XF86Config-4 is renamed XF86Config-4.O, and the XF86Config-4.N file is renamed to XF86Config-4.
To manually regenerate the XF86Config-4 file, follow these steps:
Stop graphics:
# /usr/gfx/stopgfx
Make a backup copy of the XF86Config-4 file:
# mv /etc/X11/XF86Config-4 /etc/X11/XF86Config-4.bak
Regenerate your XF86Config-4 file:
# /etc/X11/gen-XF86Config
Restart graphics:
# /usr/gfx/startgfx
If there are no graphics hardware changes, this procedure will do nothing.
If any graphics hardware not listed in the existing XF86Config-4 file is detected, a new file named XF86Config-4.N is created, containing the new hardware. The existing XF86Config-4 file is left unchanged. The graphics system will still start this way (though some graphics pipes will not be active). The user can then choose to manually replace the old XF86Config-4 file with the new XF86Config-4.N file and reboot.
If some graphics hardware listed in the existing XF86Config-4 file is no longer detected, the existing XF86Config-4 is renamed XF86Config-4.O, and a new XF86Config-4 file is written in its place. This allows the graphics system to start, which it would not do if the XF86Config-4 file listed graphics hardware no longer present in the system.
| Note: The XF86Config-4 file generated by this procedure provides a good starting point. To take advantage of additional features, the file may be customized, as described in “Modifying Configuration Files”. |
| Note: Systems with more than 10 graphics pipes require multiple X servers. For more information, see “Configuring an Onyx4 System for Multiple X servers”. |
Much of the functionality of the Onyx4 system is controlled by contents of configuration files, such as the /etc/X11/ XF86Config-4 file.
This section describes the following topics:
Onyx4 systems may be configured for use with multiple X servers, where each X server has a keyboard, a mouse, and one or more displays. This configuration is done by creating a distinct XF86Config-4 file for each desired X server, as described in this section.
Each X server can support a maximum of 10 graphics pipes. Systems with more than 10 pipes must therefore be configured with multiple X server, though smaller configurations may be configured.
Make a backup copy of the /etc/ioconfig.conf file:
# cp /etc/ioconfig.conf /etc/ioconfig.conf.bak
Remove all keyboard and mouse entries from the /etc/ioconfig.conf file.
Attach all keyboards and mice to be used (see “Attaching Keyboards and Mice to an Onyx4 System”).
Use ioconfig to create links for all keyboards and mice:
# /sbin/ioconfig -f /hw
Look in the /dev/input* directories to verify that links were created for each keyboard and mouse.
Make a copy of the /etc/X11/XF86Config-4 file for each X server to be run, appending “.serverN” to each file. For example, for a four-server system:
# cp /etc/X11/XF86Config-4 /etc/X11/XF86Config-4.server0
# cp /etc/X11/XF86Config-4 /etc/X11/XF86Config-4.server1
# cp /etc/X11/XF86Config-4 /etc/X11/XF86Config-4.server2
# cp /etc/X11/XF86Config-4 /etc/X11/XF86Config-4.server3
Edit the XF86Config-4.server0 file to point to the correct mouse:
In the core pointer “InputDevice” section (not the core keyboard “InputDevice” section), replace the line:
Option "Device" "/dev/mouse"
with:
Option "Device" "/dev/input/mouse"
Repeat step 7 for each of the XF86Config-4.serverN files, but this time replace the line with:
Option "Device" "/dev/inputN/mouse"
where N is the server number.
For each of the XF86Config-4.serverN files, edit the Device Section, Screen Section, and Server Layout Section to reflect the pipes that are to be managed by that particular X server.
Create a file named /var/X11/xdm/Xservers.Nkey (where N is the number of X servers to be run) and add a line associating each keyboard with an X server, as demonstrated in Example 3-1 for a system running six X servers.
Edit the /var/X11/xdm/xdm-config file to point to the new Xservers.Nkey file.
Replace the line:
DisplayManager.servers: /var/X11/xdm/Xservers
with:
DisplayManager.servers: /var/X11/xdm/Xservers.Nkey
where N is the number of X servers to be run.
Stop and restart graphics:
# /usr/gfx/stopgfx
# /usr/gfx/startgfx
Example 3-1. Example /var/X11/xdm/Xservers.6key File
:0 secure /usr/bin/X11/X :0 -xf86config /etc/X11/XF86Config-4.server0 -devdir /dev/input
:1 secure /usr/bin/X11/X :1 -xf86config /etc/X11/XF86Config-4.server1 -devdir /dev/input1
:2 secure /usr/bin/X11/X :2 -xf86config /etc/X11/XF86Config-4.server2 -devdir /dev/input2
:3 secure /usr/bin/X11/X :3 -xf86config /etc/X11/XF86Config-4.server3 -devdir /dev/input3
:4 secure /usr/bin/X11/X :4 -xf86config /etc/X11/XF86Config-4.server4 -devdir /dev/input4
:5 secure /usr/bin/X11/X :5 -xf86config /etc/X11/XF86Config-4.server5 -devdir /dev/input5
This section describes how to configure an Onyx4 system to display stereo images.
| Note: Stereo sync is supported only on systems running IRIX version 6.5.21 with patch 5208, or running IRIX version 6.5.22 or later. However SGI recommends that in order to get the best performance from your Onyx4 system you upgrade to at least IRIX version 6.5.22 with patch 5448. To determine the IRIX version running on your system, see “IRIX Operating System Version Requirements”. |
| Note: Simultaneously running stereo and full scene anti-aliasing can require more graphics-card memory than is available, and thus may not work correctly. |
Create a copy of the XF86Config-4 file to be customized for stereo:
# cp /etc/X11/XF86Config-4 /etc/X11/XF86Config-4.Stereo
Edit the XF86Config-4.Stereo file to include the following line at the end of each “Device” section:
Option "Stereo"           "1"
Option "StereoSyncEnable" "1"
(see the example “Device” section in Example 3-2).
Edit the XF86Config-4.Stereo file to include the appropriate stereo modes in the “Monitor” section:
Create an appropriate mode (for samples modes, see Example 3-3).
Add that mode to the “Monitor” section of your XF86Config-4.Stereo file (see the example “Monitor” section in Example 3-4).

Note: “Mode” and “Modeline” are two alternative formats used to present the same information.
Ensure that the monitor supports the high horizontal sync rate setting. Refer to the documentation for the monitor to determine the horizontal sync rate. Modify the HorizSync setting in the “Monitor” section of the XF86Config-4.Stereo file. For example:
HorizSync 22-105
Modify the “Screen” section so that you use the appropriate mode setting. For example:
Modes "1280x1024@96"
(see the example “Screen” section in Example 3-5).
Create a new /var/X11/xdm/Xservers.Stereo file containing the following line:
:0 secure /usr/bin/X11/X :0 -xf86config /etc/X11/XF86Config-4.Stereo
Edit the /var/X11/xdm/xdm-config file to point to the new Xservers file:
Replace the line:
DisplayManager.servers: /var/X11/xdm/Xservers
with:
DisplayManager.servers: /var/X11/xdm/Xservers.Stereo
Stop and restart graphics:
# /usr/gfx/stopgfx
# /usr/gfx/startgfx
Note: A stereo sync signal will not be present until you run a stereo application. One such application is ivview. To use ivview to test the stereo configuration, run:
ivview /usr/share/data/models/X29.iv
and right click to activate the stereo setting on the preferences pane.Example 3-2. Example “Device” Section for Stereo
Section "Device"
    Identifier  "SGI SG-0"
    Driver      "fglrx"
    BusId       "PCI:2:0:0"
# === QBS Management ===
    Option "Stereo"           "1"
    Option "StereoSyncEnable" "1"
EndSection
Example 3-3. Sample Stereo Mode Entries
Modeline "1024x768@96" 103.5  1024 1050 1154 1336  768 771 774 807
Modeline "1280x1024@96" 163.28  1280 1300 1460 1600  1024 1027 1033 1063
Modeline "1024x768@100" 113.309 1024 1096 1208 1392 768 769 772 814
Modeline "1024x768@120" 139.054 1024 1104 1216 1408 768 769 772 823 +hsync +vsync
Modeline "1280x1024@100" 190.960 1280 1376 1520 1760 1024 1025 1028 1085 +hsync +vsync
Mode "1280x1024_96s_mirage"
    DotClock       152.928
    HTimings       1280 1330 1390 1500
    VTimings       1024 1026 1030 1062
EndMode
Example 3-4. Example “Monitor” Section for Stereo
Section "Monitor"
    Identifier  "Stereo Monitor"
    HorizSync   30-96      # multisync
    VertRefresh 50-160     # multisync
    Modeline "1024x768@96" 103.5  1024 1050 1154 1336  768 771 774 807
EndSection
Example 3-5. Example “Screen” Section for Stereo
Section "Screen"
    Identifier          "Screen SG-0"
    Device              "SGI SG-0"
    Monitor             "Stereo Monitor"
    DefaultDepth         24
    SubSection          "Display"
        Depth   24
        Modes   "1280x1024@96"
    EndSubSection
EndSection
This section describes how to configure an Onyx4 system for global or per-window full scene anti-aliasing.
| Note: Simultaneously running stereo and full scene anti-aliasing can require more graphics-card memory than is available, and thus may not work correctly. |
Create a copy of the XF86Config-4 file to be customized for full scene anti-aliasing:
# cp /etc/X11/XF86Config-4 /etc/X11/XF86Config-4.AntiAlias
Note: Automatically generated XF86Config-4 files should contain the customized multi-sample positions shown in Example 3-6. If these values are not already present, adding them will significantly improve the quality of your output. Edit the XF86Config-4.AntiAlias file to include the following line at the end of each “Device” section:
Option "FSAAScale" “X”
where X is 1, 2, 4, or 6 (see the example “Device” section in Example 3-6).
Note: Per-window full scene anti-aliasing is accomplished by setting “FSAAScale” to 1. The anti-aliasing level may then be set by the appropriate selection of visuals.
Global anti-aliasing is accomplished by setting “FSAAScale” to 2, 4, or 6. In this case, the setting will apply to all OpenGL windows, regardless of the visual being displayed.Create a new /var/X11/xdm/Xservers.AntiAlias file containing the following (all on one line):
:0 secure /usr/bin/X11/X :0 -xf86config /etc/X11/XF86Config-4.AntiAlias
Edit the /var/X11/xdm/xdm-config file to point to the new Xservers file:
Replace the line:
DisplayManager.servers: /var/X11/xdm/Xservers
with:
DisplayManager.servers: /var/X11/xdm/Xservers.AntiAlias
Stop and restart graphics:
# /usr/gfx/stopgfx
# /usr/gfx/startgfx
Example 3-6. Example “Device” Section for Full Scene Anti-Aliasing
Section "Device"
    Identifier  "SGI SG-0"
    Driver      "fglrx"
    BusId       "PCI:2:0:0"
# === FSAA Management ===
    Option "FSAAScale"                  "1"
    Option "FSAADisableGamma"           "no"
    Option "FSAACustomizeMSPos"         "yes"
    Option "FSAAMSPosX0"                "0.250000"
    Option "FSAAMSPosY0"                "0.416666"
    Option "FSAAMSPosX1"                "0.083333"
    Option "FSAAMSPosY1"                "0.083333"
    Option "FSAAMSPosX2"                "0.416666"
    Option "FSAAMSPosY2"                "0.750000"
    Option "FSAAMSPosX3"                "0.750000"
    Option "FSAAMSPosY3"                "0.916666"
    Option "FSAAMSPosX4"                "0.583333"
    Option "FSAAMSPosY4"                "0.250000"
    Option "FSAAMSPosX5"                "0.916666"
    Option "FSAAMSPosY5"                "0.583333"
EndSection
To configure an Onyx4 system for dual-channel operation, follow the steps in this section.
| Note: If any pipes managed by an X server have their second channel enabled, then every pipe managed by that X server must have its second channel enabled. |
| Note: Both channels on a pipe must have the same display resolution. |
Create a copy of the XF86Config-4 file to be customized for dual-channel operation:
# cp /etc/X11/XF86Config-4 /etc/X11/XF86Config-4.DualChannel
Edit the XF86Config-4.DualChannel file to include the following line at the end of each “Device” section:
Option "DesktopSetup" mode
where mode is one of the following:
"0x00000100" [this mode clones the managed area]
"0x00000200" [this mode scales the managed area by 2 horizontally]
"0x00000300" [this mode scales the managed area by 2 vertically]
(see the example “Device” section in Example 3-7).
Note: All pipes managed by the same X server must be set to the same mode. Note: See “Using Both DVI Channels on a Card” for important limitations on the use of digital monitors. When using monitors or monitor cables which do not conform to the VESA Display Data Channel (DDC) standard, append the following entry in the “Device” section to enable proper display configuration:
Option "NoDDC" "on"
Create a new /var/X11/xdm/Xservers.DualChannel file containing the following line:
:0 secure /usr/bin/X11/X :0 -xf86config /etc/X11/XF86Config-4.DualChannel
Edit the /var/X11/xdm/xdm-config file to point to the new Xservers file:
Replace the line:
DisplayManager.servers: /var/X11/xdm/Xservers
with:
DisplayManager.servers: /var/X11/xdm/Xservers.DualChannel
Stop and restart graphics:
# /usr/gfx/stopgfx
# /usr/gfx/startgfx
Example 3-7. Example “Device” Section for Dual Channel
Section "Device"
    Identifier  "SGI SG-0"
    Driver      "fglrx"
    BusId       "PCI:2:0:0"
    Option      "DesktopSetup" "0x00000200"
EndSection
To configure an Onyx4 system for SwapReady, it must first be enabled in all pipe connected to a particular ImageSync board, as described in these steps:
On the screen 0 desktop, open a winterm.
Within that winterm, run xsetmon, setting the target to the pipe you are configuring and setting the display to screen 0. For example:
# xsetmon -target :0.1 -display :0.0
would start the GUI on screen 0 to configure pipe 1.
Click the two radio buttons on the GUI main menu:
Swap Buffers on Vertical Blank: On
GLX Swap Barrier Extension: On
Save the configuration by clicking the Load button.
Repeat steps 1 through 4 for each additional pipe connected to the same ImageSync board.
Log out from the desktop, then log back on.
External genlock and framelock may be used with ImageSync2 cards, but not with ImageSync1 cards. To determine the version of an ImageSync card, see “Determining ImageSync Card Version”.
To configure an Onyx4 system to receive an external genlock or framelock signal you must run the setmon command with the appropriate options.
Before running setmon, use printenv DISPLAY to ensure that the DISPLAY environment variable is set to the local system (for example, :0.0). If it is not, use setenv DISPLAY :0.0 to change it (substituting other numbers for :0.0 if appropriate).
To set the system for genlock, execute the following command:
# setmon -ppipenumber -g graphicsformat |
where pipenumber is the pipe to which this setting should be applied, and
graphicsformat is one of the timings (modes) listed in the “Monitor” section of the /etc/X11/XF86Config-4 file.
To set the system for framelock, execute the following command:
# setmon -ppipenumber -Lvideoformat graphicsformat |
where pipenumber is the pipe to which this setting should be applied,
videoformat is the input video format to be used as a framelock source, and
graphicsformat is one of the framelock-certified timings (modes) listed in the “Monitor” section of the /etc/X11/XF86Config-4 file that is compatible with the chosen input video format (Table 3-1 provides a list of compatible formats).
| Note: The default behavior of setmon is to load the new format for the current session only and to prompt for input to determine if the format should be saved as the default. To save the new format as the default you must be logged in as root. |
For more information about the setmon command, see the setmon manual page (man setmon).
| Note: Framelock-certified timings will include an “f” appended to their name (i.e., “1280x1024_5994f” is certified for NTSC (525 line) video timing). |
| Note: Some of the ImageSync2 features documented in this guide require at least IRIX version 6.5.24 and patch 5585. To determine the IRIX version and patch level running on your system, see “IRIX Operating System Version Requirements”. |
Table 3-1. Framelock Source Format to Graphics Format Compatibility
Input Video Format (Framelock Source) | Format Name | Compatible Graphics Formats |
|---|---|---|
525 line at 59.94Hz (NTSC) | 525 | 1280x1024_5994f |
625 line at 50Hz (PAL) | 625 | 1280x1024_50f |
720-line progressive-scan at 59.94Hz | 720p_5994 | 1920x1154_5994f |
720-line progressive-scan at 60Hz | 720p_60 | 1280x1024_60f |
1080-line progressive-scan at 25Hz | 1080p_25 | 1280x1024_50f |
1080-line interlaced at 25Hz | 1080i_25 | 1280x1024_50f |
1080-line progressive-scan at 29.97Hz | 1080p_2997 | 1920x1154_5994f |
1080-line interlaced at 29.97Hz | 1080i_2997 | 1920x1154_5994f |
1080-line progressive-scan at 30Hz | 1080p_30 | 1280x1024_60f |
1080-line interlaced at 30Hz | 1080i_30 | 1280x1024_60f |
When an X-Server is managing multiple monitors, it needs to know their relative positions in order to properly handle cursor cross-over locations.
The monitor positions are specified in the “ServerLayout” section of the /etc/X11/XF86Config-4 file as follows:
Each screen is listed, followed by a list of the four screens above, below, to the left, and to the right of it (in that order). Figure 3-1 and Example 3-8 show an example of four monitors arranged in a line. Figure 3-2 and Example 3-9 show an example of four monitors arranged in a square.
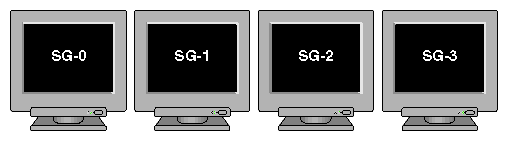
Example 3-8. Example “ServerLayout” Section for Four Monitors in a Line
Section "ServerLayout"
    Identifier  "Four-in-a-Line"
    Screen "Screen SG-0"        ""      ""      ""      "Screen SG-1"
    Screen "Screen SG-1"        ""      ""      "Screen SG-0"   "Screen SG-2"
    Screen "Screen SG-2"        ""      ""      "Screen SG-1"   "Screen SG-3"
    Screen "Screen SG-3"        ""      ""      "Screen SG-2"   ""
    InputDevice "Mouse1" "CorePointer"
    InputDevice "Keyboard1" "CoreKeyboard"
EndSection
|
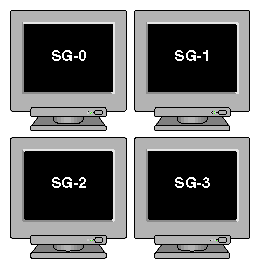
Example 3-9. Example “ServerLayout” Section for Four Monitors in a Square
Section "ServerLayout"
    Identifier  "Four-in-a-Square"
    Screen "Screen SG-0"        ""      "Screen SG-2"      ""      "Screen SG-1"
    Screen "Screen SG-1"        ""      "Screen SG-3"      "Screen SG-0"   ""
    Screen "Screen SG-2"        "Screen SG-0"      ""      ""   "Screen SG-3"
    Screen "Screen SG-3"        "Screen SG-1"      ""      "Screen SG-2"   ""
    InputDevice "Mouse1" "CorePointer"
    InputDevice "Keyboard1" "CoreKeyboard"
EndSection
|
Onyx4 systems support both analog and digital monitors. The type of monitor connected to each graphics card is specified in the “Device” sections of the /etc/X11/XF86Config-4 file.
| Note: See “Using Both DVI Channels on a Card” for important limitations on the use of digital monitors. |
Table 3-2 lists the allowable options for the MonitorLayout line. If the line is not present, both channels default to AUTO.
Table 3-2. Options for MonitorLayout Line
Monitor Type | Meaning |
|---|---|
AUTO | Automatically select monitor type (default) |
TMDS | Digital monitor |
CRT | Analog monitor |
NONE | No monitor |
The format is:
Option "MonitorLayout" "channel1type, channel2type" |
where channel1type is the type (AUTO, TMDS, CRT or NONE) of monitor attached to channel 1 (the left DVI-I connector) for this pipe, and
channel2type is the type (AUTO, TMDS, CRT or NONE) of monitor attached to channel 2 (the right DVI-I connector) for this pipe.
Example 3-10. Example “Device” Section for Use With Two Analog Monitors
Section "Device"
    Identifier  "SGI SG-0"
    Driver      "fglrx"
    BusId       "PCI:2:0:0"
    Option      "MonitorLayout" "CRT, CRT"
EndSection
|
During an interactive session with the Window Manager, you can use the DISPLAY environment variable to control where a newly-started graphics programs will run. When the DISPLAY variable is set to :0.0, programs you start will run on the first Xserver (server 0) and the first pipe (pipe 0) on that server; when it is set to :0.1, programs you start will run on the first Xserver (server 0) and the second pipe (pipe 1) on that server.
For convenience, the default startup files (.login, .profile) for root and guest shells set the DISPLAY variable to a reasonable initial value if it is not already set. Each screen has a toolchest that can be used to invoke graphics programs. Each toolchest has the DISPLAY variable in its environment set to the correct value for the screen on which it appears, so any application you invoke from a toolchest inherits this DISPLAY value, and thus appears on the same screen as the toolchest from which it was invoked.
Similarly, programs started by clicking on an icon appear on the screen from which you invoked them.
Once a program has been launched, it is not possible to move it from one screen to another.
The ioconfig(1m) command establishes logical device numbers for each keyboard and mouse in an Onyx4 system. When the system first initializes the USB hardware, it scans each USB bus looking for devices. Initially, these devices are assigned a device ID of -1. Later in the boot process, the ioconfig(1m) command assigns device IDs based on the contents of the file
/etc/ioconfig.conf. |
If the device is already represented in ioconfig.conf, the associated device ID is assigned. If the device is new (not already in ioconfig.conf), a new device ID is allocated and assigned, and a corresponding entry is appended to the ioconfig.conf file.
Each line in the ioconfig.conf file is a two-column entry. The left column is the numeric logical device ID (0 in our example), and the right column is the hardware path pointing to the device. For example:
0 /hw/module/001c13/Ibrick/xtalk/15/pci/5/usb/1/1/keyboard 0 /hw/module/001c13/Ibrick/xtalk/15/pci/5/usb/1/2/mouse |
| Note: The device IDs are unique only among devices of a given type. Different device types may use overlapping device IDs. |
For USB devices, the hardware path is divided into two parts: the USB controller prefix and the USB relative path. The controller prefix is the portion of the path up to and including the component “usb.” For example:
/hw/module/001c13/Ibrick/xtalk/15/pci/5/usb |
The controller prefix encodes the hardware components leading to the USB controller. In the previous example, the controller path indicates that there is a USB controller at PCI slot 5 of the compute module that is located at 001c13.
The USB relative path is the portion of the path after the “usb” component. This path indicates the path leading from the controller to the actual device. The path is a series of numeric components terminated with a device type. The numeric components represent USB hub port numbers. You can think of the '/' separator as representing a hub and the numeric component as representing a port on that hub.
Multiple numeric components represent multiple layers of USB hubs, with the leftmost component representing the root hub, or the hub built into the USB controller.
The following example indicates a keyboard device attached to port 1 of a hub, which is attached to port 1 of the root hub:
.../usb/1/1/keyboard |
The following example shows a mouse attached to port 2 of the same hub:
.../usb/1/2/mouse |
You can use the hinv command to display the ID of a device. See the hinv(1) man page for additional information.
The device ID of a keyboard or mouse determines under which /dev/input directory the keyboard or mouse is placed. A keyboard or mouse with device ID 0 will be placed under /dev/input (for historical reasons), while a device with an ID greater than 0 will be placed under /dev/inputX (where X is the numeric device ID).
When an X Window System server starts, the -devdir option controls which directory is searched for input devices. By default, /dev/input is used.
If it becomes necessary to reconfigure the keyboard or mouse layout, manual configuration is necessary. Reasons for reconfiguration may include:
Adding a new keyboard and mouse
Adding hubs
Moving a keyboard and mouse
Follow these steps to reconfigure the keyboard and mouse setup:
Run /usr/gfx/stopgfx to shut down the graphics subsystem.
Add or move devices as necessary.
Run /sbin/ioconfig -f /hw to assign temporary device IDs.
Edit the /etc/ioconfig.conf file.
Re–run /sbin/ioconfig -f /hw if you made changes in step 4.
Restart the graphics subsystem using the command /usr/gfx/startgfx.
Steps 4 and 5 are the keys to binding the devices in your new configuration to the correct IDs. Because a keyboard and mouse with the same ID are put in the same /dev/inputX directory, you must ensure that both the keyboard and mouse used by a given X server have the same ID. Because ioconfig does not know what device IDs to assign automatically for new devices, the correct IDs might not be assigned in step 3. You can change the device IDs manually by editing /etc/ioconfig.conf and then re–running ioconfig. The /dev/input/keyboard and /dev/input/mouse entries are always created, even if a keyboard and/or mouse with device ID 0 are not present. This allows the default X server to run without a keyboard or mouse physically attached for manufacturing checkout purposes.
| Note: If you boot the system in this mode (that is, without a keyboard, without a mouse, or without both) and connect a keyboard or a mouse after the system is running, you must restart the graphics system to use the newly-connected devices. |
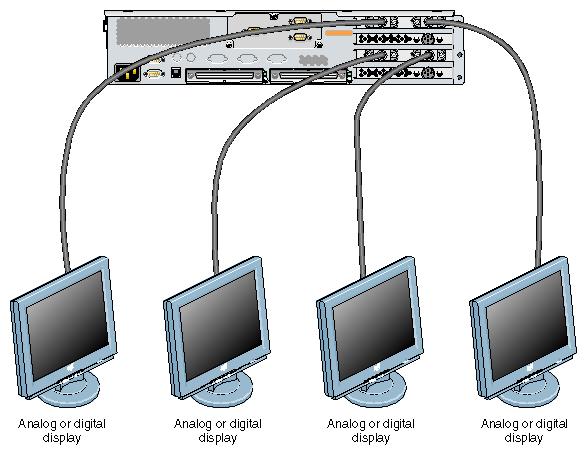
Your Onyx4 system can drive as many as four monitors per G2-brick or G2N-brick (however see “Using Both DVI Channels on a Card” for limitations).
See “Display Requirements” in Appendix B for detailed monitor requirements and “DVI-I Connector Pinout” in Appendix B for detailed information about the DVI-I connectors.
| Note: Although the markings on the graphics boards (and the illustrations in this manual) refer to the channels as “1” and “2,” the IRIX command gfxinfo reports the channels as “0” and “1.” |
Onyx4 systems can contain two different versions of graphics card, with different capabilities. The two versions are distinguishable by the presence or absence of a sticker on the rear panel of the graphics card.
If a graphics card has a sticker on the back indicating part number 030-2003-xxx, as shown in Figure 3-3, it is an SG2.1 card, and both DVI ports on the card may be connected to either a digital monitor or an analog monitor.
If a graphics card does not have a sticker on the back, it is an SG2 card, and only the first DVI-I port (channel 1, on the left) may be connected to either a digital monitor or an analog monitor. The second DVI-I port (channel 2, on the right) may only be connected to an analog monitor.
| Note: Some versions of IRIX report both cards as SG2 in hinv. Therefore the only reliable method to determine the revision of a graphics card is to look for the sticker on the rear panel. |
| Note: It is possible for an Onyx4 system to simultaneously contain both SG2 and SG2.1 graphics cards. |
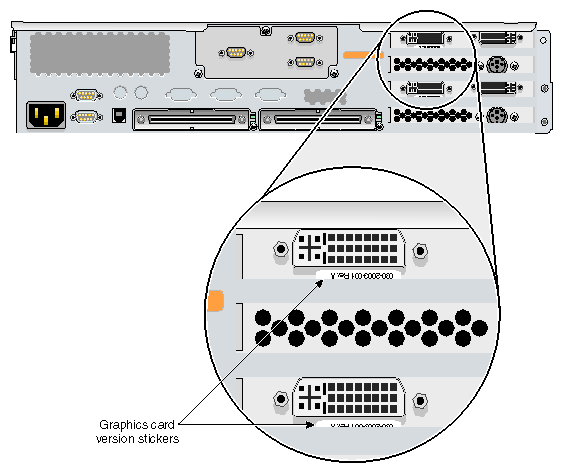
Figure 3-4 shows the four monitor connectors on G2-bricks and G2N-bricks.
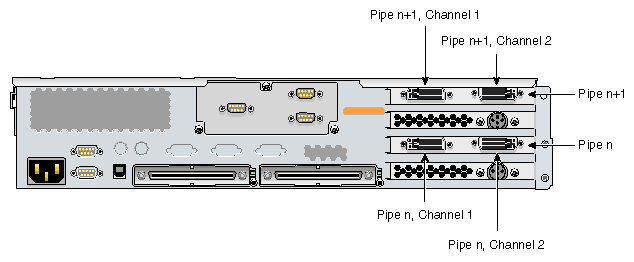
| Note: The IRIX® OS console will appear on the monitor connected to the pipe 0, channel 1 connector on your Onyx4 system. |
Figure 3-5 shows the connection of four monitors to an SGI Onyx4 system G2-brick or G2N-brick with SG2 graphics cards.
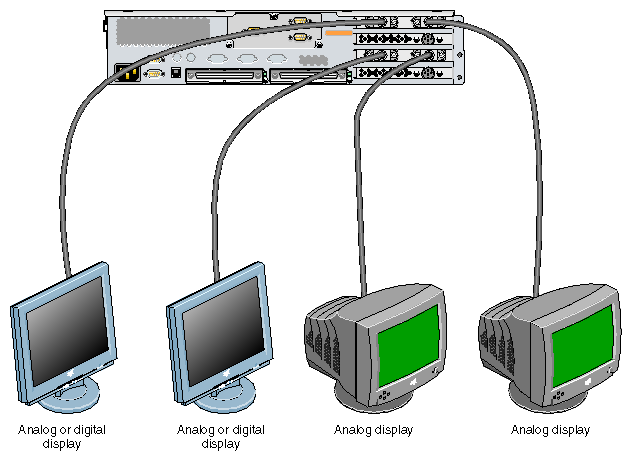
Figure 3-6 shows the connection of four monitors to an SGI Onyx4 system G2-brick or G2N-brick with SG2.1 graphics cards.
In an Onyx4 system containing only one G2-brick or G2N-brick, that brick will contain pipe 0.
In an Onyx4 system containing more than one G2-brick or G2N-brick, pipe 0 will typically be in the graphics brick located closest to the bottom of the rack. For more information on rack locations and cabling, see “Selecting Rack Locations” in Chapter 2.
Once you have located the correct brick, pipe 0, channel 1 will be the lower left DVI-I port on that brick, as shown in Figure 3-4.
The best way to determine the location of pipe 0, however, is to use the IRIX gfxtopology command, as follows:
From an IRIX command prompt, run /usr/gfx/gfxtopology. The output will look similar to:
# /usr/gfx/gfxtopology
pipe 0  g @ 001c12/CG:15/0      SG2
pipe 1  g @ 001c12/CG:15/1      SG2
pipe 2  g @ 001c14/CG:15/0      SG2
pipe 3  g @ 001c14/CG:15/1      SG2
pipe 4  g @ 001c16/CG:15/0      SG2
pipe 5  g @ 001c16/CG:15/1      SG2
pipe 6  g @ 001c18/CG:15/0      SG2
pipe 7  g @ 001c18/CG:15/1      SG2

input   k @ 001c10/I:5/1        m @ 001c10/I:5/2
#
Locate the line in the gfxtopology output that begins “pipe 0.”
On this line, locate the string following the “@” symbol. This string will be of the form AAAxBB (in the example provided above, the string would be “001c12”).
Decode this string as follows:
“AAA” is the rack number (in this example, rack 001)
“x” is module type (in this case, c indicates a compute module)
“BB” is the “U” number within that rack, counting from the bottom (in this case, slot 12).
Locate the brick at the rack location indicated. The L1 controller display on the front of that brick should be displaying the same string you just decoded.
Go to the back of the rack, and determine if this brick is a G2N-brick or a host system compute module.
If the brick has four DVI-I connectors (as shown in Figure 1-2), it is a G2N-brick, and it contains pipe 0.
If the brick does not have DVI-I connectors, it is a host-system compute brick. In this case, a G2-brick will be connected to its XIO port. This XIO-connected G2-brick will contain pipe 0.
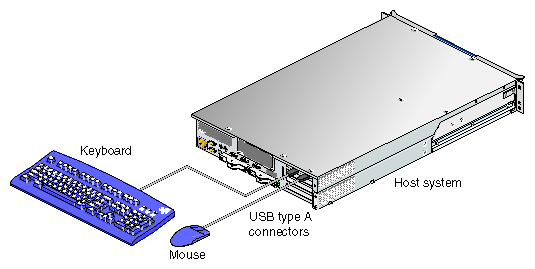
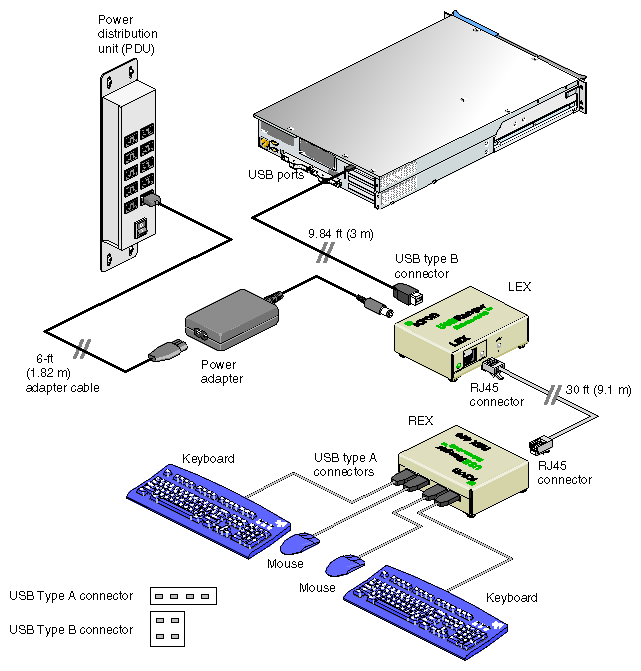
Your Onyx4 system uses USB keyboards and mice. This section describes how to connect them to a host system.
If you need to connect more keyboards and mice than you have available USB ports on your host system, refer to “Using a USB Hub for Keyboards and Mice”.
If the keyboards and mice will be further than 10 feet (3 meters) from the host system, refer to “Using a USB Extender to Connect Keyboards and Mice”.
Each keyboard and mouse pair must be connected to either the odd-numbered USB ports (ports 1 and 3, as shown in Figure 3-7) or the even-numbered ports (ports 2 and 4). The USB port closest to the side of the chassis is port 1.
Figure 3-7 shows the USB PCI card in bus 2, slot 2 (the top PCI slot) of a host system chassis, which is the preferred location for this card. Some configurations, however, may have the USB card in a different PCI slot in the host system.
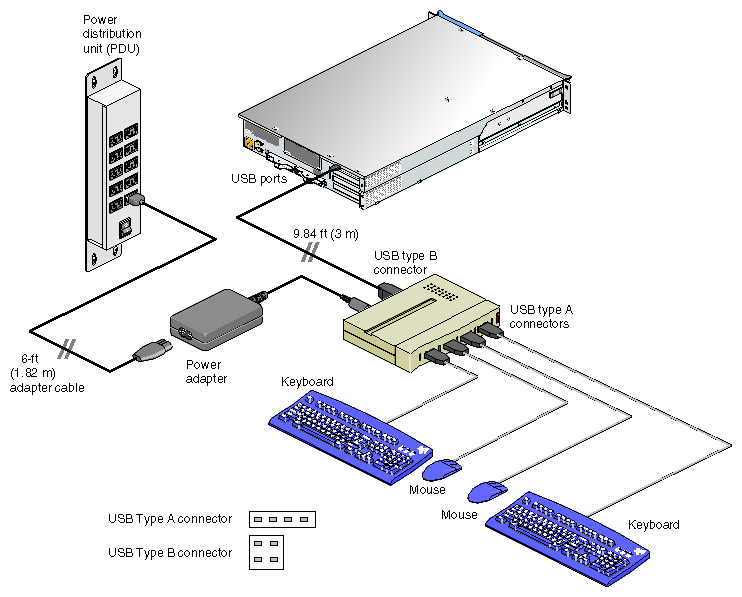
If the number of USB devices connected to your host system will be greater than the number of USB ports on that system, you will need one or more USB hubs. Figure 3-8 shows how a USB hub is used for this purpose.
Figure 3-8. Using a USB Hub to Connect Multiple Keyboards and Mice to Host System (USB Hub May Differ From Illustration)
 |
If one or more of your keyboard/mouse pairs will be further than 10 feet (3 meters) away from the USB ports on the host system, you will need to use one or more USB extenders. The use of an extender will allow keyboards and mice to be placed up to 328 feet (100 meters) from the host system (a 30-foot (9.1 meter) cable is supplied with the USB extender).
Figure 3-9 shows how a USB extender is connected.
Only keyboards and mice may be connected through USB extenders. Hubs, in particular, will not work through a USB extender. A USB extender, however, may be plugged into a hub.
| Note: The local extender (LEX) receives AC power from a standard AC outlet (typically the power distribution unit (PDU) in the rack). A 6-ft. (1.82-m) adapter cable connects the extender's power adapter to the PDU. The remote extender (REX) does not use an external power source. |
This section describes the following additional external connections:
The SGI Onyx4 system has a stereo sync connector for each pipe (thus two on each G2 or G2N brick).
| Note: Stereo sync is supported only on systems running IRIX version 6.5.21 with patch 5208, or running IRIX version 6.5.22 or later. However SGI recommends that in order to get the best performance from your Onyx4 system you upgrade to at least IRIX version 6.5.22 with patch 5448. To determine the IRIX version running on your system, see “IRIX Operating System Version Requirements”. |
Stereo sync must have been configured as described in “Configuring an Onyx4 System for Stereo”.
Figure 3-10 shows the location of the two stereo sync ports on G2-bricks and G2N-bricks.

For details of the stereo sync connector, see “Stereo-Sync Connector Pinout” in Appendix B.
| Note: A stereo sync signal will not be present until you run a stereo application. One such application is ivview. To use ivview to test the stereo configuration, run: ivview /usr/share/data/models/X29.iv and right click to activate the stereo setting on the preferences pane. |
The SwapReady signal synchronizes the front and rear framebuffer swapping between multiple pipes.
Use a standard 75-ohm BNC cable between the SwapReady connector on the ImageSync card and the SwapReady input on the display device or compositor.
SwapReady must have been configured as described in “Configuring an Onyx4 System for External Genlock or Framelock”.
Figure 3-11 shows the connector locations on an ImageSync card.
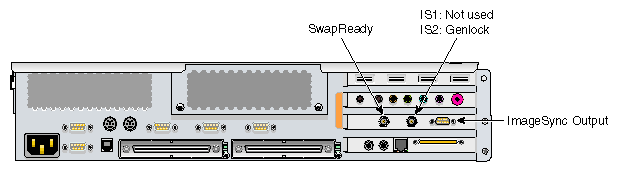
For details of the SwapReady connector, see “SwapReady Connector Pinout” in Appendix B.
ImageSync1 and ImageSync2 cards look similar from the rear of the chassis. The easiest way to distinguish them is by using the hinv command as follows:
At an IRIX command prompt, type hinv:
[1%] hinv
Look in the output of the hinv command for one or more lines like the following:
ImageSync2 board: unit 0, version 1.4
Each line represents one ImageSync card.
Note: Some of the ImageSync2 features documented in this guide require at least IRIX version 6.5.24 and patch 5585. To determine the IRIX version and patch level running on your system, see “IRIX Operating System Version Requirements”.
Genlock and framelock are only available on ImageSync2 (IS2) cards. To determine the version of your ImageSync card(s), see “Determining ImageSync Card Version”.
The Genlock connector allows the ImageSync2 card to receive a genlock or framelock signal from an external source. The ImageSync card then uses the external signal as the source for the sync signal it sends to each pipe it controls.
Use standard 75-ohm BNC cables between the genlock source and each device that receives the signal. Use a BNC L-connector at each device, and a 75-ohm BNC terminator at the last device in the chain.
Genlock or framelock must have been configured as described in “Configuring an Onyx4 System for External Genlock or Framelock”.
Figure 3-12 shows the connector locations on an ImageSync card.
For details of the genlock connector, see “Stereo-Sync Connector Pinout” in Appendix B.